Master Page
BATTERY's Master page consists of a number of effects that can be applied to all cells or a selection thereof.
The Master page consists of a number of effects that can be applied to all cells or a selection thereof, controls for the Reverb and Delay send effects that each cell can be sent to, and the Buses area that facilitates routing and mixing of cells with additional effects processing.
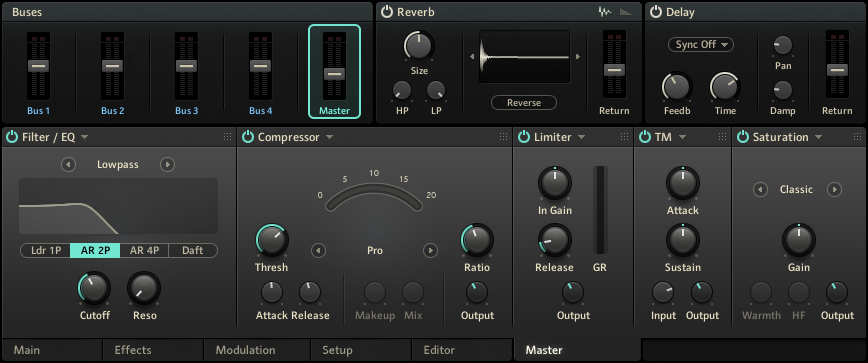
The Master page in the Edit area.
Note
The representation of cell states in the Cell Matrix differ depending on whether the Master page or one of the other pages in the Edit area is opened. For more information, refer to Cell States.
Using Buses and Master Effects
The Master page offers a number of basic workflows for routing cells, applying effects, and setting up buses and outputs.
To assign cells to a bus or the Master, drag and drop a cell or a selection of multiple cells onto the respective control. By default, all cells are assigned to the Master.

The cells are assigned and highlighted in the Cell Matrix when the bus or Master is selected.
To show the effects for a bus or the Master, click on the respective control to select it.
To apply an effect to all cells assigned to the respective bus or the Master, click the Module On/Off button in the upper left corner of the module to activate the effect.
To change the order of effects, move the module to the left and right by clicking and dragging the matrix symbol in the upper right corner.

To route a bus to a specific BATTERY output, right-click it the respective bus control and select the output from Output sub-menu in the context menu. By default, all buses are routed to the Master.
To rename a bus, right-click the respective bus control and select Rename FX Bus in the context menu.
Tip
You can save and load presets for the effects on the Master page in the same way as for the effects on the Effects page. For more information, refer to Using Effect Presets.
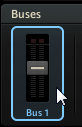
Buses
The Buses area on the Master page facilitates routing, mixing and processing of cells. Each bus features the same set of effects as the Master.
The buses area contains the following controls:
Bus 1 - Bus 4: The four buses each have their own level control and set of effects. The level meters show the peak level of the respective bus. The buses only apply to cells that have been actively assigned to them. Right-clicking on the bus control opens a context menu with additional functions.
Master: The Master has its own level control and set of effects. The level meters shows the Master's peak level. By default, all cells are assigned to the Master. Right-clicking on the Master control opens a context menu with additional functions.
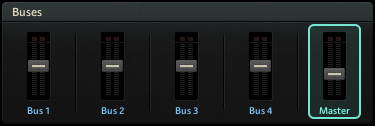
Reverb
The Reverb send effect simulates the properties of acoustic spaces. You can use it to achieve a wide range of spatial effects, from adding ambience and depth to completely washing out the sound. It offers both algorithmic and convolution reverb modes that can be selected using the icons in the upper right corner of the effect.
This module contains the following parameters and controls:
Module On/Off: Activates or deactivates the module.
Mode selector: Selects either the algorithmic (envelope symbol, right) or the convolution reverb (waveform symbol, left) mode. The following sections describe each of the modes in detail.
Return: Adjusts the output level of the effect.
Convolution Mode
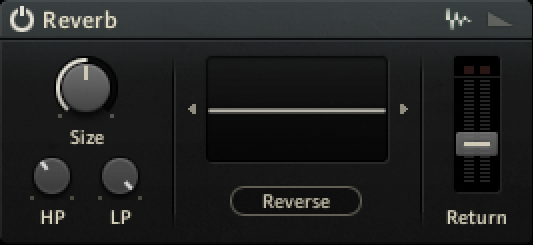
Size: Adjusts the swell and reflection pattern of the reverb effect, creating the impression of differently sized spaces. Turning the control to the right changes the size from small to large.
HP: Adjusts the cutoff frequency of the high-pass filter applied to the effect signal.
LP: Adjusts the cutoff frequency of the low-pass filter applied to the effect signal.
Convolution display: Click the arrow-shaped buttons next to the display to select one of the presets for the reverb module. You can also drag and drop samples from the Library Browser, or .wav files from your desktop directly onto the display to use them as reverberation templates for the convolution reverb.
Reverse: Reverses the impulse response.
Algorithmic Mode
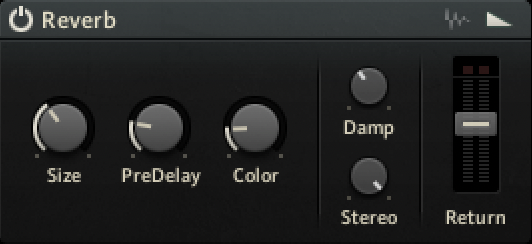
Module On/Off: Activates or deactivates the module.
Size: Resizes the impulse response, affecting both the time and the color of the reverb.
Predelay: Adjusts the duration of the predelay, which is the time it takes for the reverb effect to set in.
Color: Adjusts the frequency response of the reverb, emulating the effect of different types of surfaces in a room. Turning Color to the left emulates softer surfaces, turning it to the right emulates harder surfaces.
Damp: Adjusts the tonal quality from bright to dark. Turning the control to the right attenuates the reverb's high-frequency content.
Stereo: Adjusts the stereo width of the reverb effect.gez va
Delay
The Delay send effect is an echo effect that can be used to add depth to the sound or create rhythmic effects.
This module contains the following parameters and controls:
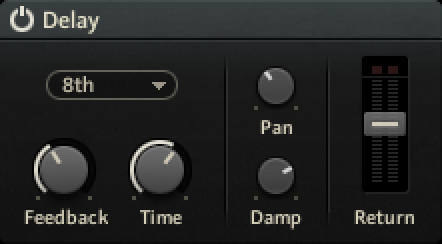
Module On/Off: Activates or deactivates the module.
Sync: Selects a musical interval relative to the tempo of the host that is used to synchronize the delay time. When Sync Off is selected, the Time can be set freely in milliseconds.
Feedb: Adjusts the amount of feedback. Turning Feedb to the right increases the amount of delay repetitions.
Time: Adjusts the delay time in milliseconds. When Sync is used, Time is set in musical intervals relative to the tempo of the host.
Pan: Adjusts the stereo spread of the delay repetitions. When set to 0, all delay repetitions are located at the center of the stereo image. When turning Pan to the right, the delay repetitions alternate between the left and right stereo channel. When set to 100, the delay repetitions alternate between the extremes of the stereo image.
Damp: Attenuates high-frequency content in the delay signal. Since the filtering occurs in the feedback path, the sound gets darker with each delay repetition.
Return: Adjusts the output level of the effect.
Filter / EQ
The Filter / EQ module shapes the frequency content of signals, not unlike equalizers. You can use it to polish and clean up sounds, or add color and resonances. The filter modes offer a selection of different filter types, each with their own unique character.
This module contains the following parameters and controls:
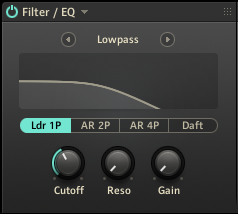
Module On/Off: Activates or deactivates the module.
Preset menu (arrow button): Opens the Preset menu that enables you to load factory presets or save and recall your own user presets.
Mode selector: Selects one of seven filter modes that determine the basic character of the filter, Solid G EQ, 3-band EQ, Lowpass, Highpass, Bandpass, Peak/Notch, Effect. The following sections describe each of the modes in detail.
Type selector: Selects different filter types in Lowpass, Highpass, Bandpass, Peak/Notch, Effect mode, and the frequency band in Solid G-EQ and 3-band EQ mode.
Filter controls: Adjust the available parameters for the selected filter mode.
Note
Since filters require a considerable amount of CPU power, it is recommended to switch this module off when it is not in use.
Solid G-EQ
Solid G-EQ mode emulates the 4-band parametric equalizer of a highly regarded mixing desk. It offers four dedicated frequency bands that can be used simultaneously.
You can select the frequency band for editing using the Type selector:
L: Low frequency band
LM: Low-mid frequency band
HM: High-mid frequency band
H: High frequency band
The following controls are available in this mode:
Freq: Adjusts the filter frequency of the respective frequency band.
Bell: Switches the L and H frequency bands to a bell instead of a shelf filter.
Q: Adjusts the Q factor, or resonance, of the LM and HM frequency bands. The Q factor determines the width of the frequency band around the filter frequency that is attenuated or boosted.
Output: Adjusts the output level of the module.
3-Band EQ
3-Band EQ mode is a classic parametric equalizer. It offers three flexible frequency bands that can be used simultaneously.
You can select the frequency band for editing using the Type selector:
Band 1
Band 2
Band 3
The following controls are available in this mode:
Freq: Adjusts the filter frequency of the respective frequency band.
BW: Adjusts the Q factor, or resonance, of the respective frequency band. The Q factor determines the width of the frequency band around the filter frequency that is attenuated or boosted.
Gain: Adjusts the output level of the respective frequency band. Setting Gain to high values can be used to apply a soft saturation effect.
Lowpass
Lowpass mode is a resonant filter that attenuates frequency content above the cutoff frequency, creating a darker sound. It offers four different filter types that change the character of the filter.
You can select the filter type using the Type selector:
Ldr 1P: 1-pole ladder filter with a -6 dB/octave slope
AR 2P: 2-pole ladder filter with a -12 dB/octave slope
AR 4P: 4-pole filter with a -24 dB/octave slope
Daft: Aggressive 2-pole filter with a -12 dB/octave slope
The following controls are available in this mode:
Cutoff: Adjusts the cutoff frequency.
Reso: Adjusts the resonance amount of the filter. Turning the control to the right makes the frequency content at the cutoff frequency more pronounced.
Gain: Adjusts the output level of the filter. Setting Gain to high values can be used to apply a soft saturation effect. This control is not available when selecting the AR filter types.
Highpass
Highpass mode is a resonant filter that attenuates frequency content below the cutoff frequency, creating a brighter sound. It offers four different filter types that change the character of the filter.
You can select the filter type using the Type selector:
Ldr 1P: 1-pole ladder filter with a -6 dB/octave slope
AR 2P: 2-pole ladder filter with a -12 dB/octave slope
AR 4P: 4-pole filter with a -24 dB/octave slope
Daft: Aggressive 2-pole filter with a -12 dB/octave slope
The following controls are available in this mode:
Cutoff: Adjusts the cutoff frequency.
Reso: Adjusts the resonance amount of the filter. Turning the control to the right makes the frequency content at the cutoff frequency more pronounced.
Gain: Adjusts the output level of the filter. Setting Gain to high values can be used to apply a soft saturation effect. This control is not available when selecting the AR filter types.
Bandpass
Bandpass mode is a resonant filter that attenuates frequency content above and below the cutoff frequency, creating a thinner and more focused sound. It offers four different filter types that change the character of the filter.
You can select the filter type using the Type selector:
Ldr 2P: 2-pole ladder filter with a -12 dB/octave slope
Ldr 4P: 4-pole ladder filter with a -24 dB/octave slope
AR 2P: 2-pole ladder filter with a -12 dB/octave slope
AR 4P: 4-pole filter with a -24 dB/octave slope
Daft: Aggressive 2-pole filter with a -12 dB/octave slope
The following controls are available in this mode:
Cutoff: Adjusts the cutoff frequency.
Reso: Adjusts the resonance amount of the filter. Turning the control to the right makes the frequency content at the cutoff frequency more pronounced.
Gain: Adjusts the output level of the filter. Setting Gain to high values can be used to apply a soft saturation effect. This control is not available when selecting the AR filter types.
Peak/Notch
Peak/Notch mode is a resonant filter that can create either peaks or notches in the frequency spectrum. It offers four different filter types that change the character of the filter.
You can select the filter type using the Type selector:
Ldr Peak: Ladder peak filter that boosts frequency content at the cutoff frequency. The amount of boost can be set using Reso.
Ldr Notch: Ladder notch filter that attenuates frequency content in two narrow bands above and below the cutoff frequency.
SV Notch: 4-pole state-variable notch filter that attenuates or boosts frequency content at the cutoff frequency. The amount of attenuation or boost can be set using Reso.
SV BR: State-variable band reject filter that attenuates frequency content in a narrow band slightly below cutoff frequency.
The following controls are available in this mode:
The following controls are available per filter: Cutoff (adjusts the frequency below which signals will be attenuated); Reso (with a value greater than 0, this control will boost a small frequency range around the cutoff frequency); and Gain (controls the amplitude increase after the filter, which can be used to compensate for amplitude reduction due to the filter, or to increase the soft saturation of the effect — this one is only available for Ldr Peak and Ldr Notch).
Cutoff: Adjusts the cutoff frequency.
Reso: Adjusts the resonance amount of the filter. Turning the control to the right makes the frequency content at the cutoff frequency more pronounced.
Gain: Adjusts the output level of the filter. Setting Gain to high values can be used to apply a soft saturation effect. This control is not available when selecting the Ldr filter types.
Effect
Effect mode is a collection of special filters that transform the frequency spectrum in specific ways. It offers four different filter types that change the character of the filter.
You can select the filter type using the Type selector:
Frm 1: Variation 1 of a formant filter that produces resonances typical to those of the human voice.
Frm 2: Variation 2 of a formant filter that produces resonances typical to those of the human voice.
Vow A: Variation A of a special filter that mimics the way vowel sounds are produced by the human mouth, similar to classic talk box effects.
Vow B: Variation B of a special filter that mimics the way vowel sounds are produced by the human mouth, similar to classic talk box effects.
Phaser: Classic phaser effect that produces a number of peaks and troughs in the frequency spectrum.
The following controls are available in this mode when the Vow or Phaser filter types are selected:
Cutoff: Adjusts the filter frequency, effectively shifting the position of the effect in the frequency spectrum.
Reso: Adjusts the resonance amount. Turning the control to the right makes the effect more pronounced.
The following controls are available in this mode when the Frm filter types are selected:
Talk: Adjusts the the frequency response of the filter in order to produce different vowel sounds.
Sharp: Adjusts the resonance amount. Turning the control to the right makes the effect more pronounced.
Size: Adjusts the filter frequency, effectively shifting the position of the effect in the frequency spectrum.
Compressor
The Compressor module is a classic studio effect that shapes the contour and dynamics of a signal. It can be used to add punch, bring out the attack or sustain of sounds, increase overall loudness, or distort the signal.
This module contains the following parameters and controls:
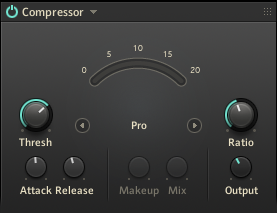
Module On/Off: Activates or deactivates the module.
Preset menu (arrow button): Opens the Preset menu that enables you to load factory presets or save and recall your own user presets.
Mode Selector: Selects one of four available compressor modes, Solid Bus Comp, Classic, Pro, and SC Bus Comp. The first three modes offer different flavors of compression, while SC Bus Comp enables side-chain compression. In this case, the compression applied to the input signal is controlled by a specific cell that can be selected by dragging it onto the SC Source area.
Threshold (Compressor): Adjusts the threshold level of the compressor. When the control signal rises above the threshold, gain reduction at a ratio set using the Ratio control is applied to the signal. Turning Threshold to the left lowers the threshold, which increases the amount of gain reduction by making the compressor more sensitive to low input levels.
Ratio: Adjust the relative amount of gain reduction applied to signals rising above the threshold. When turned fully to the left, minimal gain reduction is applied. When turned fully to the right, the compressor acts as a limiter.
Attack: Adjusts the attack time, which is the time it takes the compressor to apply the full amount of gain reduction after the control signal rises above the threshold.
Release: Adjusts the release time, which is the time it takes the compressor to stop applying gain reduction after the control signal falls below the threshold.
Makeup: Adjusts the amount of gain added to the signal after the compression. You can use this control to compensate for the gain reduction applied by the compressor and thus increase the overall loudness of the signal. This control is only available in Solid Bus Comp mode.
Mix: Blends the input signal with the effect signal, facilitating parallel compression. When the control is turned fully to the left, only the input signal is sent to the output. Turning the control to the right adds the compressed signal to the output. When turned fully to the right, only the compressed signal is sent to the output. This control is only available in Solid Bus Comp mode.
SC Source: Accepts drag and drop from a cell to select it for controlling side-chain compression in SC Bus Comp mode. This control is only available in Solid Bus Comp mode.
Output: Adjusts the output level of the module.
Note
Since compression requires a considerable amount of CPU power, it is recommended to switch this module off when it is not in use.
TM (Transient Master)
The TM (Transient Master) module enables you to emphasize or attenuate the transients of your audio material by manipulating its attack and sustain phases. Unlike compressors and limiters, it does not use the level of your signal to decide when to come into effect, but rather modifies the envelopes of every attack and sustain phase. A notable benefit of this processing is that it affects all parts of the signal, whatever their level is, therefore retaining the natural character of your sound.
This module contains the following parameters and controls:
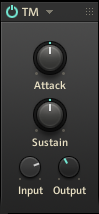
Module On/Off: Activates or deactivates the module.
Preset menu (arrow button): Opens the Preset menu that enables you to load factory presets or save and recall your own user presets.
Attack: Sharpens/softens the attack phases in your signal. With the knob at the center position, the attack phases are not altered. From this position, turning the Attack knob to the left softens the attack phases, while turning it to the right sharpens them.
Sustain: Prolongs/shortens the sustain phases in your signal. With the knob at the center position, the sustain phases are not altered. From this position, turning the Sustain knob to the left shortens the sustain phases, while turning it to the right prolongs them.
Input: Adjusts the input level of the module.
Output: Adjusts the output level of the module.
Saturation
The Saturation module emulates the behavior of analog circuits when signal levels go into overdrive and clipping. This reduces signal peaks and add the same time adds harmonic content to the signal, creating the warm and full sound associated with analog saturation. When taken to the extreme, the module can be used to create distortion effects.
This module contains the following parameters and controls:
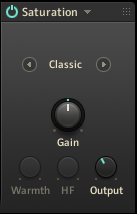
Module On/Off: Activates or deactivates the module.
Preset menu (arrow button): Opens the Preset menu that enables you to load factory presets or save and recall your own user presets.
Mode Selector: Selects one of three available saturation modes, Classic, Drums, and Tape.
Gain: Adjusts the input level of the module, effectively controlling the amount of saturation applied to the signal.
Warmth: Adjusts the level of low-frequency content in the signal. This control is only available in Tape mode.
HF: Adjusts the cutoff frequency of a low-pass filter applied to the signal. Frequency content exceeding the cutoff frequency is attenuated. This control is only available in Tape mode.
Output: Adjusts the output level of the module.
Limiter
The Limiter module is a specialized compressor with a high compression ratio and a fast response. It effectively prevents the signal to rise above the specified level. You can use it to protect your outputs and speakers from clipping or increase the overall loudness, however it can also be applied creatively to shape the contour of a sound.
This module contains the following parameters and controls:
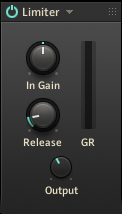
Module On/Off: Activates or deactivates the module.
Preset menu (arrow button): Opens the Preset menu that enables you to load factory presets or save and recall your own user presets.
In Gain: Adjusts the input level of the module, effectively controlling the amount of limiting applied to the signal.
Release: Adjusts the release time, which is the time it takes the limiter to stop applying gain reduction after the signal falls below the threshold.
GR: Shows the amount of gain reduction applied to the signal.
Output: Adjusts the output level of the module.