Setup Page
The Setup page provides tools specifically designed for drum playing and programming, including settings for velocity, articulation, humanization and MIDI.
The Setup page provides tools specifically designed for drum playing and programming. You can use them to fine-tune cells/Kits or create totally new sounds out of the existing library content. All effects/parameters are cell-based, which means that each cell can have totally different settings.
To open the Setup page, click on the Setup tab at the bottom of the application.

The Setup page in the Edit area.
MIDI Input
The MIDI Input module lets you customize the MIDI channel and velocity response of cells and change their trigger behavior.
The MIDI Input module contains the following settings and options:
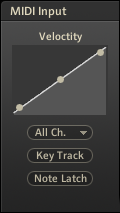
The MIDI Input module.
Curve: Adjusts the velocity curve for a cell using handles.
MIDI channel: Specifies whether a cell should receive data from all MIDI channels or only a specific MIDI channel with this menu.
Key Track: Sets key range tracking. When activated (lit) and the key range exceeds one note (refer to "Key Range control" in Quick Access Area), all samples in the current cell will change pitch in response to the MIDI input. For example, if the key range is C1-D1 and you play D1 with Key Track on, the pitch will be two semitones higher than if you had played C1. When deactivated, the cell's pitch will be determined solely by its root key and the Tune knob (refer to Quick Access Area).
Note Latch: Activates "latch" for incoming notes. For instance, you can play a note to trigger the sample, play the note again to stop it.
Voice Groups
The Voice Groups module allows you to create virtual groups with limited voices. This can be useful when, for example, simulating a real drum set, where an open and a closed hi-hat would never occur at the same time, you'd assign both cells to a voice group and set the Voices setting to 1, which would allow only one of the cells in the voice group to play at a time. But there can be a number of creative reasons for using voice groups.
The Voice Groups module contains the following settings and options:
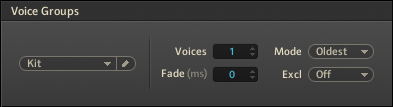
The Voice Groups module.
Voice group: Assigns a cell to either no voice group (this is the default Kit setting) or to any of the 128 available voice groups from here. Use the pencil button to rename a voice group for more transparency.
Voices: Sets the number of voices allowed for the given voice group (1 to 127) with this control.
Mode: Selects a mode to decide which notes to choke if the voice group runs out of voices. You can choose from:
Kill Any: Removes any note.
Kill Oldest: Removes the earliest note played.
Kill Newest: Removes the last note played.
Kill Highest: Removes the highest note played.
Kill Lowest: Removes the lowest note. For example, if the voice group allows for three simultaneous voices, and you play four notes in a row, the first note will be muted for the fourth note to be audible when you set the Mode to Kill Oldest.
Fade (ms): Sets the time that voices overlap before cutting each other off completely (for instance, the previously played voice sustains for a while even after a new voice has been triggered). This prevents an overly abrupt transition between voices. Available settings are 0 to 999 milliseconds.
Excl: This advanced programming feature allows for even more complex muting schemes; assign multiple voice groups to an exclude group to make the assigned groups mute each other.
Tip
You could assign a blank sample (no sound) to a group so that triggering this cell turns off any loops playing and silences the output.
Tip
Take some hi-hat sounds and set them to exclusive voice groups, for example, with the open hi-hat assigned to voice group 1 and the closed hi-hat to voice group 2. Now the open hi-hat sound can be set to more voices, five, for example. This allows some audio trails to be heard. The second voice group can be set to one voice. Both of these groups should now be assigned to exclude group 1. With this setup, you obtain the effect of trailing drum sounds while having a controlled polyphony (voice group 1), and you can still mute that group with the closed hi-hat.
Cell Activation
The Cell Activation module allows you to determine conditions under which a cell is triggered. Usually, a cell is triggered upon receiving a MIDI note, which is expressed by the default settings of Trigger being set to Note On, and Condition being set to Always in this module.
The Cell Activation module contains the following settings and options:
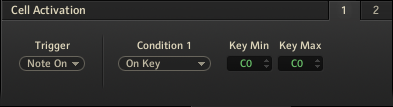
The Cell Activation module.
Tabbed pages 1 and 2: The pages provide you with two menus for setting up nested conditions. Page 2 is only available when Condition 1 is not set to Always.
Trigger: A cell can be triggered either by a Note On command (default setting) or a Note Off command. If you choose Note Off, the cell will be triggered when you release the key. Velocity and duration will work the same way as Note On, only after you release the note. This is important when combining the Note Off trigger with articulations such as Roll or Geiger Counter in the Articulation module.
Condition 1 and 2: The Condition menus provide the following options:
Always: Always Sets no condition for when a MIDI note triggers a cell. This is the default setting.
Start on Key: Activates a cell with a specific key/pad (range) on your keyboard. The two key-number fields (Key Min and Key Max) will appear right next to the menu when this option is selected. Here, you can set the specific key range that will trigger the cell by incoming MIDI notes. For example, if cell A1 is triggered by MIDI note C1 (which you assign with the Key Range controls of the Quick Access area; refer to Quick Access Area), and the Start On Key condition is set to C2/C2, then pressing C2 on your keyboard will activate the cell, that is, you will hear it playing upon pressing C1 on your keyboard. Press C2 again, and the cell will no longer be triggered by the C1 key.
Start on Controller: Allows cells to be triggered depending on the position of a MIDI controller, for example, on the position of the mod wheel. Choose the controller number of the controller you want to use for activating a cell (CC), then set the Min and the Max values in between of which the condition will be fulfilled.
Cycle Round Robin: Allows you to cycle through various cells using only one key on your keyboard. It's good to start with an example: select multiple cells and press the Learn button (the MIDI symbol button) in the Quick Access area (refer to Quick Access Area); then hit a key twice on your MIDI keyboard. You have just assigned all selected cells to be triggered by that one MIDI note; now, back in the Setup page, set the cell activation to Cycle Round Robin. You can now assign a Position in the cycle to each of the selected cells. For example, let's say you've assigned cells A1 through A6 to be triggered by MIDI note C1, and you have then assigned cells A1 through A6 to the Position numbers 1 to 6 in the cycle; the cells will then play successively when you hit MIDI note C1 on your controller repeatedly. Once you are familiar with this, it can turn out to be a very frequently used feature. Position sets the cell's position in the cycle; Cycle Nr. is used to set up further cycles that run simultaneously to the first one; Reset CC is used to assign a MIDI note to reset the relevant cycle to position 1.
Cycle Random: This works the same way the Cycle Round Robin function does, only you cannot influence the order of the cells being played.
Articulation
Use Articulation to add articulation presets to your performance. It is important to note that each articulation can sound different on different instruments. Also, since many of them alter velocity, be sure to check the Velocity To Volume modulation settings in the Velocity module on the Main page (refer to Main Page).
The Articulation module contains the following settings and options:
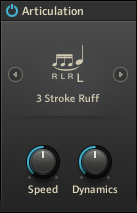
The Articulation module.
Power: Activates/deactivates the module.
Articulation: There are ten different articulation presets available in the articulation selection menu. Depending on the articulation selected, the buttons below will have different functions. Use them to adjust articulation parameters such as velocity, speed, or depth of the effect.
Alternate Stroke: Produces sounds that slightly vary in character.
Release Stroke: Plays the original note and produces a second stroke when you release your MIDI key.
Flam: Plays two notes in rapid succession, the first of which is a grace note.
Drag: Plays an exaggerated flam-like effect.
3 Stroke Ruff: Plays a nice military-style drum effect.
Roll: Plays a continuous drum roll.
Buzz: Produces a buzz-like effect.
Muted: Produces a "muted" version of your drum sound by quickly fading in and out.
Speed Roll: Plays a very fast drum roll. The duration of the triggered sample is also shortened, so even though many notes are triggered, the voice count is reasonable.
Geiger Counter: Produces a random Geiger-like effect.
MIDI Echo
The MIDI Echo module can be used to create a variety of tempo-syncable echo effects.
The MIDI Echo module contains the following settings and options:
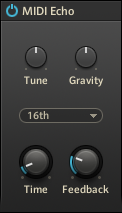
The MIDI Echo module.
Power: Activates/deactivates the module.
Tune: Adjusts the tuning of the echoes.
Gravity: Adjusts the gravity of the echoes. When turned clockwise, there'll be less gravity and the echoes get slower. When turned counterclockwise, the echoes get faster.
Note value: Sets the echo time to either a tempo-based value (which is synchronized to BATTERY's tempo control or your host's tempo), or an absolute time-based value (Sync Off), which is independent of the host tempo.
Time: Adjusts the Echo time. If you select Sync Off from the note value selection menu above, the Time knob will let you set an absolute echo time value of 10 to 1000 milliseconds. With sync activated, the value depicted represents the numerator for the note value.
Feedback: Sets the number of echoes from 1 to 100. If you feel that adjusting this control has no effect, make sure to check the Velocity To Volume modulation settings in the Velocity module on the Main page (refer to Main Page). With a high modulation amount (near 100), the last echoes might not be audible.
Humanize
The Humanize module can add slight randomization to the sonic characteristics and the timing of your performance.
The Humanize module contains the following options:
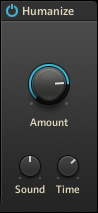
The Humanize module.
Power: Activates/deactivates the module.
Amount: Adjusts the amount of randomization of Sound and Time.
Sound: Slightly randomizes the sonic characteristics such as velocity, tune, and volume.
Time: Slightly randomizes the timing of the notes played.