Acoustic Collection
A vast body of string, wood, brass and percussive instruments, the acoustic collection comprises 60 different instruments from a huge range of locations.
Get creative with flutes, dulcimers, recorders, bagpipes, fiddles, hurdy gurdy, and a range of gongs and percussion sounds with editable MIDI patterns. The Acoustic collection packs 60 meticulously recorded instruments that let you add layers of unique character to tracks. Cross borders and continents to tap into distinctive, authentic sounds from a huge range of locations, including Ireland, Turkey, Japan, Cuba, Armenia, and beyond.
Melodic Instruments in the Acoustic Collection
Melodic Instruments feature different sets of parameters that enable you to explore sound variations and create a variety of articulations and musical gestures.
The Main page consists of the following parameters:
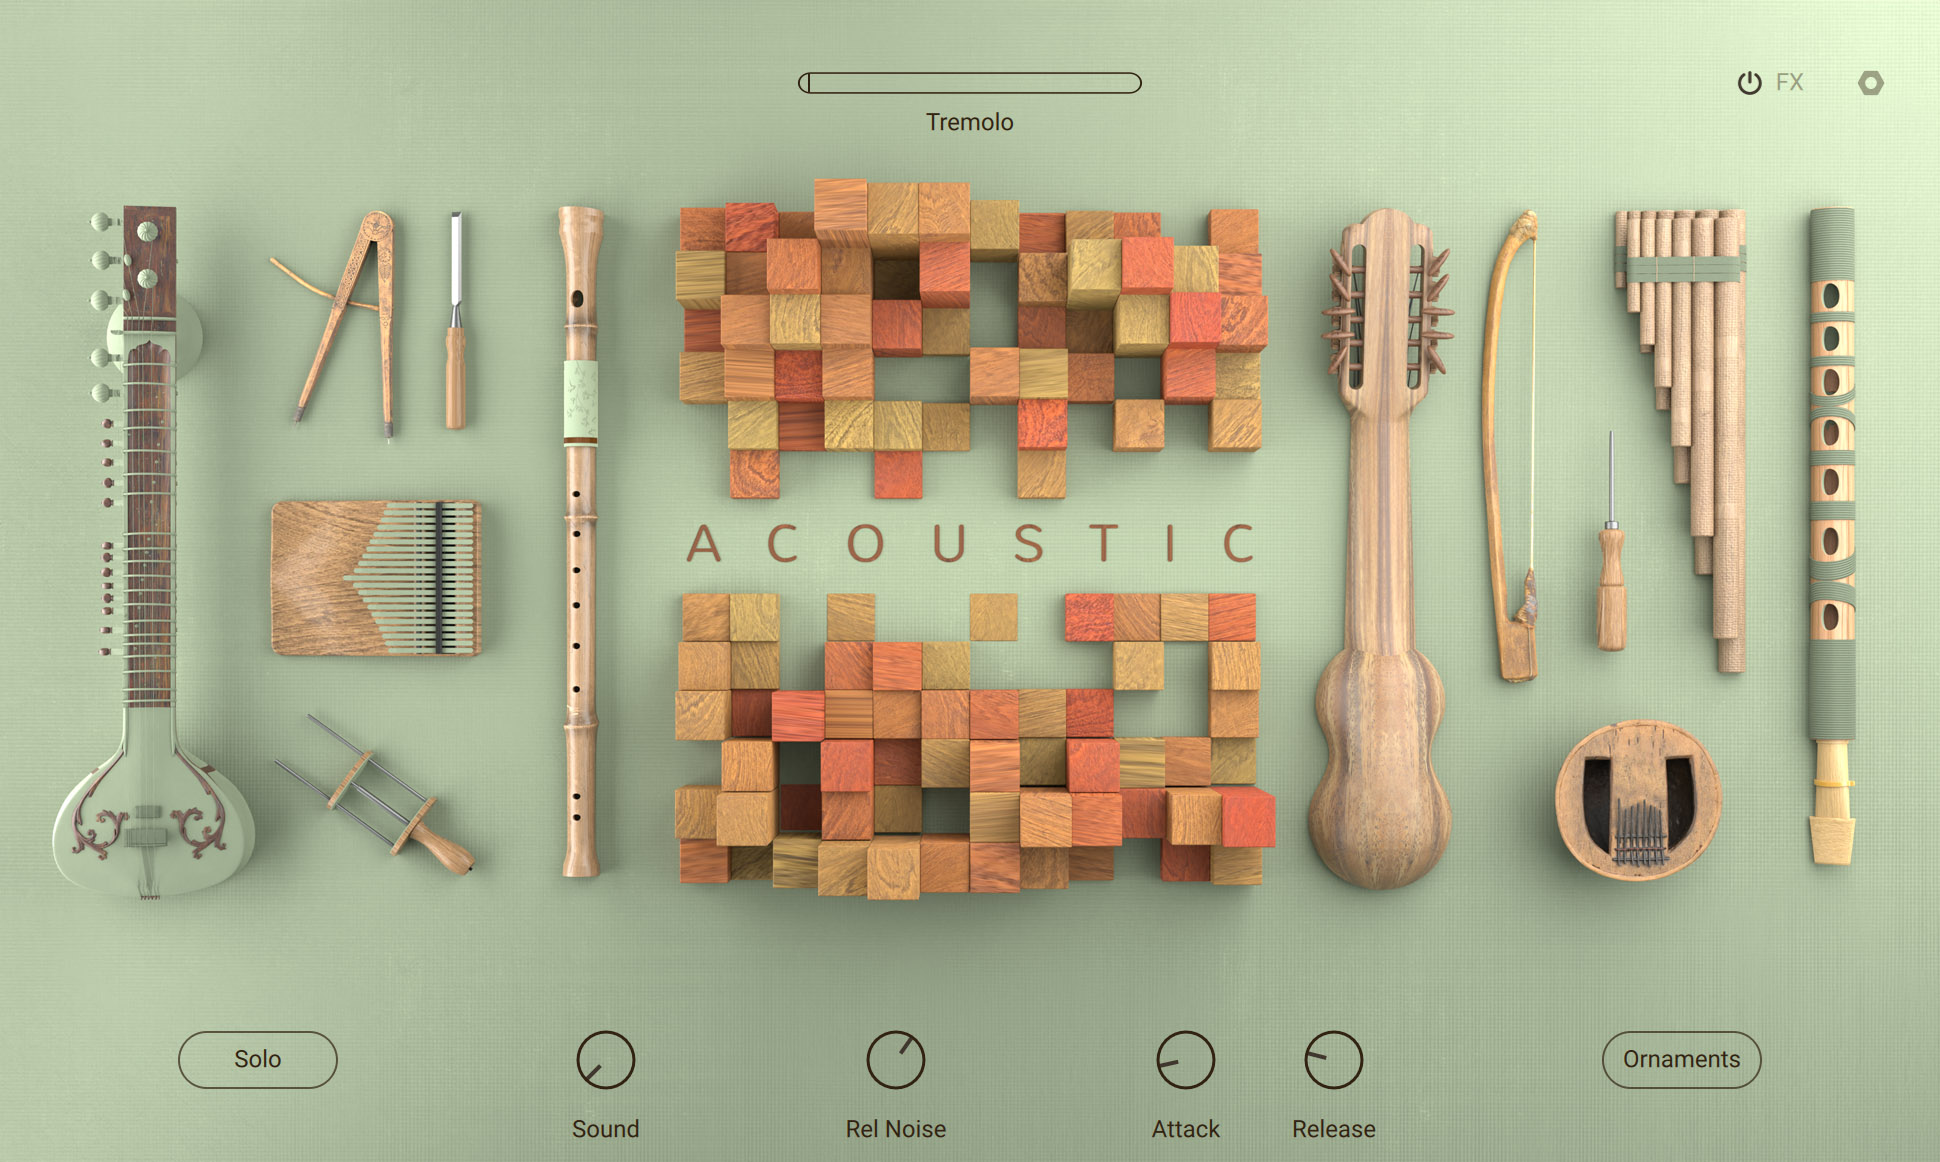
Mod wheel: Displays and adjusts the parameter controlled by the modulation wheel. Each instrument in this collection features one of the following parameters:
Brightness: Adjusts the timbre of the sound from dark to bright. This control is assigned to the modulation wheel.
Dynamics: Adjusts the intensity of the sound both in terms of level and timbre.
Speed: Adjusts the speed of the articulations triggered by the Ornaments keyswitches. This control is assigned to the modulation wheel.
Tremolo: Adjusts the amount of the tremolo effect.
Vibrato: Adjusts the amount of the vibrato effect.
Instrument Parameters: Enable you to adjust the sound and behaviour of the Instrument. For more information, refer to Instrument Parameters.
Instrument Parameters
Each Instrument in this collection provides parameters that enable you to adjust the sound and behavior of the Instrument.
Basic Controls
The following parameters relate to the basic behavior of the Instrument.
Solo: Switches the Instrument to monophonic mode, and enables automatic triggering of samples for realistic legato performances.
Chord: Selects a chord to be played when pressing a single key. When Off is selected, keys trigger individual notes. You can open the drop-down menu by clicking on the name and selecting an entry from the list. Alternatively, you can use the left and right arrow buttons to select the previous or next entry, respectively.
Ornaments: Activates key switches in the range from C0 to B0 that trigger various articulations, enabling you to create authentic movements and gestures in your performance.
Vel Split: Sets the velocity value that splits regular and ornamented notes. Velocities below this value trigger regular notes, velocities above this value trigger ornamented notes.
Envelope Controls
The following parameters relate to the volume envelope, or amplitude envelope, of the sound.
Attack: Adjusts the attack time. Turning the control to the left produces a sharper onset of the sound. Turning the control to the right produces a softer onset of the sound.
Decay: Adjusts the decay time. Turning the control to the left makes the sound decay more quickly. Turning the control to the right makes the sound decay more slowly.
Release: Adjusts the release time. Turning the control to the left makes the sound decay more quickly after releasing a key. Turning the control to the right make the sound decay more slowly.
Damp: Switches damping on or off. When on, the sound is more muted and decays quicker.
Sound Controls
The following parameters relate to the sound of the instrument.
Sound: Morphs between different timbre settings. Turning the control fully to the left produces a neutral sound.
Key Noise: Adjusts the level of the the noise produced by the instrument's keys when played by the musician.
Rel Noise: Adjusts the level of the release noise, which affects the sound produced when releasing the keys.
Resonance: Adjusts the intensity of the instrument body's resonance.
Hammers: Adjusts the level of the sound produced by the hammers on the string.
Jivari: Switches the buzzing and metallic sound of the Tempura's Jivari bridge on or off.
Instrument Registers and Keyboard Sections
The following parameters relate to the level and behavior of specific instrument registers and keyboard sections.
Instrument Registers:
Bass Reg: Adjusts the level of the bass register, or voice.
Treble Reg: Adjusts the level of the treble register, or voice.
Reg 1: Adjusts the level of the lower register, or voice.
Reg 2: Adjusts the level of the higher register, or voice.
Keyboard Sections:
Bass Vol: Adjusts the level of the bass section that is assigned to the keys in the range from C1 to B1.
Chords Vol: Adjusts the level of the chords section that is assigned to the keys in the range from C2 to B2.
Manual Vol: Adjusts the level of the manual, or lead, section that is assigned to the keys in the range from C3 to C6.
Drone Notes:
Drone Vol: Adjusts the level of the drone notes, which are mapped to the keys from G1 to E2.
Drone Latch: Switches key latching for the drone notes on or off. When switched on, the last pressed drone note keeps playing even when the key is released.
Drum and Percussion Instruments in the Acoustic Collection
Drum Instruments have a dedicated set of parameters that enable you to explore rhythmic variations by selecting different patterns and altering the playback behaviour.
You can play single drum hits in the range from C1 to B2, and trigger pattern playback in the range from C3 to B3.
Each Instrument contains a kit consisting of a number of different drum pieces. You can edit parameters on both the Main page and the Mixer page for each drum piece individually.
To select a drum piece for editing, activate Select by MIDI and play the respective note, or go to the Mixer page and use the Drum Piece selector.
The Main page consists of the following parameters:
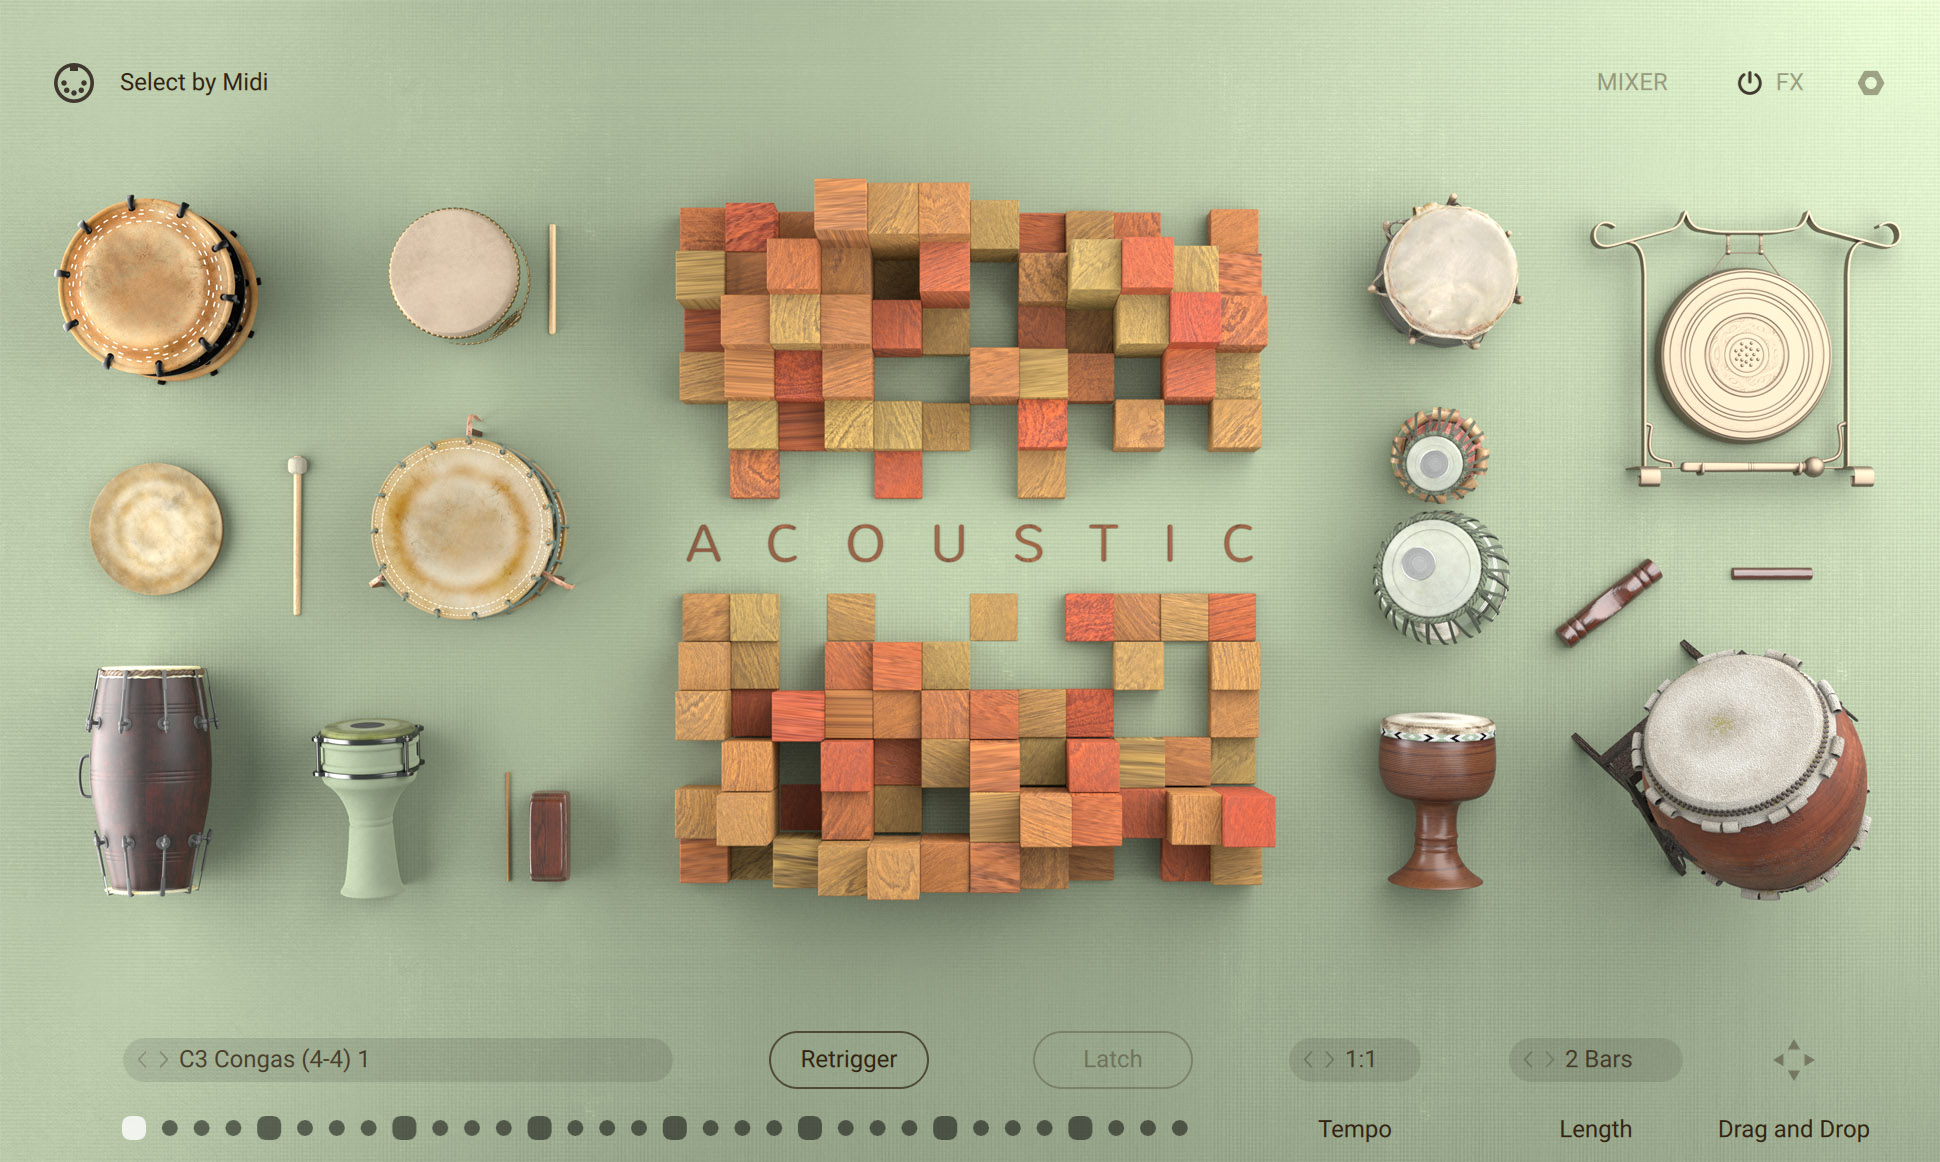
Select by MIDI: Activates selection of a drum piece for editing according to the last played note.
MIXER: Shows the Mixer page with additional sound settings. For more information, refer to Mixer Page.
Pattern Browser: Selects the rhythmic preset used for the selected pattern. You can open the Pattern browser by clicking on the name and select an entry from the list on the right side of the menu. Both the collection and the various categories can be selected on the left side of the menu. The slider in the bottom left corner adjusts preview volume. Clicking on the speaker icon switches preview on or off. To change the pattern you are editing, click on the left and right arrow buttons next to the preset name. Alternatively, you can activate Select by MIDI to change patterns from your MIDI controller.
Pattern Display: Shows the position of the playback relative to the pattern.
Retrigger: Switches pattern retriggering on or off. When switched on, pressing a second key will start playback of the new pattern from the beginning. When switched off, the new pattern will continue playing relative to the current playback position.
Latch: Switches key latching for the patterns on or off. When switched on, the pattern keeps playing even when the key is released.
Tempo: Switches between three different tempo divisions relative to the host tempo. The pattern can be played back at the host tempo (1:1), at half the host tempo (1:2), and at double the host tempo (2x). You can open the drop-down menu by clicking on the name and select an entry from the list. Alternatively, you can use the left and right arrow buttons to select the previous or next entry, respectively.
Length: Switches between two different lengths for the pattern playback, 1 Bar or 2 Bars. You can open the drop-down menu by clicking on the name and select an entry from the list. Alternatively, you can use the left and right arrow buttons to select the previous or next entry, respectively.
Drag and Drop: Exports the pattern as a MIDI file for use in your DAW. You can export the pattern simply by dragging and dropping the arrow icon into a MIDI track in your DAW.