Insert Effects
There are two different types of effects in MASSIVE: Insert Effects, which can be placed at various points in the signal chain (see section Signal Flow and Voicing on Routing), and Master Effects, which come at the very end of the chain. We will first discuss the Insert Effects in this section, while the Master Effects will be covered in section Master Effects Section below.
You can select and control the Insert Effects using the drop-down menus, Control knobs and Modulation Slots in the Insert Section of the interface.
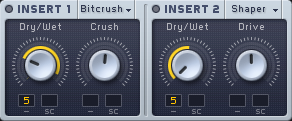
Insert 1 and Insert 2 represent two different audio effects. You can use the Effects Popup Menus to choose the effect you want to use for each (if any). The two knobs control various parameters of each effect, depending on which effect you have selected. These knobs will be labeled according to their function for the effect you have chosen. There is one Modulation Slot and one Sidechain present here for each knob as well; these can be used to modulate each control with any of the available modulation sources, just as we have seen with the other controls in MASSIVE. For more information on how to set this up, check section Interaction with the User Interface.
Routing
As mentioned above, either of the Insert Effects can be placed at a number of different points in the signal chain. Where the effects are placed will make a crucial difference to the final sound. Experiment with placing the various effects at different points to get a feel for the sonic modifications you can achieve.
You can choose where to place the Insert Effects in the signal chain by using the Routing Page in the Center Window (see section The Center Window for more on the Center Window and the various pages it contains).
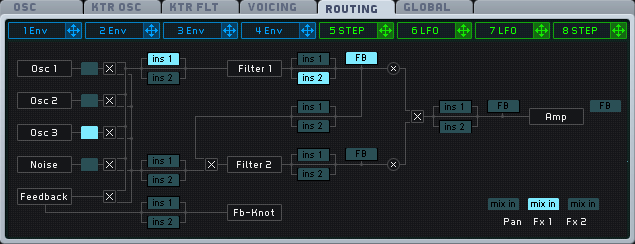
As you can see in this picture, there are a number of small buttons labeled ins1” and ins2 present in the Routing Page, placed in various positions between the oscillators, filters and other components of MASSIVE. These buttons are the Insert Effects Position Selectors. You can use these to select where exactly each Insert Effect should be placed to modify the sound. Simply click one of the buttons labeled ins1 to select where the Insert 1 effect will be placed, for example.
Below is some further information about each of the Insert Effects in MASSIVE and how it functions.
Delay
This is a standard delay that creates an echo type of effect by taking the incoming signal and delaying it by a certain amount of time before it is passed on to the next module in the signal chain.
The Dry/Wet control adjusts the balance between the unprocessed (dry) signal at the left and the delayed (wet) signal at the right.
The Time control adjusts the delay time: shorter when turned to the left and longer to the right.
In addition to basic echo-style effects, you can use the Delay to create a wide variety of sounds depending on the insert point. For example, try using the Delay within the Feedback bus (see section Feedback Section for more about the feedback functions in MASSIVE) to create feedback delay structures. Try modulating the Time Control just a little bit with one of MASSIVE’s LFOs to create detuning/vibrato-style effects.
Sample & Hold
This is a “classic” sample and hold effect: It samples the incoming audio signal at a given time interval, and this sample is held until the next sample is taken. This results in a “stepped,” temporally quantized audio signal.
The Dry/Wet control adjusts the balance between the unprocessed (dry) signal at the left and the delayed (wet) signal at the right.
The Pitch control adjusts the time interval (frequency) at which the signal is sampled; more slowly to the left, and more quickly as you turn the knob to the right. Slower sample times will result in “deep,” harsh distortion effects, while higher Pitch Control settings will result in “high,” subtler distortion sounds.
The Sample & Hold effect can be used to create a variety of different distortion effects, depending on the settings you choose. Try using low Pitch Control values to create sounds similar to old digital synthesizers. This is in effect resampled at a lower sampling rate!
Note that the Pitch Control by default follows the MIDI input pitch. You can control this within the Center Window’s Keytracking Oscillator page (see section General Pages).
Bitcrusher
The Bitcrusher is a digital effect that creates distortion in your signal by reducing the bit depth of the signal.
The Dry/Wet control adjusts the balance between the unprocessed (dry) signal at the left and the delayed (wet) signal at the right.
The Crush control adjusts the amount of bit depth reduction, from no reduction at all when turned to the left, to maximum reduction/distortion when turned to the right.
You can use this effect to create “digital degradation” sounds such as were typical with early digital samplers, or to add a slight bit of noise to your sound when only subtle Crush Control values
Frequency Shifter
Just as its name implies, the Frequency Shifter shifts the frequency of the incoming signal. This is a common effect found in many analog synthesizer designs, but is seldom implemented in digital/software-based instruments.
The Dry/Wet control adjusts the balance between the unprocessed (dry) signal at the left and the delayed (wet) signal at the right.
Pitch control: Adjusts the amount of frequency shift: downward at the left, upwards at the right.
Try using the Frequency Shifter within the Feedback bus to shift the frequency of the feedback signal and mix it with the main signal. Try modulating the Pitch Control with the Stepper modulation source to create a stepped series of melodic or harmonic intervals.
Note that the Pitch Control by default follows the MIDI input pitch. You can control this within the Center Window’s Keytracking Oscillator page (see section General Pages).
HPLP
The HPLP effect contains two simple adjustable filters (low-pass and high-pass), placed one after the other.
The High-pass control adjusts the cutoff frequency of the high-pass filter, filtering out all frequencies lower than the set level.
The Low-pass control adjusts the cutoff frequency of the low-pass filter, filtering all frequencies higher than the set level.
Given that there are already two powerful and flexible Filters included in MASSIVE, covered earlier in this manual (see section Filter Section), you may wonder why we have also included these additional filters here in the Insert Effects Section. These simpler filters can be used to quickly and easily narrow the frequency band of your signal at a particular point in the signal flow by adjusting the cutoff values of the filters. Also, by using modulation sources to change the High-pass and Low-pass controls, the frequency band can be moved, narrowed or widened over time without wasting the more elaborate dedicated Filters covered earlier.
Sine Shaper
The Sine Shaper insert effect routes your signal through a wave shaper, in which the signal’s amplitude is mapped to the rising and falling amplitude of a sine wave.
The Dry/Wet control adjusts the balance between the unprocessed (dry) signal at the left and the delayed (wet) signal at the right.
The Drive control adjusts the amount of distortion: less distortion when turned to the left and thicker, heavier distortion at the right.
Try using the Sine Shaper as a non-linear type of distortion effect. The Sine Shaper is very sensitive to rapid amplitude changes, such as the “beating” or “wobbling” sound caused by dissonant harmonic intervals. Compare the result when you use this effect while using two oscillators tuned apart from each other at various intervals.
Parabolic Shaper
The Parabolic Shaper is a waveshaping effect like the Sine Shaper, but with a different shaping curve: where the sine shaper uses a sine shape, the parabolic shaper uses an s-like curve. As you turn up the Drive control, the linear transition becomes a rectangular one, distorting the smooth transitions of any input curve.
The Dry/Wet control adjusts the balance between the unprocessed (dry) signal at the left and the delayed (wet) signal at the right.
The Drive control adjusts the amount of distortion: less distortion when turned to the left and thicker, heavier distortion at the right.