Quick Start
This chapter is the place to start getting acquainted with MASSIVE’s main features. It will guide you through loading and creating sounds with this exciting new synthesizer. Section First Steps will focus on how to find and load a sound from MASSIVE’s sound library using the powerful Browser View, so you can start playing right away. Section Creating Your Own Sound will show you how to begin using MASSIVE’s vast sound design capacities to sculpt your own new sounds.
First Steps
In this section, you will learn how to set up MASSIVE, use the Browser to search the sound library, load a sound, tweak some Macro Controls , and have a look at the Range Knobs and see how they can be controlled by the Macro Controls.
Setting up MASSIVE
Before first working with MASSIVE, you should check its Audio and MIDI Settings. Assuming that MASSIVE has been properly installed and activated on your computer (see the separate Setup Guide for more on this), start the standalone version of MASSIVE. To set up the audio and MIDI interface options, choose File > Audio and MIDI Settings from the menus at the top.
On the Soundcard tab, you should select ASIO on Windows for best results. (On a Mac this will be set to CoreAudio, your only choice in Mac OSX.) Then use the Output Device field to select the audio interface. We recommend setting the sample rate to 44100 and setting the output latency to about 10 ms. (Note that in some cases you may need to adjust the latency/buffer size in the software control panel for your soundcard; you may need to quit MASSIVE first to do this.) These are recommended settings that should work well on most computer systems; for information on what these settings mean, please refer to our Setup Guide where this is explained in more detail.
On the Routing tab, check that the two virtual outputs of MASSIVE are properly routed to the audio interface’s outputs. If “Not Connected” is displayed here, you won’t hear anything!
On the MIDI tab, check that the MIDI interface or device you are using is turned on. If you see your interface listed but it is off, click on the “off” label to turn it on. If your MIDI device does not appear here, there may be a problem with the installation of the device itself (or its software drivers). If you don’t have a MIDI controller available, you can still play MIDI notes by using the computer’s keyboard. We have assigned the four rows of alphanumeric keys in a similar pattern to that of a piano keyboard. For example, the bottom row of keys on your computer keyboard (from Z on the left to / on the right) is assigned to the white keys of the piano keyboard, with the Z key being assigned to C. The row of keys above that (from S to ;) covers the corresponding black keys, with S assigned to C#. The two rows of keys above are assigned in a similar pattern, but one octave higher.
Please note that there is also another MIDI Setup tab within the Options Dialog, found in File >Options; this deals with some additional MIDI setup options, but we don’t need to worry about this just yet. (More information about this additional setup dialog can be found in section The Standalone Menus.)
Now let’s close the Audio/MIDI Settings dialog and begin working with MASSIVE!
Finding a Sound
First let’s take a look at the Browser and see how to find and load a sound from the built-in sound library.
Switch to the Browser View by clicking the Browser button towards the right side of the Navigation Bar.
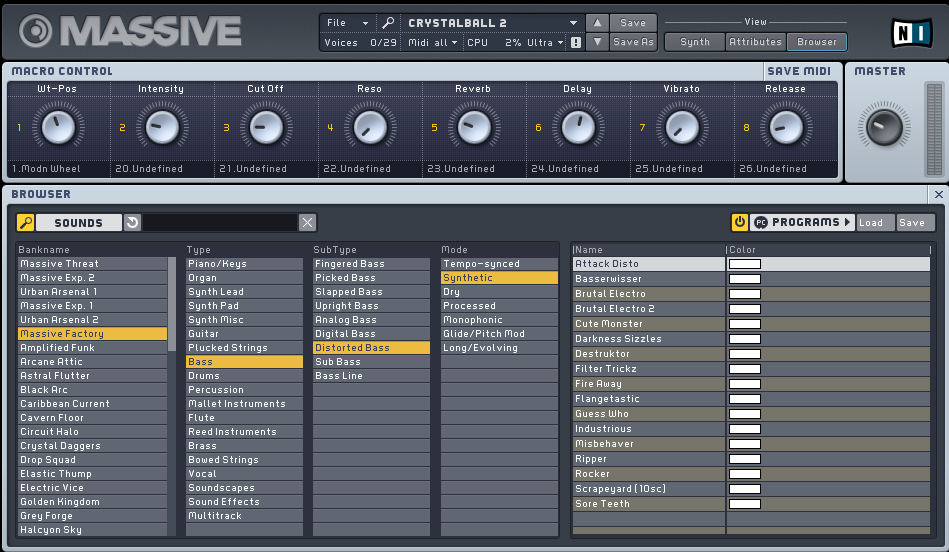
You’ll see the Database View of the Browser at the lower left, and the Search Result List to the right. Above, you will see the eight Macro Control knobs (see section Macro Controls Automation and MIDI) as well as the Master Volume Control (see section Master Volume Section). The Browser itself is described in detail in section The Attributes Concept and the Sound.
When you first open the Browser View, the Search Result List at the lower right will show the list of all sounds available in MASSIVE. Now let’s try using the Attributes at the lower left of the Database View to limit the Search Results:
Click on one or more Attributes in any column and they will be highlighted.
The Search Results List will update automatically to display only those Sounds that match the set of active Attributes.
Click a selected Attribute again to deselect it.
When no Attributes are selected, the Search Results List will display the list of all available Sounds.
Try selecting one or more Attributes from each column left to right and watch how the list gradually narrows; for example, try selecting (from left to right) “Massive Factory”, “Bass”, “Distorted Bass”, “Synthetic” and “Lead” and find the sound “Attack Disto” on the right.
Now load this patch from the Search Results List by simply double-clicking on its name.
Using the Attributes is a very convenient and powerful way to quickly find the sound you want to use!
Playing a Sound
Now that you have loaded "Attack Disto," try playing some notes with your MIDI keyboard and you should hear the sound. You might try playing in the lower range of the keyboard, as "Attack Disto" is a bass sound. Try modifying the output with one of the Macro Control knobs, arranged in a row 1-8 just above the Browser: while holding down a MIDI key and sustaining a sound, click on the third Macro Control and drag the mouse upwards. The Macro Control knob will follow the movement, and you should hear some effect, depending on what the Macro Control is assigned to in the particular patch you are using. (For more on the Macro Controls and how they are commonly assigned, see section Macro Controls Automation and MIDI).
Now try using a different sound. In the bar between the Macro Controls and the Database View, click the Reset button (the circle-like icon within the image below) and all attributes are deactivated.

You will see all the sounds in MASSIVE reappear at the right. Now let’s try searching for sounds another way:
Click with the mouse in the Search Term field to the right of the Reset Button.
Type "pad" in the Search Term field.
You will see the Search Results again automatically update and narrow to include only those Sounds that contain your search term in their names or other Meta Information fields (see section Defining Attributes and Saving Sounds).
Double-click one of the matching Sounds you see to load it.
Play and hold a MIDI note.
Try tweaking the various Macro Controls 1-8 and listen to the variety of sounds that can be created by different settings.
How are these Macro Controls affecting the sound? Let’s change to the Synth View now to get an idea of how this works. Click the Synth button towards the right side of the Navigation Bar to switch to the Synth View. You will see the same eight Macro Control knobs 1-8 in the lower right corner of the window. However, in the Synth View you can see how each control is modifying the sound, and you can create your own control assignments. For example, in the image below (displaying the Rampage sound loaded previously), the small yellow numbers beneath the control knobs indicate that the knobs are being controlled by Macro Controls 1 and 2, respectively.
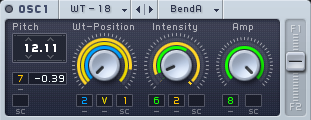
The range of influence of the Macro Control over the control it is affecting is proportional to the corresponding yellow ring around the control. For example, in the image above we can see that the influence of Macro Control 2 on the Intensity knob is greater than that of the green modulation source indicated by the numeral “6”. The different color reflects that this modulation source is not a Macro Control, but an LFO. The blue 2, finally, denotes an envelope generator.
For more on MASSIVE’s modulation sources, see section Modulation Pages. For a practical example of how to route modulation, see Creating Your Own Sound.
Creating Your Own Sound
This section explains how to create a lead synth sound and introduces you to some of the fundamental sound design techniques of MASSIVE. If you are new to MASSIVE, we recommend to read section First Steps first.
In the following tutorial you will learn how to select a wavetable for each oscillator and tweak the controls to modify the sound. We’ll also see how to configure MASSIVE’s filters and control them with a modulation source.
Controlling the Wavetable Oscillators
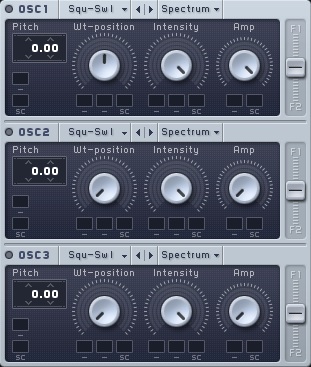
First, create a new, empty sound for editing by selecting File>New Sound from the File menu in the Navigation Bar. Now look at the Oscillator section in the upper left corner of MASSIVE: it should look like the left-hand image below. In the following instructions, we will adjust the various knobs and faders step-by-step until they match the settings in the right-hand image instead, and explain why.
 |  |
First, let’s start with some synthesis basics: in most synthesizer designs, oscillators of some kind are used to generate the raw sound material that is manipulated afterwards by filters (see section Filter Section), effects (see sections Insert Effects and Master Effects Section), and other controls. One of the most unique features of MASSIVE is that the individual oscillators generate sound by using wavetables, rather than just simple waveforms as in many other subtractive synthesizers. This gives it the ability to create dense, unique, morphing sounds that would be impossible to produce using other synthesis techniques. For detailed information about MASSIVE’s wavetable synthesis engine, see section Wavetable oscillators.
For now, we’re just going to look at how you can creatively work with some of the controls here without worrying too much about what is actually going on under the hood.
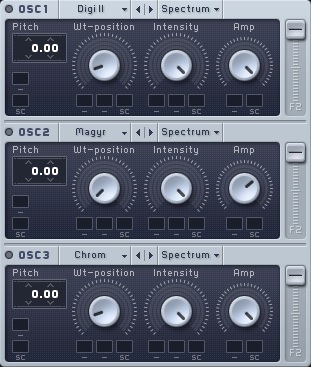
The most fundamental parameter affecting the sound in MASSIVE is the choice of which wavetable to use for each oscillator. The other parameters here in the Oscillator Section allow you to modify how that wavetable is used. You can select a wavetable to use for each of MASSIVE’s oscillators independently, by using the popup menus in their headers: click where you see the indication Squ-Sw I for each oscillator in turn and set them to Digi Cook II, Magyr, and Chrome, respectively.
Now let’s try adjusting the wavetable position, i.e. which part of the wavetable is to be used: try adjusting the Wt-Position control of the topmost oscillator with the mouse while holding down a MIDI note, and listen to the effect this has on the sound. After playing with this control a bit to get a feel for it, set this control to a position of about 10%, just like in the right-hand image above. Now try adjusting the Wavetable Position Control of the third oscillator; do you hear any change in the sound? You will not hear any change because its Amp control (amplifier) is turned all the way down.
In order to match the image above, increase the Amp control of Oscillator 3 to the maximum (all the way to the right). Similarly, set the Amp control of Oscillator 2 to about 70%. Finally, set the Filter Routing faders (at the right side of each oscillator) to their top position for all oscillators. The filters will be explained next.
Configuring the Filters
MASSIVE provides two filter busses to shape your sounds, with exceptionally flexible routing capabilities. Here you can insert a variety of different filter types to manipulate the raw sound from the oscillators.
When you start working on a new sound, the Filter section should look like the left-hand image below. In the following instructions, we will again adjust the knobs and faders step-by-step until they match the settings on the right.
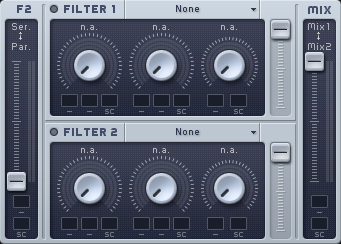 |  |
First, set the Filter Input fader (labeled F2 and marked Ser<>Par) all the way to the top. This sets up a serial filter routing, such that the second filter takes the first filter’s output signal as its input signal. In this example, we want the two filters to process the signal subsequently one after another, not parallel/simultaneously.
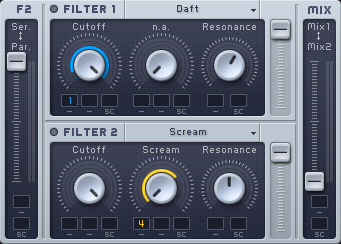
Then, choose the first filter’s type by clicking the header (where “None” is written) and selecting the entry from the list in the popup menu. Let’s choose the Daft filter type for this example.
Now play a MIDI note: you should hear no sound at first, because by default the Cutoff control is turned all the way down (to the left). Hold the note on your MIDI controller and turn the Cutoff knob up to the maximum (to the right) by clicking and dragging with the mouse. As you increase the cutoff, the filter gradually opens and you will hear the sound revealed bit by bit.
For this example, also turn up the Resonance control to about 60%; tweak the Cutoff again a bit to listen to the difference it makes in the sound.
Now slide the Output fader (at the right-hand edge of the Filter Section) all the way to the bottom. This fader sets the output mix of the complete Filter Section, between Filter 1 and Filter 2. When it is set to the bottom of its range, we will hear only the output of Filter 2 and no direct output from Filter 1.
Now play a note again: you should hear no difference yet. Although the sound is passing through Filter 2, we haven’t selected any filter to use. Change this by clicking on the popup menu in the header of Filter 2 and selecting the Scream filter. Now hold a note and gradually increase the Cutoff control to its maximum value (all the way to the right) by clicking and dragging with the mouse; you should hear the sound gradually change as the cutoff is increased.
Now set the Resonance Control to a middle position, approximately 50% of its total range. If you play a note, the sound should sound a bit different than without Filter 2, but the difference is still marginal. (Remember, you can compare the sound with and without Filter 2 in the signal chain by moving the Output Fader up and down with the mouse.)
In order to make more complex and interesting sounds with MASSIVE, we need to add a few more techniques to our sound design toolkit. In the next section, we’ll look at how to use modulation sources to change the parameters of the oscillators and filters over time.
Setting up MIDI Assignments and Modulation Sources
There are basically two different types of modulation that you can use in MASSIVE: you can set up MIDI assignments that allow you to change the parameters manually (or by sending MIDI automation commands from a host sequencer), or you can set up modulation sources within MASSIVE that automatically change over time, such as envelopes, LFOs and sequencers.
In the first case, to set up control via MIDI, first drag the cursor to the Macro Control Section in the lower right corner of MASSIVE’s interface. Here, click on the modulation handle of Macro Control 4, i.e. the small cross in the upper right corner. You will see a small numeral “4” appear, which will be attached to the mouse pointer and follow it. Now, move the cursor to the rightmost Modulation Slot of the second filter’s Scream Control, i.e. the small dark rectangle just below the knob. Click here in the Modulation Slot and the 4 attached to the mouse cursor will disappear, and you will see the 4 visible in the Modulation Slot instead. This indicates that you have assigned Macro Control 4 to control this parameter, the Scream parameter of the filter. (Note: if you hold down the Alt key and double-click the Modulation Slot holding the 4, you can remove the assignment. You can also access a context menu to edit your assignments by right-clicking the Modulation Slot; select the Off entry here to remove an assignment.)
Having made this assignment to the Scream Control, now try tweaking Macro Control 4 with the mouse while playing a note. You will hear no effect from this assignment yet, because the amount of effect of Macro Control 4 on the Scream parameter has not been set. Do this by clicking on the small “4” in the Modulation Slot and dragging the mouse up: you will see a yellow ring appear, becoming longer as you move the mouse upwards. (You can also shorten it again by moving the mouse back downwards.) The longer the ring segment, the greater the influence of the source set in the Modulation Slot, i.e. Macro Control 4. Let’s set this to a length of about 60% around the knob, and then try moving the Macro Control while playing a note. Now you should be able to hear the effect of the assignment!
To control the Scream parameter with a MIDI device, right-click Macro Control 4 and select “MIDI Learn” from the context menu. Then move your MIDI controller’s knob or fader that you want to use - the assignment will take place automatically, assuming that your device is connected correctly. Now you can change Macro Control 4 and the Scream parameter with your MIDI device.
Let’s look at how you can add an automatic modulation sources to modify another parameter in MASSIVE. First, we’ll try assigning one of the envelopes. Click on the blue tab of the first envelope (labeled 1Env) within the Center Window and you will see something like this:
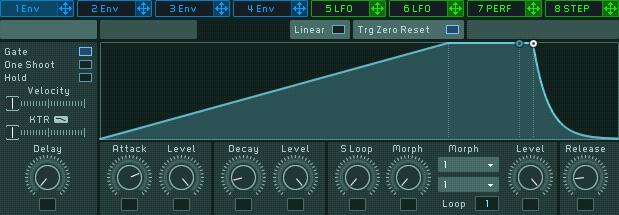
This page shows us the controls of one of MASSIVE’s four envelope generators. Envelopes are signals that first rise when a note is played, stay at some fixed level as long as the key is held (usually), and then fall back to zero when the note is released. Envelopes are often used to define the volume of a note, becoming louder when a key is pressed, holding that volume, and decaying when the note is released.
For our example, we want to use the envelope to modulate the Cutoff of Filter 1. First we will set up the envelope shape we want. Try increasing the Attack control value to about 70% of its full value so that the initial ramp of the envelope becomes much longer (as in the image above). Then, click on the modulation handle of the envelope (the small blue cross within the envelope’s Header Tab, just to the right of the label 1Env). Assign it to the Cutoff of Filter 1 by clicking into the first Modulation Slot under the Cutoff knob; you will see the small blue “1” appear in the slot when it has been assigned. Once again, the modulation amount needs to be set before you will hear any effect from the assignment. Click the Modulation Slot again and drag the mouse downwards. You will see a blue ring start from where the controller is (i.e. at the right) and move “inversely” to the left. Set this to about 10% of maximum value, as in the right-hand image in the previous section. This inverse modulation means that high envelope values will actually lower the Cutoff value instead of increasing it. Try playing a note on your MIDI controller: the sound will become duller in the time after you hit the key, as the envelope signal increases and turns down the Cutoff control. If you try adjusting Macro Control 4 again, its influence is now also audibly much stronger because of the added influence of the envelope on the filter cutoff.
For more on envelopes and other modulation sources, see section Modulation Pages.
Saving Your Sound
Congratulations: you have just created your first sound in MASSIVE! Now let’s save it in our sound library for future reference.
You can save your sound by switching to the Attributes View. Do this by clicking the Attributes View button within the Navigation Bar, between the buttons for the Browser View and the Synth View.
Here in the Attributes View you can set the attributes for your sound so that you can find it in the database in the future, just as explained in section First Steps. As we saw, there are many different attributes available for you to use in categorizing your sounds. (Note: you can find a complete definition of each one in Appendix B and several examples in Appendix A.) For this first sound, let’s just quickly select a few Attributes to index our sound. Click on Bass, Distorted and Sweep/Filter Mod by clicking their labels here.
At this time, you can also add your name in the Author field of the Meta Information at the right, along with any other descriptive details you might choose to enter to help you find the sound again when you need it.
When you’re done, click the Save As button within the Navigation Bar and enter the name of your new sound; clicking OK then saves it to the database. You will now be able to find your sound from the Browser by using the Attributes or by entering terms in the Search field.
If you would like to hear an example of what could be done to further modify this sound, go to the Browser, enter “propeller” into the Search Term field and load the Sound “Propeller Saw.” Switch to the Synth View and you should be able to see some similarities with the example we have been working with here. If you start looking at what makes this Sound different from our example, you’ll find a lot of inspiration and techniques for your own creations.