Audio Routing, Remote Control, and Macro Controls
Maschine comprises a very flexible and powerful routing system. Learn about creative audio routing, sending and receiving MIDI, and creating powerful Macro Controls.
This chapter describes a few important topics and features of Maschine’s routing and assignment system. Understanding these will be of great help in numerous Maschine workflows. This section will explain:
How the audio routing works in Maschine+ and how to take advantage of its flexibility, refer to Audio Routing.
How to route MIDI signals to and from your Sounds and Groups, and how to control Maschine+ parameters via MIDI: Using MIDI Control.
How to use the powerful Macro Controls to greatly improve your live experience by putting the desired parameters at your fingertips: Creating Custom Sets of Parameters with the Macro Controls.
The Channel Properties
Most of the features described here can be accessed via the Channel properties. Channel properties are global settings that apply to a particular Sound, Group, or to the Master independently of which Plug-ins are loaded in its Plug-in slots.
Channel properties are organized into four sets. Similar sets of properties are available for all channels (Sounds, Groups, and Master): Input properties (unavailable for the Master), Output properties, Groove properties, and Macro properties.
You can access Channel properties and their parameters via the same procedure as for Plug-ins. Please refer to section Navigating Channel Properties, Plug-ins, and Parameter Pages for a detailed description.
The Input properties, Output properties, and Macro properties are covered in the following sections. For more information on the Groove properties, please refer to section
Using MIDI Control
Maschine+ provides you with flexible MIDI remote control and host automation facilities that can be used in many situations.
Incoming MIDI
The Master, Groups, and Sounds can be controlled via MIDI:
By default, all MIDI data incoming on the activated MIDI input port(s) will be received by the focused Sound of the focused Group. See MIDI Settings to find information on how to enable/disable MIDI input ports in Maschine+.
Triggering Sounds via MIDI notes: By default, incoming MIDI notes will trigger the focused Sound. You can change this default behavior and map incoming MIDI notes differently in order to adapt Maschine+ to your requirements. The appropriate MIDI settings can be configured in the MIDI page of the Input properties, both for individual Sounds and for entire Groups. These are described in section Triggering Sounds via MIDI Notes.
Outgoing MIDI
You can also send MIDI data from Sounds. This enables you to record your performance on the pads as a MIDI pattern on another device. This is described in section Sending MIDI from Sounds.
Sending MIDI from Sounds
Your Sounds can output MIDI notes and automation data to the outside world, allowing you to control any MIDI-capable application and/or external MIDI gear from Maschine+.
With its MIDI output activated, a Sound will send:
MIDI notes corresponding to the notes played by that Sound in the current Pattern.
MIDI notes corresponding to your hits on the pads.
All events of the MIDI tracks you might have created in the MIDI Automation.
Tip
A Sound without any Plug-in loaded can still send the MIDI data listed above! Furthermore, if the Sound has no Plug-in it will forward any incoming MIDI notes to its MIDI output. To know how to configure the MIDI note input of Sounds, please refer to section Triggering Sounds via MIDI Notes.
The MIDI output of Sounds is configured on the MIDI page of the Output properties for Sounds.
Notice
The MIDI page of the Output properties is available for Sounds only.
To access the MIDI Output page:
Press CHANNEL.
Press Button 3 (SOUND).
Use the 4-D encoder to select Output.
Press the right Page button to select page 3 MIDI.
The settings can now be adjusted using the Knobs.
The MIDI page of the Output properties for a Sound in the software.
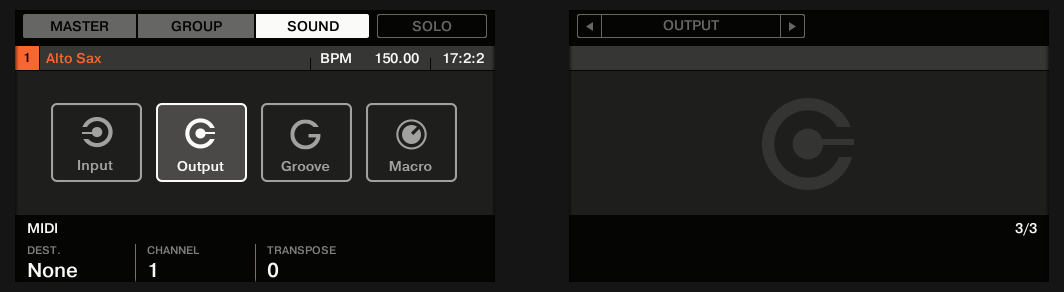
The MIDI page of the Output properties for a Sound
Notice
Please refer to section Navigating Channel Properties, Plug-ins, and Parameter Pages to learn how to access the MIDI page of the Output properties.
Control | Description |
|---|---|
MIDI Section | |
Dest. | Selects the MIDI port on which the Sound will send MIDI data. If Maschine+ is running in Stand-alone mode, available entries are None (MIDI output deactivated, default setting), every activated MIDI output port, as well as any Sound in the same Group containing a Plug-in that can receive MIDI (multitimbral Plug-in). Check the MIDI page of the Settings page to enable the desired MIDI output ports on your MIDI interfaces (see MIDI Settings). If Maschine+ is in Controller mode and the Maschine software is running as a plug-in in a host application, the entries for the activated MIDI output ports are None (MIDI output deactivated, default setting) and Host. If Host is selected, Maschine will forward the MIDI data from the Sound to the host application. This notably allows you to record what you play on the pads as MIDI files in your host. |
Channel | Selects the MIDI channel on which the Sound will send MIDI data. By default Sound slot 1 will send MIDI data on channel 1, Sound slot 2 on channel 2, etc. |
Transpose | Applies an offset to the MIDI note numbers before the notes are sent. Values range from -48 (downward transposition by 48 semitones, for instance, four octaves) to +48 (upward transposition by 48 semitones, for instance, four octaves). The default value is 0. |
Triggering Sounds via MIDI Notes
Maschine+ allows you play your Sound(s) via MIDI (for example, from a MIDI keyboard).
By default and without any configuration, incoming MIDI notes on any MIDI port and any MIDI channel will trigger different pitches of the Sound slot currently focused.
To play one or more Sounds via MIDI notes independently of the Sound currently focused, you need to configure the MIDI input settings of your Sound(s) or of their Group, i.e. define how the Sound(s) or the Group should react to incoming MIDI notes. This is done on the MIDI page of the Group or the Sounds Input properties.
Notice
The Input properties of the Master channel does not have a MIDI page.
When configuring these MIDI input settings, keep in mind the following:
MIDI input settings for a Group affect all Sounds in the Group: Each Sound will be triggered by a different MIDI note. Typically, this allows you to quickly set up a MIDI remote control for an entire drum kit.
MIDI input settings for a Sound affect only that Sound: Incoming MIDI notes will trigger different notes of this Sound. Typically, this allows you to control a melodic instrument via MIDI. More precisely, the incoming MIDI notes will be routed to the first Plug-in slot of the Sound.
Tip
If the Sound has no Plug-ins, incoming MIDI notes will be forwarded to the Sound’s MIDI output, if activated (refer to Sending MIDI from Sounds.
MIDI input settings of a Sound and its parent Group are merged: For example, if you configure a Group to react to incoming notes on MIDI channel 1, but one Sound is set up to react to incoming notes on MIDI channel 2, then this Sound will react to one incoming note on MIDI channel 1 and all incoming notes on channel 2.
To access the MIDI Input page:
Press CHANNEL.
Press Button 2 (GROUP) or Button 3 (SOUND).
Use the 4-D encoder to select Input.
Press the right Page button to select page 3 MIDI.
The settings can be adjusted using the Knobs.
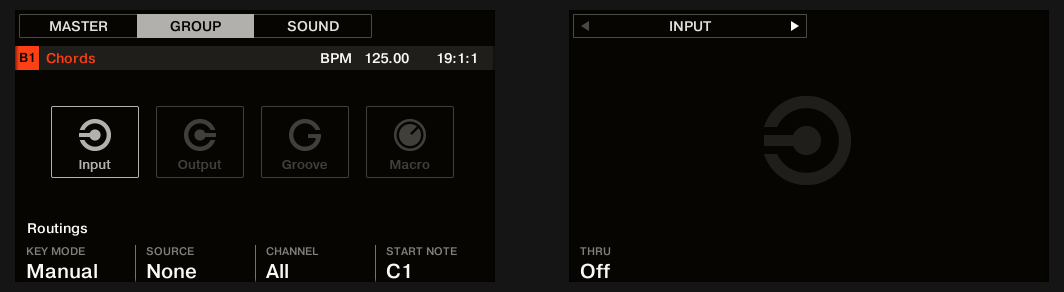
The MIDI page of the Input properties (a Group is shown here)
The MIDI input settings for Sounds and Groups provide the following parameters:
Controls | Description |
|---|---|
MIDI ROUTING Section | |
Key Mode (Pad Mode only) | Enables the MIDI note input for the selected Group (deactivated by default). Key Mode offers the following options: Off: Select this option to deactivate MIDI note input for the selected Group. Drumkit: Select this option to conveniently configure the MIDI note input for the selected Group and place each Sound on a specific key chromatically across the keyboard starting from C2 upwards. Manual: This option allows you to configure the MIDI note input based on your own preferences, including the Source, Channel, Start Note and Thru settings. |
Source (stand-alone and in Manual mode only) | Select the MIDI port on which the Sound or Group will receive MIDI notes. Available entries are None (MIDI note input deactivated, the default setting), All (MIDI notes are received on all activated input ports), and each activated MIDI input port. You can enable the desired MIDI input ports of your MIDI interfaces in the MIDI page of the Settings (refer to MIDI Settings). Note that when None is selected for both a Sound and its parent Group, if the Sound is focused it will receive MIDI notes from all MIDI ports and on all MIDI channels. |
Channel (Manual mode only) | Select the MIDI channel on which the Sound or Group will receive MIDI notes. If you select All (default setting), the Sound or Group will receive MIDI notes from all channels. |
Start Note (Manual mode only) | Define the MIDI root note for that Group (C1 by default). The MIDI root note and the upper 15 MIDI notes (from Root Note until Root Note + 15) will trigger the root note of Sound slot 1–16, respectively. Incoming MIDI notes outside this range will be ignored by the Group. |
Thru (Manual mode only) | Switch this parameter on to send incoming events through to the MIDI outputs. This can be useful if you want to record notes played from Maschine+ into your host sequencer, and then play them back from there, using Maschine as the sound source. Switch this parameter off to stop incoming events from being routed to the outputs. |
MIDI Change
MIDI Change allows you to use standard MIDI Note or Program Change messages to trigger Scene, Section, or Lock snapshot changes from an external MIDI device. This can be used to provide more flexibility during live performances. For example, you could set up an external MIDI device to send MIDI Notes or Program Change messages to trigger different Scenes or Sections while you focus on playing, or to trigger Lock snapshots for instant parameter changes.
The following instructions explain how to set up MIDI Change. It assumes your external MIDI device is connected to Maschine+ using a MIDI cable or USB and sends either MIDI note or Program Changes messages on the same MIDI channel as your Maschine+. Consult the documentation provided with your external MIDI device for more information on how to set it up.
To set up MIDI Changes on Maschine+:
Press Settings.
Use the 4-D encoder to select MIDI.
Turn Knob 5 to select the input of the device you want to use to trigger MIDI Changes.
Turn Knob 6 to activate the selected device by setting it to on.
Press the right Page button (>) to select Page 2.
Turn Knob 1 to choose the type of MIDI Change you want to trigger: Scene, Section, or Lock.
Select the trigger you want to use: Program Change or Notes.
Select the MIDI input source you activated in Step 3.
Ensure the selected input device is activated. See Step 4 for more information.
Finally, select the MIDI Channel. Both the external device and Maschine+ should use the same MIDI Channel.
MIDI Change can now be used to trigger Scenes, Sections, or Lock snapshots.
Note
MIDI Note numbers: Some host applications (DAWs) and MIDI devices use various conventions to name MIDI notes. For example, in Maschine+, MIDI Note number 0 is referred to as C-2, and MIDI Note number 60 (middle C) as C3. Please refer to the documentation of your external device to find out which convention is used.
Note
Program Change numbers: Some host applications and MIDI devices send Program Change numbers in the range [0–127] instead of [1–128]. In that case, Program Change number 0 will trigger snapshot slot 1, PC 1 will trigger snapshot slot 2, etc. Refer to the documentation of your host application or MIDI device to know in which range it sends Program Change numbers.
For more information on how to configure MIDI Settings, refer to MIDI Settings.
For information on Scenes and Sections, refer to Arranging Your Project, and for information on Lock, refer to Using Lock Snapshots.
Audio Routing
Maschine+ offers a powerful audio routing system that you can finely customize to fit your specific needs.
To make it short, by default the various channels are structured in a simple, hierarchical way:
At the bottom level, each Sound has its own channel. The output of the Sound’s channel is sent to its parent Group.
At the mid-level, each Group has its own channel, which sums all channels of the included Sounds. The output of the Group’s channel is sent to the Master.
At the top level, the Master has its own channel, which sums the channels of all Groups and ends up at the main output of Maschine+. The output of the Master’s channel is sent to your amplification system.
This default basic configuration can be customized in numerous ways. Using the audio settings available in the Input and Output properties at the Sound, Group, and Master level, you can build complex routing that covers a wide range of situations, as you will see in the next sections:
Feed external audio to the input of your Sounds: Sending External Audio to Sounds.
Adjust the main output of your Sounds and Groups, and route it to various destinations: Configuring the Main Output of Sounds and Groups.
Send auxiliary outputs of your Sounds and Groups to other destinations: Setting Up Auxiliary Outputs for Sounds and Groups.
Choose the destination and settings for the Master output as well as for the Cue bus used for pre-listening: Configuring the Master and Cue Outputs.
Configuring the Audio Routing
All the procedures described in the following sections make use of the Channel properties. To follow these procedures, switch to Control mode and navigate to the desired Channel properties as described in section Navigating Channel Properties, Plug-ins, and Parameter Pages.
Sending External Audio to Sounds
Each Sound can be configured to receive external audio signals. These audio signals can be coming from the following sources:
Outside Maschine+ from the audio inputs or from a connected audio interface.
Additional outputs of multiple-output Plug-ins that might be loaded somewhere else in your Project.
Each Sound can use one external stereo input. The same external signal can be fed into any number of Sounds.
For example, this allows you to have any external audio signal be processed by the Plug-ins loaded in that Sound, and more generally, integrate external audio signals into the Maschine+ routing and processing system. See also section Applying Effects to External Audio for an example of use and step-by-step instructions.
The configuration of external audio inputs for a Sound is done on the Audio page of the Sound’s Input properties.
Notice
The Audio page of the Input properties is available for Sounds only.
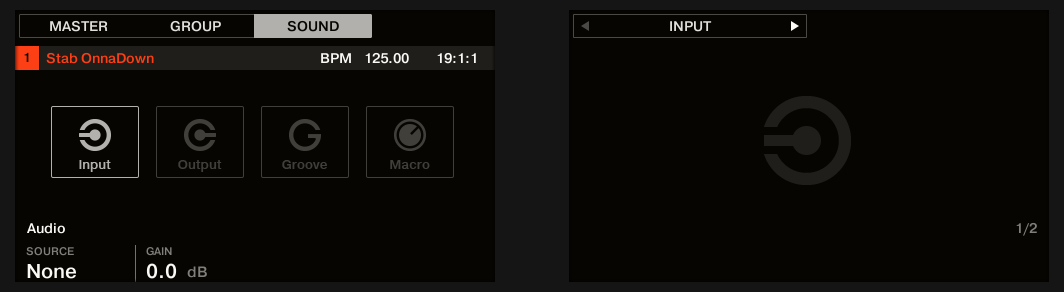
The AUDIO page of the Input properties for a Sound
Notice
Please refer to section Navigating Channel Properties, Plug-ins, and Parameter Pages in the Control Area to learn how to access the Audio page of the Input properties.
Controls | Description |
|---|---|
AUDIO Section | |
Source | Selects an external audio input to be routed to the Sound. Available entries are None (no external input) and the four external stereo inputs Ext. 1–4, as well as any additional output(s) of multiple-output Plug-ins loaded in other Sounds of the same Group. Check the Routing page of the Audio Settings (see, Audio Settings) to route the physical inputs of your audio interface to the virtual audio inputs of Maschine+. |
Gain | Adjusts the gain of the incoming signal. |
Notice
To access and change Channel properties or Plug-in parameters, simply use the common workflow described in Navigating Channel Properties, Plug-ins, and Parameter Pages Furthermore, you will find a step-by-step use case in Applying Effects to External Audio.
Configuring the Main Output of Sounds and Groups
By default the outputs of all Sounds in a Group are sent to this Group, where they are mixed together and processed by the Plug-ins loaded in the Group if any have been added. Similarly, by default, the outputs of all Groups are sent to the Master, where they are mixed together and processed by the Plug-ins loaded in the Master if any have been added.
This default behavior can be customized to your liking: You can adjust the level and panoramic position of the channel output, or send it to the Cue bus for pre-listening. Furthermore, you could send individual Sounds or whole Groups to other pairs of outputs on your audio interface in order to process them separately at a later stage. The output routing configuration is done on the Audio page of the Output properties for Sounds and Groups.
Notice
We describe here the Audio page of the Output properties for Sounds and Groups only. The equivalent page for the Master will be described in section Configuring the Master and Cue Outputs.
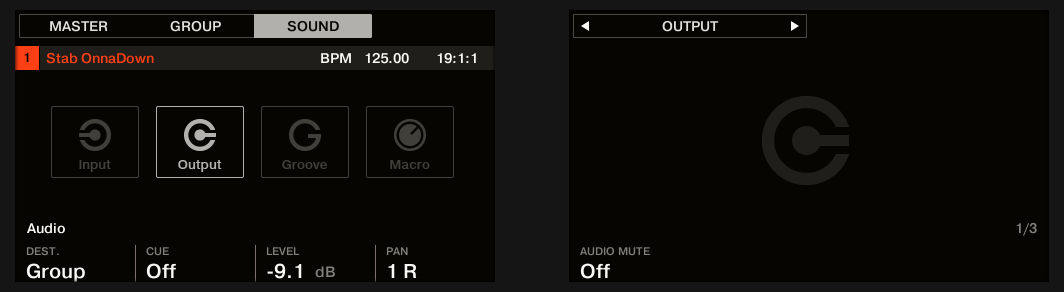
The AUDIO page of the Output properties (here for a Sound)
Controls | Description |
|---|---|
AUDIO Section | |
Dest. | Selects where you want to send the main audio output of your channel. For Sounds, available options are None (no output), Master, Group (parent Group, default setting), any other Group or any other Sound acting as bussing point (i.e. containing an Effect Plug-in in its first Plug-in slot), as well as the 16 external stereo outputs Ext. 1–16. For Groups, available options are None (no output), Master (default setting), any other Group acting as bussing point (i.e. containing an Effect Plug-in in its first Plug-in slot), any Sound acting as bussing point in any other Group, as well as the 16 external stereo outputs Ext. 1–16. The available bussing points are labeled as described below. |
Cue | When Cue is activated, the main output of the channel is sent to the Cue bus instead of its normal target (defined in Dest., refer to above). For example, this is very useful to pre-listen a channel before you mix it in your performance. Note that when Cue is activated, the channel’s Aux 1 and Aux 2 outputs are muted as well, but they are not sent to the Cue bus (refer to Setting Up Auxiliary Outputs for Sounds and Groups. |
Level | Adjusts the overall volume level of the channel. |
Pan | Defines the pan position of the channel in the stereo field. |
Audio Mute (Sounds only) | If you enable Audio Mute, muting this Sound will not only bypass its events but also mute its audio output, thereby muting any audio tails from notes already played. See section for more information. |
Tip
If Maschine+ is in Controller mode and the Maschine software is running as a plug-in, the external stereo outputs Ext.1–16 available in the Dest. selector of the MAIN section will correspond to virtual outputs in your host. This allows you to send individual Sounds or Groups from Maschine to their own mixer channels within your DAW, for example.
Labels for Bussing Points in the Dest. Selector
The various bussing points available in the Dest. selector (described in the table above) are labeled differently in the drop-down menu and in the display of the selector:
In the drop-down menu they are labeled as follows:
For Groups: [Group name] (for example, Drums).
For Sounds: [Group name]: [Sound name]-[input number] (for example, Drums: Kick-1).
In the selector display they are labeled as follows:
For Groups: [Group letter+number] (e.g., A2).
For Sounds: [Group letter+number]:S[Sound number]-[input number] (for example, A2:S4-1 for the first input of the Sound 4 of Group A2).
Notice
The bussing points available in the DEST. parameter are labeled as in the selector display described above.
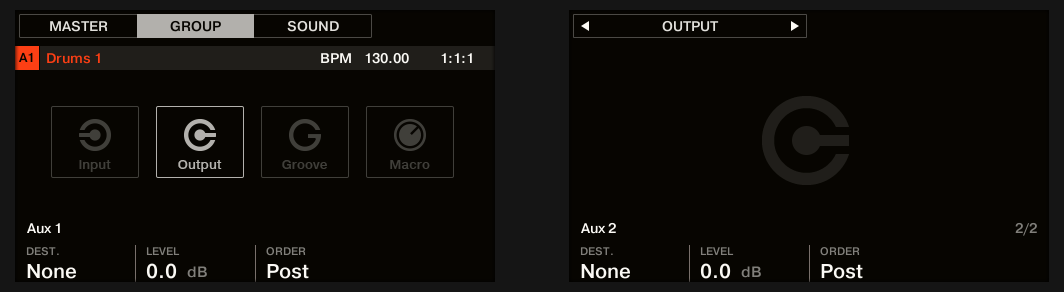
Setting Up Auxiliary Outputs for Sounds and Groups
Each Sound or Group of your Project provides two auxiliary outputs that you can route to additional targets. For example, you can send a definable amount of the channel’s audio output to other channels for further processing. This is notably used in send effects, refer to section Creating a Send Effect to learn how to set up a classic send effect.
The auxiliary outputs of a Sound/Group are configured on the Aux page of the Output properties.
Notice
There is no Aux page in the Output properties of the Master.
The AUX page of the Output properties (for a Group shown here)
Notice
Please refer to section Navigating Channel Properties, Plug-ins, and Parameter Pages to learn how to access the Aux page of the Output properties.
Controls | Description |
|---|---|
AUX 1 / AUX 2 Section | |
Dest. | Selects where you want to send the Aux 1 or Aux 2 output of your channel. Available options are the same as for the Dest. selector of the Audio page (see Configuring the Main Output of Sounds and Groups), except that for Aux 1 and Aux 2, the default destination is None, in other terms there are no auxiliary sends defined by default. |
Level | Adjusts the level of the signal sent to the Aux 1 or Aux 2 output. |
Order | If Order is set to Pre, the channel will be fed into Aux 1 or Aux 2 |
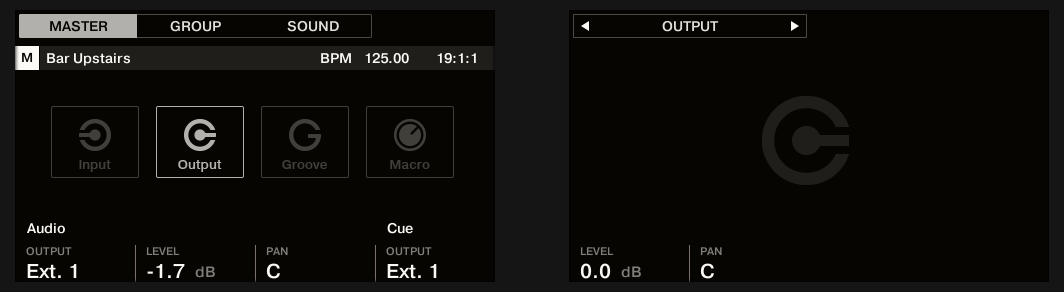
Configuring the Master and Cue Outputs
All channels routed to the Master are mixed together and processed by any Plug-ins loaded in the Master. The result is then sent to the Master output (that is, the main output).
Besides, all channels currently routed to the Cue bus for pre-listening are mixed together and sent to the Cue output.
You can choose to which outputs both Master and Cue outputs should be sent, and adjust their respective levels and panoramic positions. This is done on the Audio page of the Output properties for the Master.
The AUDIO page of the Output properties for the Master
Notice
Please refer to section Navigating Channel Properties, Plug-ins, and Parameter Pages to know how to access the Audio page of the Output properties.
Controls | Description |
|---|---|
AUDIO Section | |
Output | Selects where you want to send the master output of your Maschine Project. Available options are the 16 external stereo outputs Ext. 1–16. |
Level | Adjusts the overall volume level of the master output. |
Pan | Defines the panoramic position of the master output in the stereo field. |
CUE Section | |
Output | Selects where you want to send the Cue bus of your Maschine Project. Available options are the 16 external stereo outputs Ext. 1–16. By selecting a different output from the one used for the main stereo output, you can effectively pre-listen on this additional output (e.g., on your headphones) any channel(s) currently sent to the Cue bus. To send a channel to the Cue bus, enable the Cue switch in the Audio page of its Output properties (refer to Configuring the Main Output of Sounds and Groups. |
Level | Adjusts the level of the Cue output. |
Pan | Defines the panoramic position of the Cue output in the stereo field. |
Mono Audio Inputs
Each Sound can be configured to receive external stereo or mono audio signals. You may use audio signals from outside Maschine+.
Maschine+ offers either 4 stereo inputs or 8 mono inputs, so each Sound can use one external mono or stereo input. The same external signal can be fed into any number of Sounds.
For example, this allows you to process any external audio signal using the plug-ins loaded in a Sound, and more generally, integrate external audio signals into the Maschine+ routing and processing system.
The external audio inputs for a Sound can be configured on the Audio page of the Sound’s Input properties.
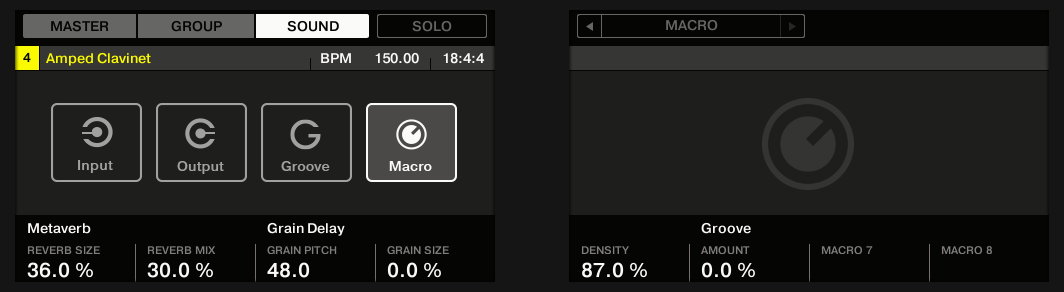
Creating Custom Sets of Parameters with the Macro Controls
Macro Controls enable you to control in one same location a selection of parameters coming from different sources. Available in every channel (Sounds, Groups, and Master), Macro Controls are very useful for playing live since you can choose a set of parameters from various sources to manipulate on one screen without having to switch screens.
The Macro Controls are available in the Macro properties.
The Macro properties (here for a Sound)
Notice
Please refer to section Navigating Channel Properties, Plug-ins, and Parameter Pages to learn how to access the Macro properties.
Macro Control Overview
Each Macro Control can be assigned to one destination with the full range of the selected parameter. On the other hand, the same parameter can be the destination of more than one Macro Control.
To know which parameters you can assign to a Macro Control, consider this single rule:
A Macro Control of a channel can control any parameter located in the properties or Plug-ins of that channel or of any underlying channel. In other words:
For Sounds: You can assign the Macro Controls of a Sound to any parameters in its properties or Plug-ins. It is also possible to assign MIDI Control Change messages, Pitchbend and Program Changes to Macro Controls in order to control external MIDI devices.
For Groups: You can assign the Macro Controls of a Group to any parameters in its properties or Plug-ins as well as any parameters in any Sound inside the Group.
For the Master: You can assign the Macro Controls to any parameters found in the properties or Plug-ins of any channel in your Project.
Notice
Obviously, the Macro properties (even of a different channel) are not available as targets for any Macro Control.
Tip
Linking the same parameter to more than one Macro Control can be useful in the following example: If a parameter of a Sound is particularly important, you can link it to the same knob in the Macro Controls of that Sound, of its parent Group, and of the Master. By doing this, you ensure that the parameter is always available on the same knob when you switch between the Master, Group, and Sound level (but not if you switch to another Sound or Group, of course).