Connecting Maschine+
Integrate Maschine+ into your setup by connecting it to: A computer, audio effects and inputs, midi devices, Wi-Fi, and Ableton Link.
As well as being a groovebox and a sampler for creating custom kits, Maschine+ can be used as the centerpiece of your studio to record vocals, guitars, and drums. You can connect MIDI or USB hardware synths and sequence them to capture the results or sculpt external audio using effects and modulation. You can control, mix, and manipulate the rest of your setup with line, and mic inputs to bring everything together.
This chapter contains a quick walk-through of the basic hardware setups and the necessary connections.
Setup Examples
In this section, you will learn how to connect Maschine+ in various setup scenarios. Although it's not possible to cover all imaginable setups here, the examples are general enough to apply the information to most situations.
Connecting Active Monitor Speakers
This example shows an all-in-one production system set up in which your active monitor speakers are directly plugged into the main outputs of your Maschine+.
 |
Maschine+ setup with active monitors.
To use active speakers (self-powered speakers with a built-in amplifier) with Maschine+:
Turn the LINE OUT VOLUME knob on the rear panel to the left-end stop to set the output volume to a minimum.
Connect the LINE OUT L/R sockets on the rear panel of Maschine+to your active speakers using balanced cables with 1/4" TRS jack plugs. First, connect the L output channel with the left speaker, then the R output channel with the right speaker.
Once you have connected the speakers to the device, set the volume knob on your active speakers to 0 dB and turn them on.
Start the playback of a Maschine Project.
Gradually turn the LINE OUT VOLUME knob on the rear panel of Maschine+ until you reach an appropriate listening level.
Tip
If you have a main mixer connected to your monitors, and various devices plugged into your main mixer, you can simply add Maschine+ to your setup by connecting its audio outputs to any stereo line input on your main mixer.
Connecting Headphones
This example shows a setup for “on-the-road” beat making or performance including Maschine+, and a pair of headphones
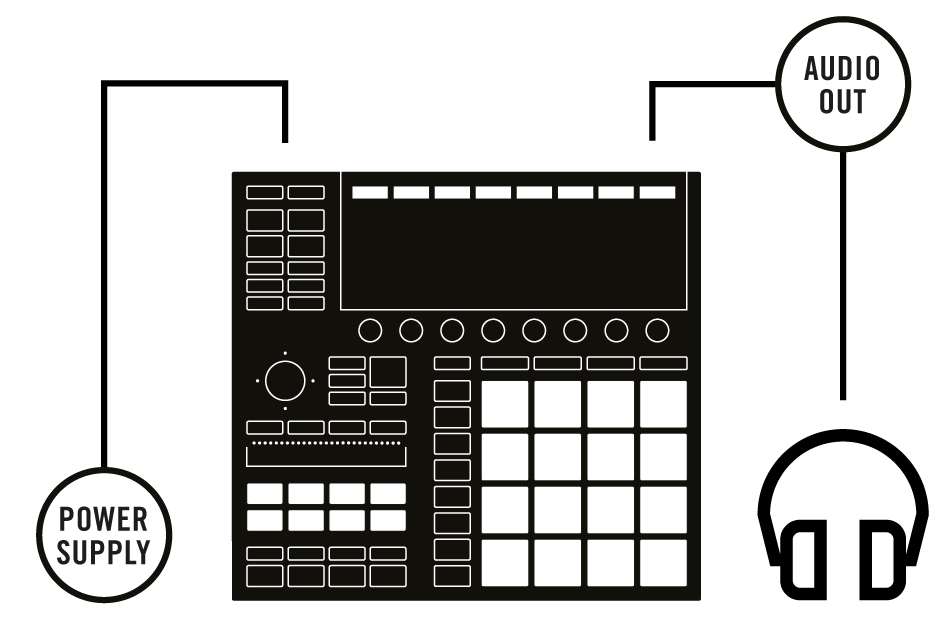 |
Maschine+ setup with headphones.
To use headphones with Maschine+:
Turn the PHONES VOLUME knob on the rear panel of Maschine+ to the left-end stop to set the headphones volume to a minimum.
Plug the 1/4" TRS jack of your headphones into the PHONES socket nearby.
Start the playback of a Maschine Project.
Gradually turn the PHONES VOLUME knob on Maschine+ until you reach a comfortable listening level.
Note
The headphones output of your Maschine+ is an additional stereo output, distinct from the main output pair, and perfectly tailored for the Cue channel of Maschine+. However, if you want to monitor the main outputs in your headphones, please select +Phones in the Outputs section of the Hardware page in the SETTINGS. For more information, refer to Hardware Settings.
Connecting Line Level Equipment
This example shows a setup with both a pair of active speakers (refer to Connecting Active Monitor Speakers) and a pair of headphones (refer to Connecting Headphones) with an extra line-level input device, for example, a synthesizer.
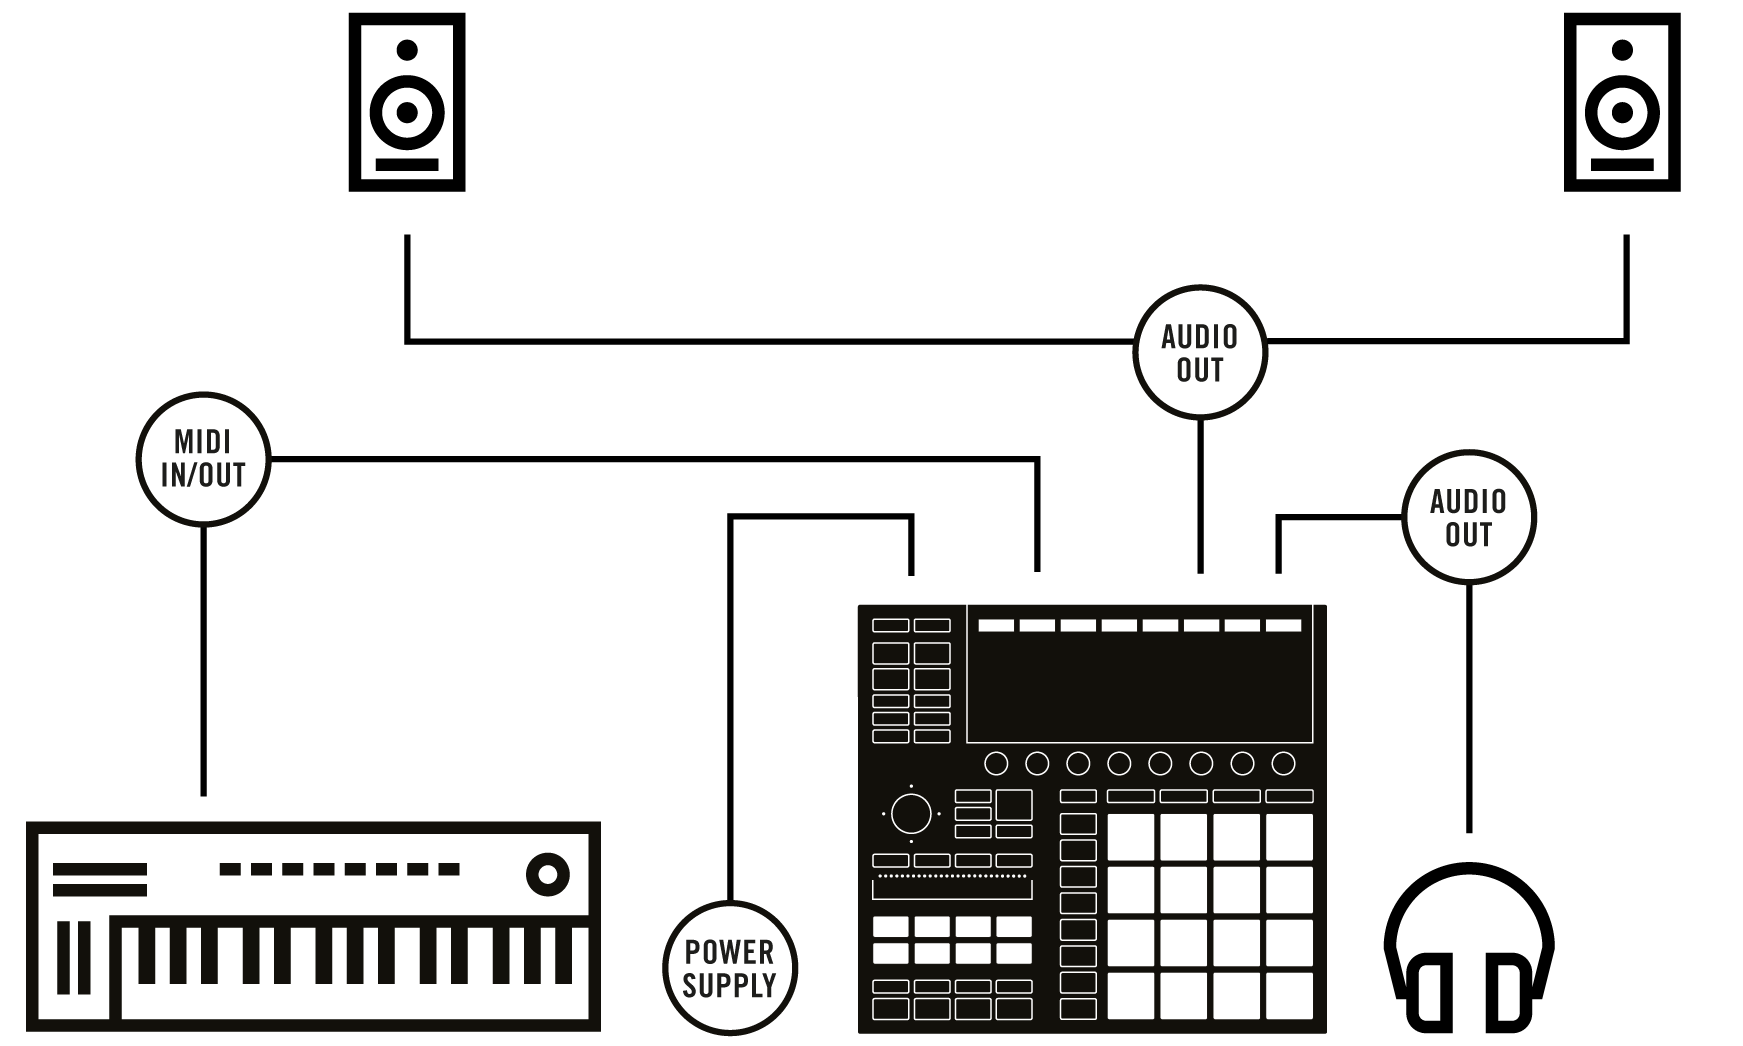 |
Maschine setup with a line-level device (here a synthesizer) as input.
To use the Maschine+ in a setup with typical line level equipment:
Turn the LINE OUT VOLUME and PHONES VOLUME knobs on the rear panel of your Maschine+ to the left-end stop to set the output and headphones volumes to a minimum.
Plug a pair of 1/4" TRS jacks from the outputs of your device into the LINE IN 1 and 2 sockets on the rear panel of the Maschine+ (use a single jack plugged into the LINE IN 1 socket if you are using a mono device).
Adjust the output signal of your connected device by using its relevant volume/gain control. Check that your input signal does not clip.
Turn the LINE OUT VOLUME and PHONES VOLUME knobs back to their usual levels.
Caution
In order to use the LINE IN 1 and 2 sockets on your Maschine+, make sure that no microphone is connected to the MIC IN socket nearby! Indeed, plugging a microphone into the MIC IN socket bypasses the LINE IN 1 and 2 sockets.
Connecting a Dynamic Microphone
This example shows a setup with both a pair of active speakers (refer to Connecting Active Monitor Speakers) and a pair of headphones (refer to Connecting Headphones) with a dynamic microphone, for example, when recording vocals.
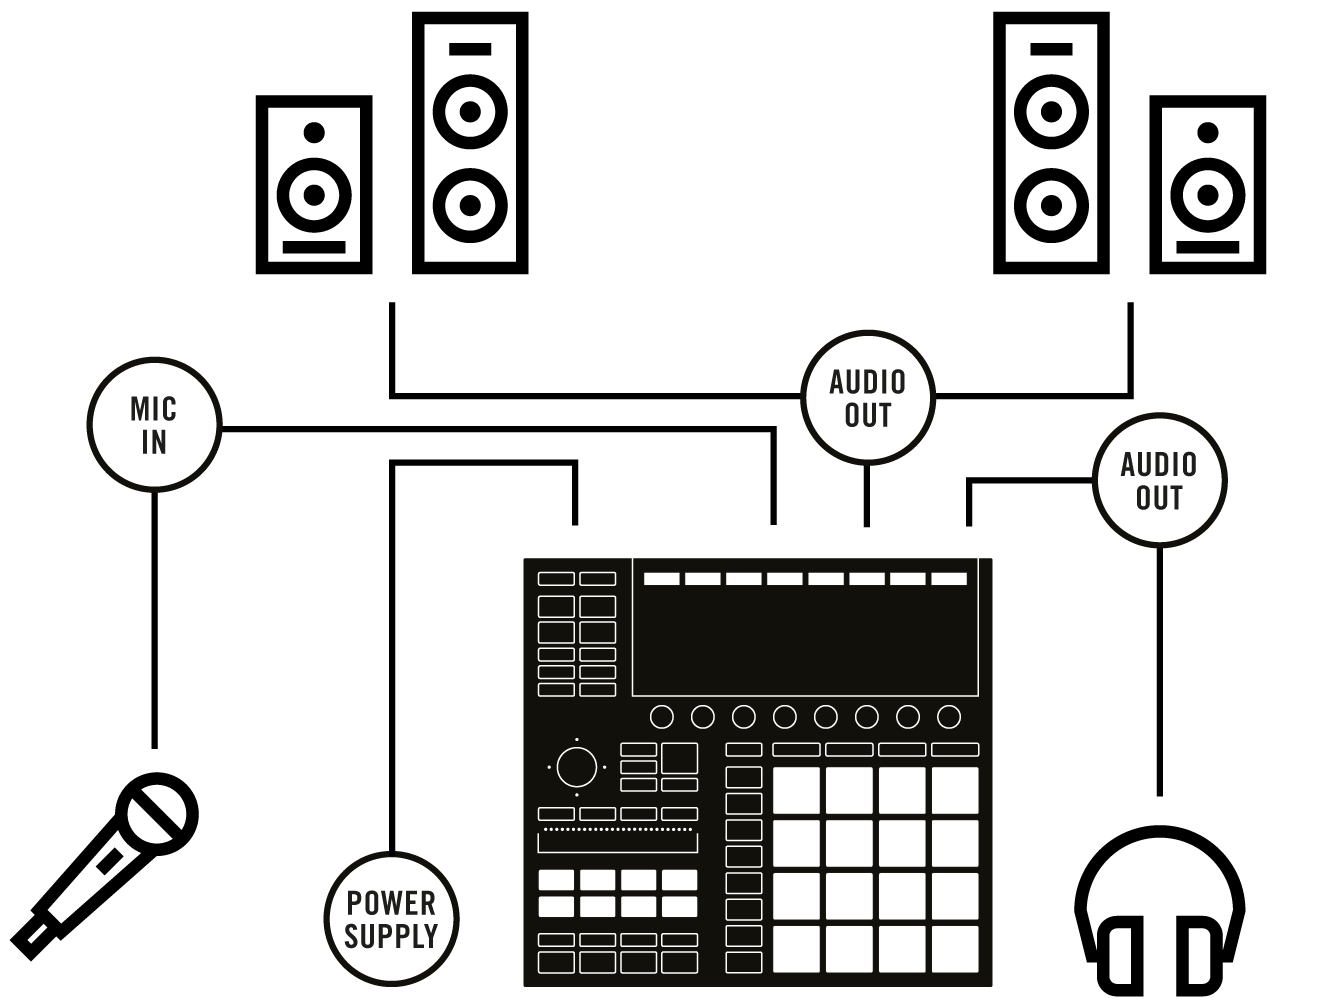 |
Maschine+ setup with a dynamic microphone.
Caution
Make sure the LINE OUT VOLUME, PHONES VOLUME, and MIC IN GAIN knobs are turned down before connecting a microphone to Maschine+. Microphones placed near speakers can cause a loud squealing tone (a phenomenon called the “Larsen effect” or “audio feedback loop”) and can seriously damage your hearing and your equipment. The greater the distance between a microphone and the speakers, the less chance there is of this effect occurring.
Note
You cannot plug a condenser microphone directly into Maschine+. It will require a preamp.
To use the Maschine+ in a recording setup with a dynamic microphone:
Turn the LINE OUT VOLUME, PHONES VOLUME , and MIC IN GAIN knobs on the rear panel fully to the left to set the output volume, headphones volume, and microphone input level to a minimum.
Plug the 1/4" TRS jack of your dynamic microphone into the MIC IN socket on the rear panel of your Maschine+.
Turn the LINE OUT VOLUME and PHONES VOLUME knobs back to their usual levels.
While singing/playing an instrument into the microphone, adjust the input signal level by gradually turning the MIC IN GAIN knob to the right while checking that the signal is not clipping.
Note
When a microphone is plugged in the MIC IN socket, the LINE IN 1 and 2 sockets are bypassed. Hence, if you want to record the audio from a line-level device, make sure that no microphone is connected to the MIC IN socket!
Connecting to Wi-Fi
Connecting Maschine+ to a network enables you to download content to your Library from your Native Instruments account using your Native ID, connect to other devices using Ableton Link, and perform system updates.
Disconnecting from Wi-Fi
It is possible to disconnect Maschine+ from the Wi-Fi network from the Settings page.
Using Airplane Mode
Airplane mode suspends the device's network signal transmission, effectively disabling the network service. As the name suggests, this mode is for use in environments where you are not allowed to use Wi-Fi.
Syncing Maschine+ using Ableton Link
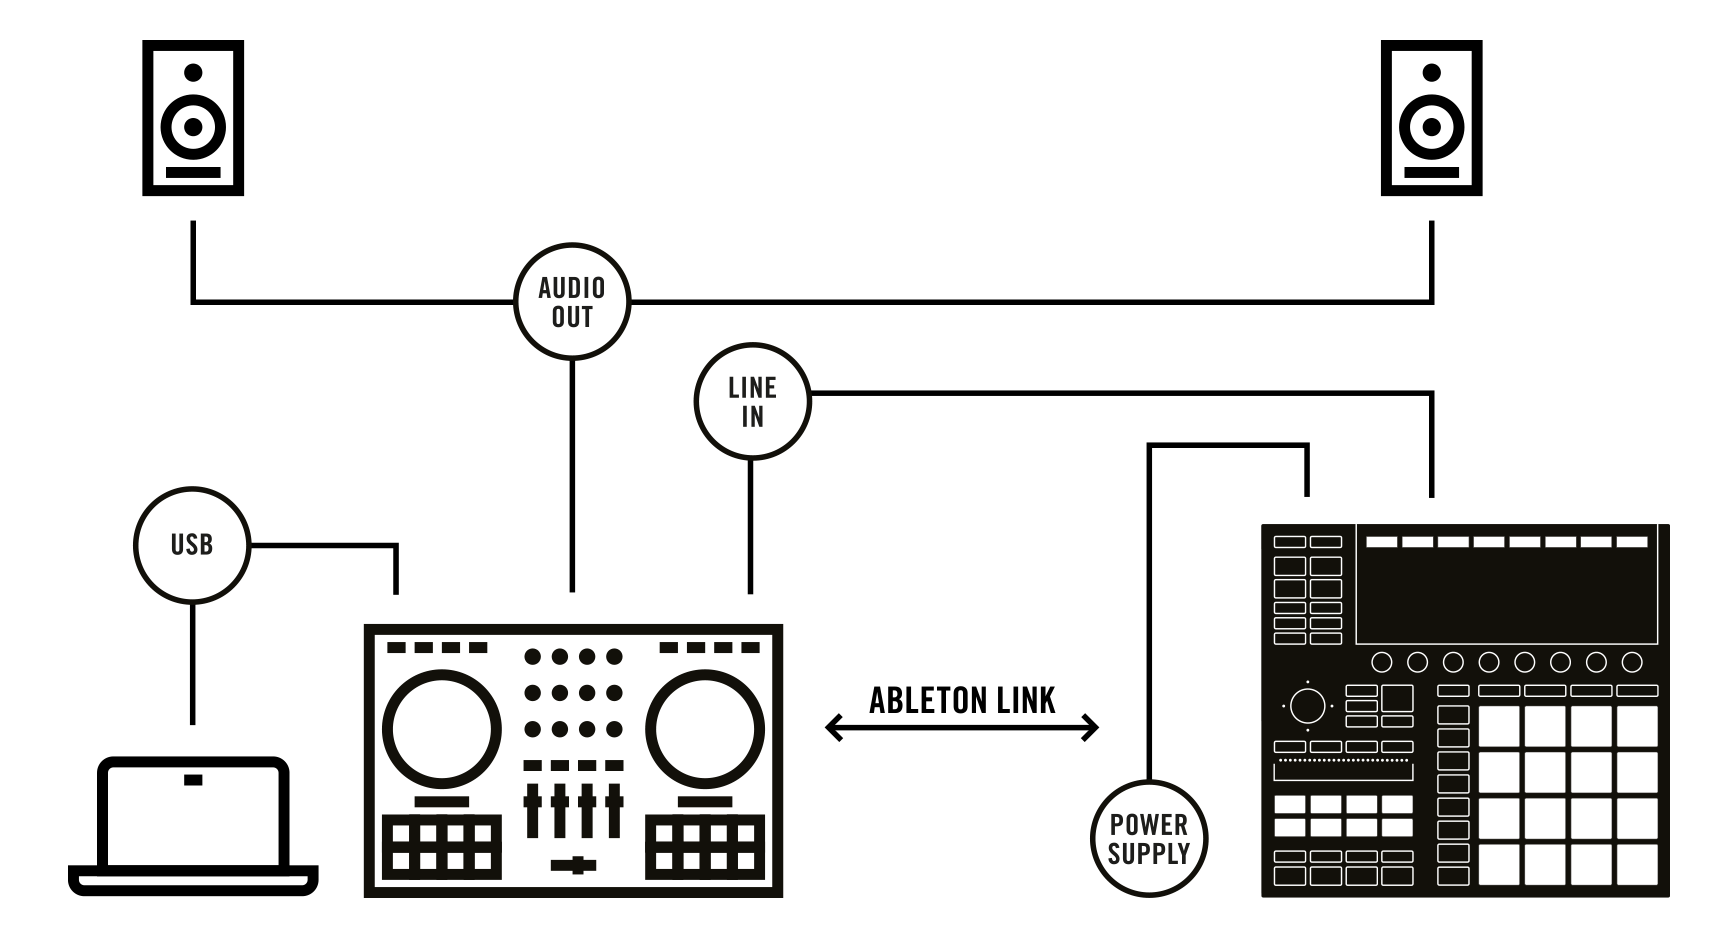 |
Using Ableton Link to synchronize with external equipment
Connecting to Ableton Link
Applications that support Ableton Link can join a Link session when connected to the same network. To enable Link within Maschine+, simply make sure it is connected to the same local network as the other applications you want to link to. This can either be a local network or an ad-hoc (computer-to-computer) connection.
For more general information on setting up and using Link, please refer to the Link FAQs article located on the Ableton website:
https://help.ableton.com/hc/en-us/articles/209776125-Link-FAQs.
Tip
Instead of using Wi-Fi, you can also connect Maschine+ to a network using a USB ethernet adapter.
Joining and Leaving a Link Session
Integrating Maschine+ into a MIDI Setup
You can quickly integrate Maschine+ into a MIDI setup.
You can use MIDI in various ways. Notably:
You can synchronize a MIDI Clock signal between Maschine+ and other MIDI devices:Sync to External MIDI Clock and Send MIDI Clock.
If you connect a MIDI keyboard to the MIDI IN, you can directly play the focused Sound with it without having to set anything up.
You can let particular Sounds and Groups react to incoming MIDI data and send MIDI data to the desired port. More on these in section Using MIDI Control.
Connecting External MIDI Equipment
Maschine+ has dedicated MIDI sockets that allow you to directly connect other MIDI devices using a MIDI cable with a 5-pin DIN MIDI jack to integrate it into your MIDI setup.

The MIDI sockets on the rear panel of Maschine+
To connect your external MIDI equipment:
Connect the device receiving MIDI signals to the MIDI OUT socket on the rear panel using a 5-pin DIN MIDI jack.
Connect the device sending MIDI signals to the MIDI IN socket on the rear panel using a 5-pin DIN MIDI jack.
The MIDI equipment is connected.
Depending on your use case, additional configuration is required:
You need to activate the corresponding MIDI inputs and outputs of your Maschine+ in the MIDI page which is accessible by pressing SETTINGS. For information on MIDI settings, refer to MIDI Settings.
If Maschine+ is being used in Controller mode and the Maschine software is running as a plug-in in a host, the MIDI configuration is managed by the host.
Sync to External MIDI Clock
If Maschine+ is running as a stand-alone application, it can be controlled externally via MIDI Clock by any device that is capable of sending MIDI Clock. This could be hardware such as a drum machine, another groovebox, or even another sequencer.
To configure Maschine+ to receive MIDI Clock from an external device:
Press SETTINGS.
Select the MIDI page.
Turn Knob 1 to select Receive from the menu.
Maschine+ can now receive MIDI Clock from an external device
When Receive is selected, the PLAY button is deactivated.
Send MIDI Clock
If Maschine+ is running in Standalone mode, it can send a MIDI Clock signal to any device capable of receiving MIDI Clock. This could be hardware such as a drum machine, another groovebox, or even another software sequencer.
To configure Maschine+ to receive MIDI Clock from an external device:
Press SETTINGS.
Use the 4-D encoder to select MIDI.
In the MIDI Sync section, select Send Clock from the menu.
Maschine+ will send a MIDI Clock signal to any connected device capable of receiving MIDI Clock.
Notice
You can adjust the MIDI Clock offset in the MIDI page of the SETTINGS panel. For more information, refer to MIDI Settings.
Connecting a Pedal
Maschine+ provides a pedal input in the form of a 1/4-inch socket on the rear panel.

The PEDAL socket on the rear panel.
The PEDAL socket allows you to use a pedal footswitch to control the transport. A single footswitch with two pedals can be used to control the transport in the following way:
Pedal 1: Starts/stop the playback.
Pedal 2: Engage/disengages recording.
Tip
The PEDAL socket can also be configured to send Continuous MIDI CC messages in the Preferences of the Controller Editor software. For more information read the Controller Editor manual.
Connecting Maschine+ to a Computer
Connecting Maschine+ to your computer using USB enables you to do the following:
Control the Maschine software using Controller mode. For more information, refer to Standalone vs. Controller Mode.
Control external MIDI equipment using the Controller Editor software, refer to Using Maschine+ as a MIDI Device.
Transfer files from your SD memory card in Storage mode. For more information, refer to Transferring Files to the SD Card.
To connect Maschine+ to your computer:
Attach the ‘device end’ of the included USB cable to the USB B socket on the rear panel of Maschine+.
Attach the 'computer end' of the USB cable to an available USB 2.0 (or later) port on your computer.
Note
Maschine+ will not work with your computer when it is connected to a USB 1.1 port. A USB 2.0 (or later) port is required.
Using Maschine+ as a MIDI Device
In addition to using Maschine+ as a standalone device, or as a controller for the Maschine software, you can also use it as a powerful and highly versatile MIDI controller to pilot any other MIDI-capable software application running on the computer it is connected to via USB. This is made possible by the Controller Editor software, an application that allows you to precisely define all MIDI assignments for your Maschine controller. The Controller Editor is installed during the Maschine software installation procedure. For more information on this, please refer to the Controller Editor Manual available as a PDF file via the Help menu of Controller Editor.
Using Two or More Devices with Maschine
In controller mode Maschine+ can be used to control the Maschine software. However, if two or more Maschine devices are connected to your computer, only one device can be used to control the Maschine software at a time.
Tip
If you have more than one instance of the Maschine software running on your computer, you can control each instance with a different controller. Also, a device not connected to any Maschine software instance can be used in MIDI mode (for example, as a MIDI controller) simultaneously with the other controller(s). See the Controller Editor Manual for more information on MIDI mode.
You can choose which device you want to use with the Maschine software from your hardware and in the software.
Tip
For more information on the Maschine software, refer to the Maschine Software Manual available from the Native Instruments website.
You can select the desired device from the Controller menu in Maschine:
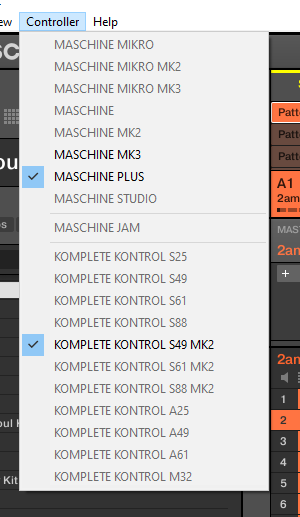 |
Click the Controller menu in the Maschine software and select the device you want to use.
Hardware
On the hardware device you want to use with the Maschine software, do the following:
Maschine+: Press SHIFT + PLUG-IN, turn the 4-D encoder to select the desired instance, and press the 4-D encoder or Button 4 to load it.
Maschine MK3 controller: Press SHIFT + PLUG-IN, turn the 4-D encoder to select the desired instance, and press the 4-D encoder or Button 4 to load it.
Maschine Studio controller: Press SHIFT + PLUG-IN, turn the jog wheel to select the desired instance, and press the jog wheel or Button 8 to load it.
Maschine (MK1 & MK2) controller: Press SHIFT + STEP, turn Knob 8 (or press Button 5/6) to select the desired instance, and press Button 8 to load it.
Maschine Mikro (MK1 & MK2) controller: Press SHIFT + F2, turn the Control encoder to select the desired instance, and press the Control encoder to load it.
Maschine Jam controller: Press SHIFT + H (INSTANCE), turn the Control encoder to select the desired instance, and press the Control encoder to load it.
Komplete Kontrol Keyboard MK1: Press INSTANCE , turn the Control encoder to select the desired instance, and press the Control encoder to load it.
Komplete Kontrol Keyboard MK2: Press INSTANCE , turn the 4-D encoder to select the desired instance, and press the 4-D encoder to load it.
Tip
For more information on Controller mode, refer to Standalone vs. Controller Mode.