Maschine+ Overview
Get familiar with the basic layout of Maschine+ and its key control elements.
This section describes the areas and control elements on your Maschine+.
Top Panel Overview
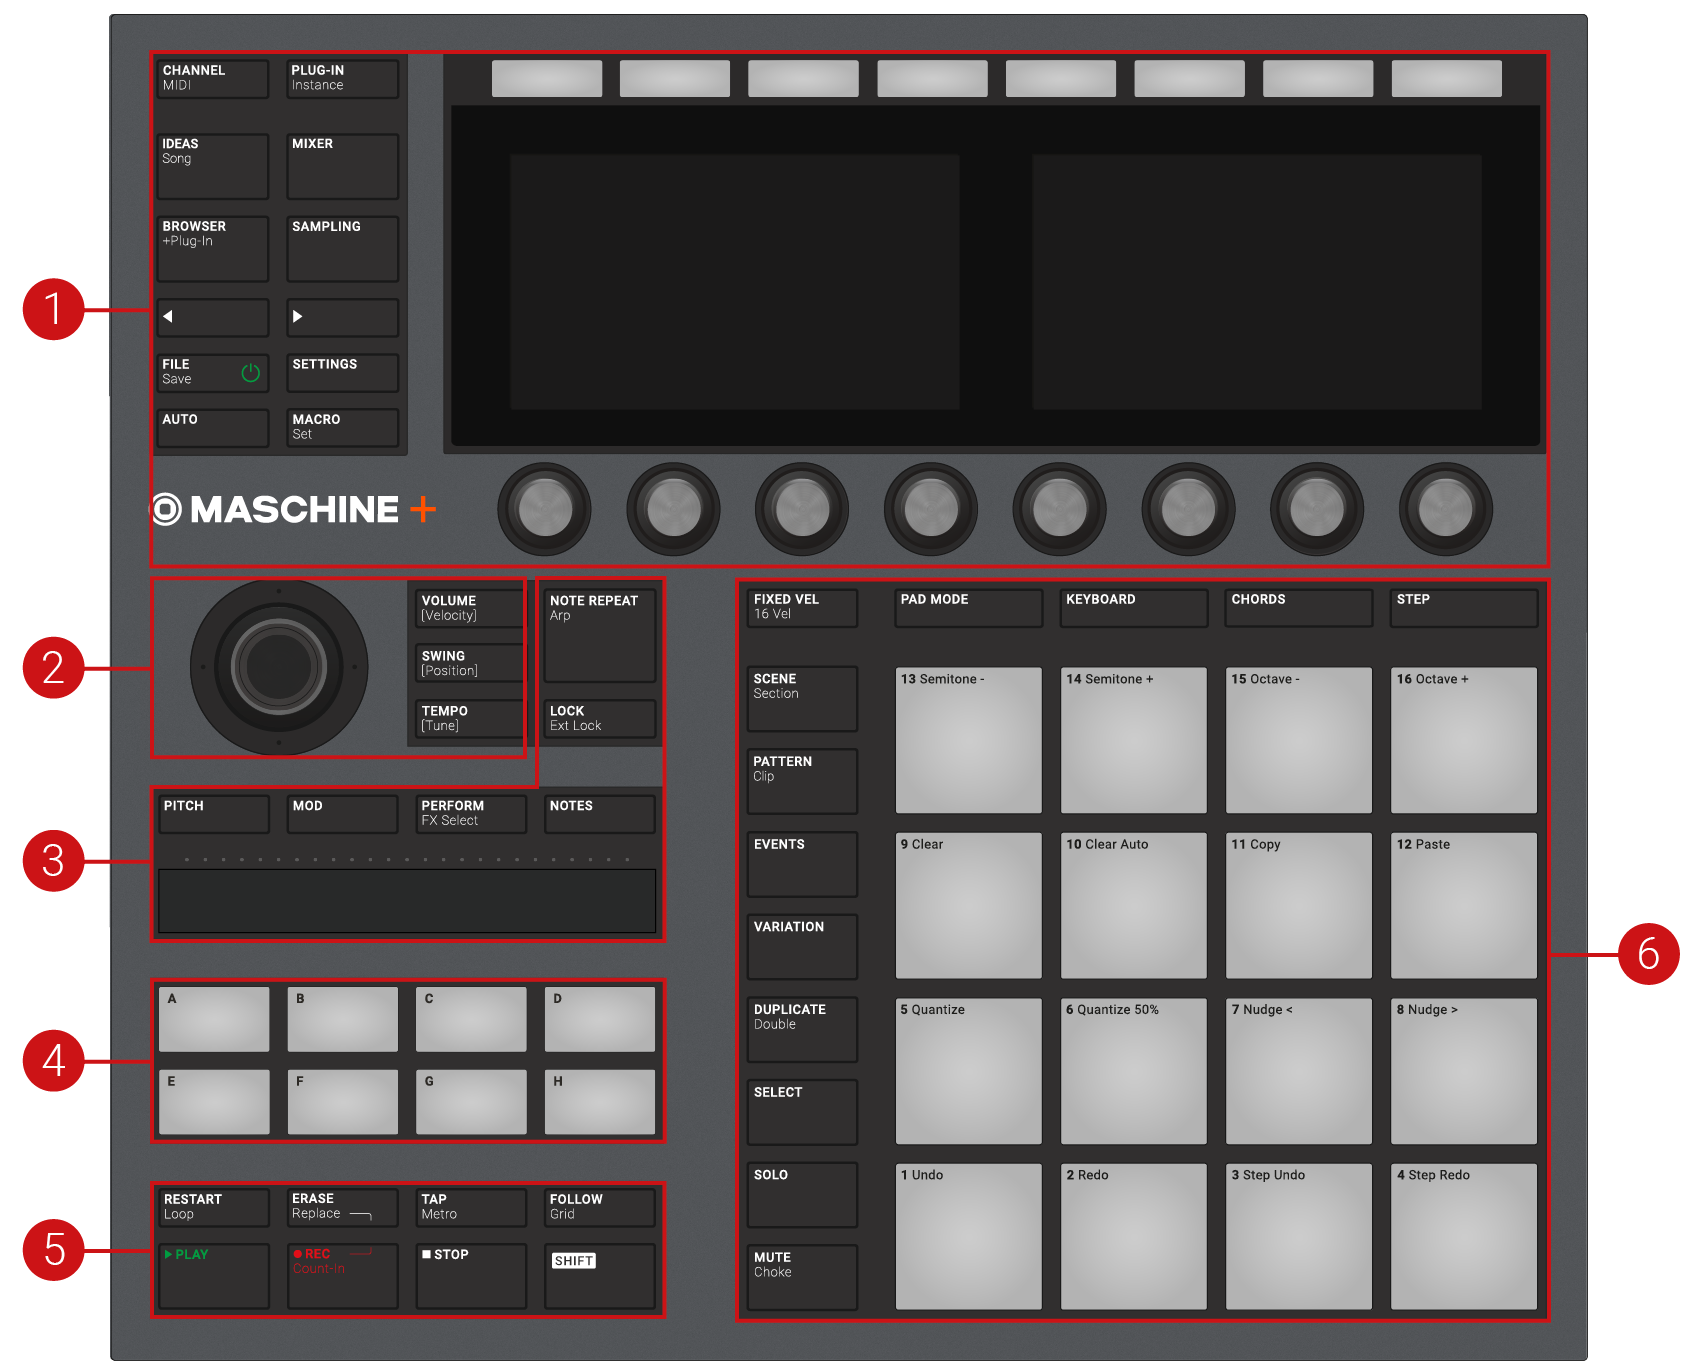
The top panel includes the following sections:
 |
Overview of the top panel and its main sections
Control section: Provides access to the Browser, Arranger, Mixer, Settings, and Sampler. Below the displays are eight knobs that let you change the parameters of the selected mode (6). For more information, refer to Control Section.
Edit section: Contains the 4-D encoder, a multifunctional element to be used in various ways. The three Quick Edit buttons nearby allow you to adjust the volume, tempo, and swing of your Sounds, Groups, and Project. In Step mode, you use them to quickly adjust the velocity, position, and tune of the selected event(s). For more information, refer to Edit Section.
Performance section: Provides you with various tools designed for live performance. The NOTE REPEAT button provides access to the Note Repeat and Arp features. The LOCK button lets you store and recall snapshots during your set. Below the Smart Strip, are the four function buttons that make up a highly versatile and intuitive tool for enriching your performance by providing performance effects, pitch bend, modulation, and the ability to strum sounds using the Notes feature. For more information, refer to Performance Section.
Group section: Provides dedicated access to each Group. A Group contains 16 Sound slots, each of which can hold one Sound. In addition to the effects applied to individual Sound, a Group can have insert effects loaded in its Plug-in slots. These affect all the Sounds in the Group. A Group can also contain an unlimited amount of Patterns organized into Pattern Banks. For more information, refer to Group Section.
Transport section: Lets you start, stop and restart playback, activate record, and tap the tempo, using dedicated buttons. Use SHIFT to access the secondary functions. For more information, refer to Group Section.
Pad section: Includes 16 pads to play your sounds and provides access to editing and commands depending on the selected mode accessed from the column of buttons to the left. Additionally, the Pad Input Mode buttons above the pads let you choose the musical function. For example, they can set the pads to trigger sounds, melodies, chords, or input events into the step sequencer. For more information, refer to Pad Section.
Control Section
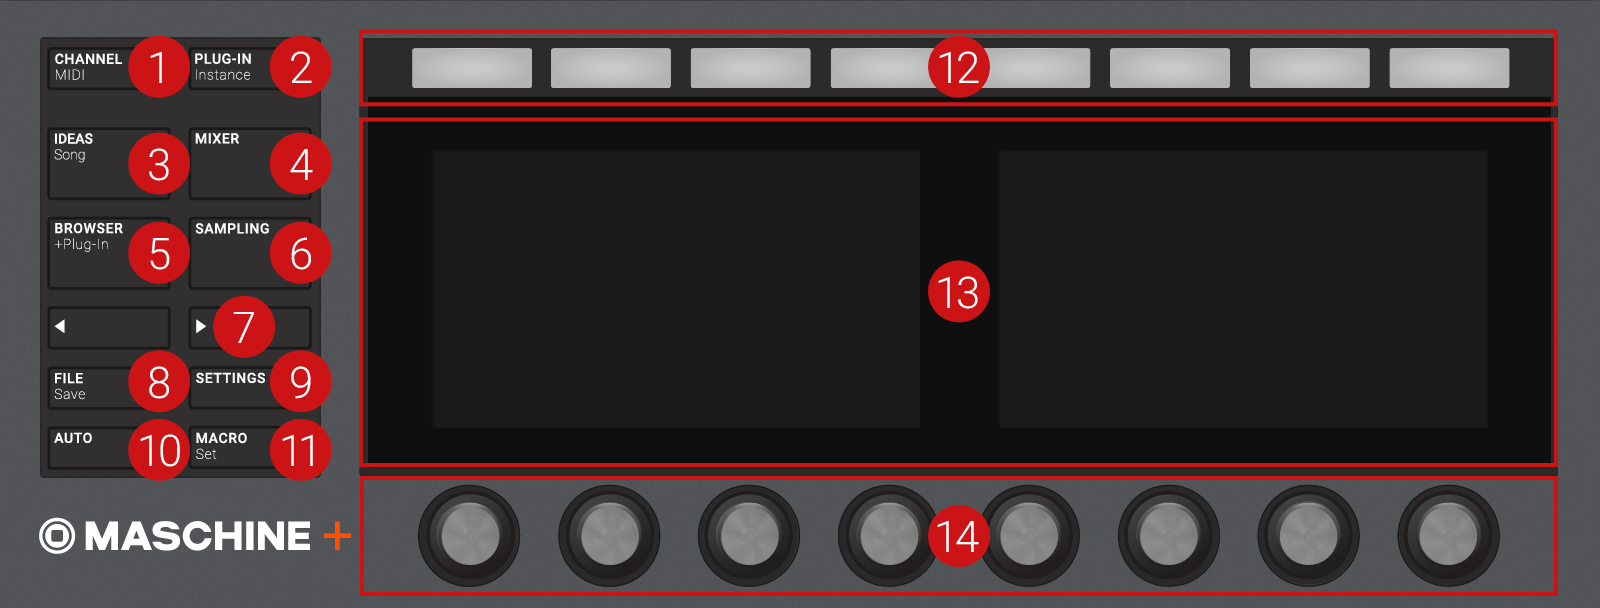
The Control section provides access to all parameters of the selected mode. It also contains dedicated buttons to access, for example, the Browser, the Arranger, the Mixer, the Sample Editor, and Settings.
The Control section
CHANNEL button: Press CHANNEL to switch to Control mode (the default mode on your device and directly display the Channel properties of the selected Sound/Group or the Master. This provides instant access to all Channel properties’ parameters via the eight Buttons and eight Knobs above and under the displays. Press SHIFT + CHANNEL (MIDI) to switch your device to MIDI mode. This mode will enable you to use Maschine as a MIDI controller. For more information, refer to the Controller Editor Manual.
PLUG-IN button: Press PLUG-IN to switch to Control mode (the default mode on your device) and directly display the Plug-in(s) loaded in the selected Sound/Group or the Master. This provides instant access to all Plug-ins’ parameters via the eight Buttons and eight Knobs above and under the displays. Press SHIFT + PLUG-IN (Instance) to enter Instance mode. In this mode you can select which instance of the Maschine plug-in you want to control from your Maschine+ if you have more than one instance open in your host.
IDEAS button: Press IDEAS at any time to get an overview of your Project. In the Ideas view you can view your Scenes and Patterns, in the Song view, you can edit your Sections, Scenes, Patterns, and Clips to create the perfect arrangement. Press IDEAS, then SHIFT and Button 1 or 2 to switch between Ideas view and Song view.
MIXER button: Press MIXER at any time to access an overview of your mix. Use the Mix view to, for example, quickly edit the level and panning of each Sound and Group. For more information, refer to Controlling Your Mix.
BROWSER button: Press the BROWSER button to access the Browser. Press SHIFT + BROWSER (+Plug-In) to access the Plug-in menu and load a Plug-in (Internal, Native Instruments, and External, as well as Instrument and Effect) in the selected Plug-in slot. For more information, refer to Using the Browser.
SAMPLING button: Press the SAMPLING button to access the Sample Editor. Here you can record and edit samples. For more information, refer to Recording Samples.
Page buttons: Press the Page buttons to switch between pages. For a clear and simple layout of the displays, parameters are grouped into different pages.
POWER / FILE button: Press the power button to switch on Maschine+ . Press and hold the power button to shutdown. The button is green in standalone mode, and orange when used in Controller mode, and flashes red when the device is in standby. The button also provides access to your files and audio export options and you can press SHIFT + FILE (Save), to quickly save a Project on the fly. For more information on the File menu, refer to ???.
SETTINGS button: Press the SETTINGS button to adjust the preferences of your Maschine+ and access MIDI, hardware, network, and mode settings. Here you can also perform system updates and access your library of content from your Native Instruments account. For more information, refer to Settings Overview.
AUTO button: Press and hold while turning any of the eight Knobs (or any combination) under the displays to record modulation for the corresponding parameter(s). Press SHIFT + AUTO to pin/unpin the Auto mode. For more information on Auto mode, refer to Recording Modulation.
MACRO button: The MACRO button provides instant access to the properties of the channel’s Macro Controls). This shortcut can greatly facilitate both reactivity and improvisation when performing live. Press SHIFT + MACRO (Set) to define new Macros in a quick and easy way, directly from your device. For more information, refer to Creating Custom Sets of Parameters with the Macro Controls.
Buttons 1–8: The eight Buttons above the displays dynamically adapt their function to the selected mode, allowing direct access to the most important functions. The action they perform is shown below each Button in the displays.
Displays: The displays are laid out to provide you with all the essential information. Press SETTINGS (9) and select Hardware to adjust the brightness.
Knobs 1–8: Each Knob dynamically controls the parameter shown in the display above it.
Edit Section
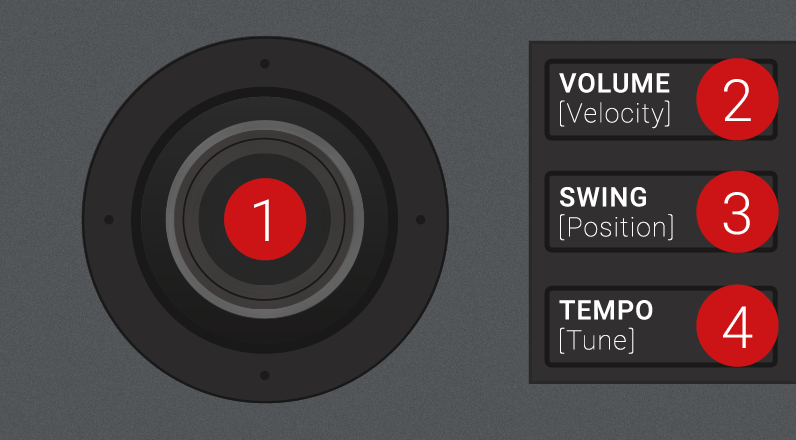
The Edit section holds the 4-D encoder, a multifunctional element to be used in various contexts. Used in combination with the 4-D encoder, the three Quick Edit buttons nearby allow you to easily adjust the volume, tempo, and swing of the Sounds, the Groups, and the Project.
 |
The Edit section
4-D encoder : The 4-Directional Push encoder combines the functionalities of a conventional joystick, of a button, and of an endless rotary encoder. Hence, it can be moved in the four directions: up, down, left, and right, as well as being pushed and rotated. These aspects make it into a highly versatile control element that can be used for navigation, for adjusting values of parameters, and for controlling instruments. Depending on the context, the four LEDs around the encoder indicate you the directions in which you can move the joystick. As well as being used in combination with the Quick Edit buttons (VOLUME, SWING, and TEMPO), press SHIFT and turn the 4-D Encoder to scroll through your Song.
VOLUME button: Enables quick adjustment of the volume via the 4-D encoder. When VOLUME is active (lit), hold a pad or a Group button and turn the 4-D encoder to change the volume level for that individual Sound or Group. Press the lit button to deactivate it and switch the encoder back to its default behavior. In Step mode, the Volume button enables you to adjust the velocity of the selected events. For more information, refer to Adjusting Volume, Swing, and Tempo.
SWING button: Enables quick adjustment of the swing via the 4-D encoder. When SWING is active (lit), hold a pad or a Group button and turn the 4-D encoder to change the swing amount for that individual Sound or Group. Press the lit button to deactivate it and switch the encoder back to its default behavior. In Step mode, the Swing button enables you to adjust the position of the selected events. For more information, refer to Adjusting Volume, Swing, and Tempo.
TEMPO button: Enables quick adjustment of the tempo via the 4-D encoder. When TEMPO is active (lit) turn the 4-D encoder to change the tempo. Press the lit button to deactivate it and switch the encoder back to its default behavior. In Step mode, the Tempo button enables you to adjust the tuning of the selected Group, or Sound. For more information, refer to Adjusting Volume, Swing, and Tempo.
Performance Section
The Performance section provides you with various tools shaped for live performance.
The Performance section
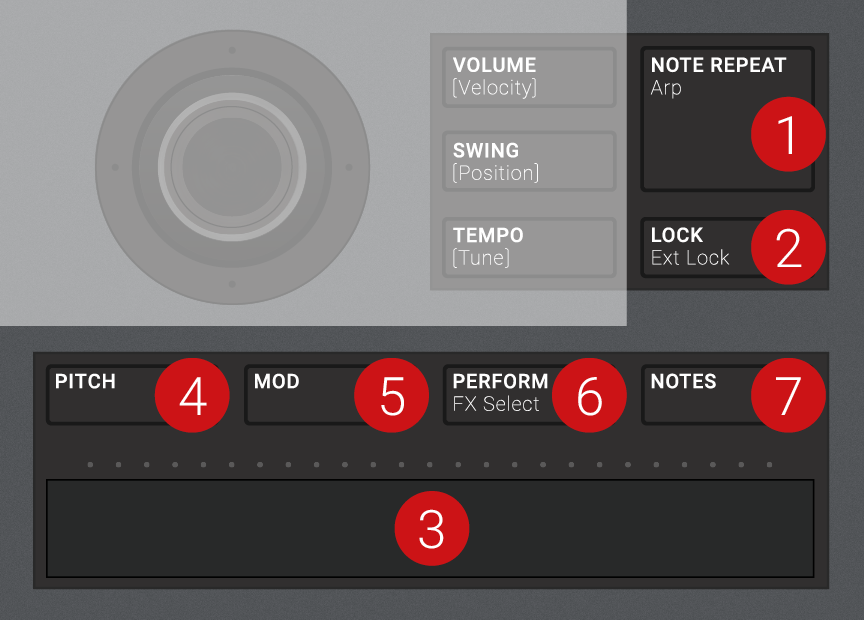
NOTE REPEAT button: Note Repeat is a convenient way to play and record beats and melodies. When your pads are in Group mode, the Note Repeat engine plays the selected Sound automatically at a given rate. While holding the NOTE REPEAT button, hold the pad you want to play: notes will be repeatedly triggered at the rate selected in the right display. With Buttons 5–8 you can select different rates while playing. You can change the rate value for the selected Button by turning Knob 3. When your pads are in Keyboard or Chord mode, NOTE REPEAT provides you instead access to the flexible and versatile Arp engine, an arpeggiator that effectively lets you play your Sounds in note sequences. The arpeggios are created according to both the pads you hold and the scale and chords you have configured. As a shortcut, when your pads are in Group mode press SHIFT + NOTE REPEAT (Arp) to directly switch your pads in Keyboard mode and activate the Arp engine. The Note Repeat / Arp mode can be pinned: Press NOTE REPEAT + Button 1 to pin/unpin the mode. For more information, refer to Using Note Repeat.
LOCK button: Press LOCK at any time to create a snapshot of all modulable parameters in your Project. Subsequently, change any of these parameters during your performance or studio session, then press the dim-lit LOCK button again to recall the snapshot with the original parameter values. Press SHIFT + LOCK (Ext Lock) to access Extended Lock mode and store/recall up to 64 snapshots using your pads, update and organize them into banks, and configure morphing transitions between them. Lock is a powerful tool for extensive modulations, but also very useful to compare mixes, or to switch up snapshots during a live performance. For more information, refer to Using Lock Snapshots.
Smart Strip : The Smart Strip puts control of several parameters at your fingertips: Depending on the Strip Mode button selected above the Smart Strip, use it to apply pitch bend or modulation to the Sound(s) played on the pads, apply and tweak Perform FX in real-time, or play Sounds by strumming on the strip, even with two fingers. Above the Smart Strip, a LED bar indicates the current value or note set on the strip. When no Strip Mode button is active, the Smart Strip LEDs display the playhead position for the selected Pattern or Clip in Ideas view, or the playhead position in the arrangement in Song view.
PITCH Enable this button and use the Smart Strip to send MIDI Pitchbend data to the selected Sound. While doing this, press REC in the Transport section to record your actions as MIDI automation into your Pattern.
MOD Enable this button and use the Smart Strip to send MIDI Modulation data to the selected Sound. While doing this, press REC in the Transport section to record your actions as MIDI automation into your Pattern.
PERFORM Enable this button and use the Smart Strip to control the Perform FX (if any) for the selected Group. Press SHIFT + PERFORM (FX Select) to quickly select and load a Perform FX for that Group while enabling its control from the Smart Strip. For more information, refer to Using Performance Effects.
NOTES Enable this button and use the Smart Strip to play whatever is currently loaded on the pads: Sounds, notes, or chords, depending on the current Pad Input mode. If you hold certain pads, only these pads are triggered by the strip, otherwise, all pads can be triggered along the strip. For example, with pads in Keyboard mode, you can touch the strip for single notes, slide your finger for progressive note strums, use two fingers for instant jumps between notes, but that’s not all: You can use the Smart Strip in combination with the Note Repeat, Arp, and Chord engines for endless creative possibilities. For more information, refer to Playing Notes with Smart Strips.
Group Section
The eight dedicated Group buttons , labeled A to H, provide instant access to the Groups.
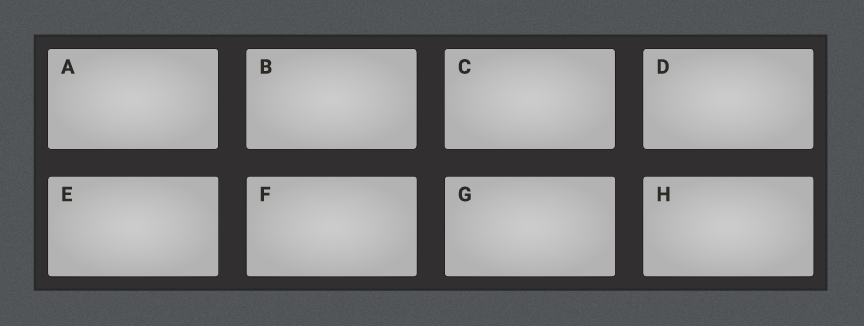 |
The Group buttons
To select the Group you want to work in, press any Group button. Once a Group is selected, its button lights up in the assigned color, and its Sounds are available on the pads: whether one Sound on each pad (pads in Group mode) or different notes for one particular Sound (pads in Keyboard mode). The other colored Group buttons are dim-lit to indicate they can be selected. Press the dim white button to create a new Group in that slot. Buttons remain uncolored and unlit for the other empty Group slots.
If you want to use more than eight Groups in your Project, hold SHIFT and press the Group buttons to select and access other banks of Groups.
These buttons are also used to solo and mute Groups on the fly when SOLO or MUTE buttons are held; this is great for jamming out your Project and performing live.
If the VOLUME, TEMPO , or SWING button is active in the Edit section above (refer to Edit Section), hold a Group button and turn the 4-D encoder to change the volume, tune or swing for that individual Group.
Transport Section
The Transport section holds various transport tools, and the SHIFT button can be used to access a secondary set of features.
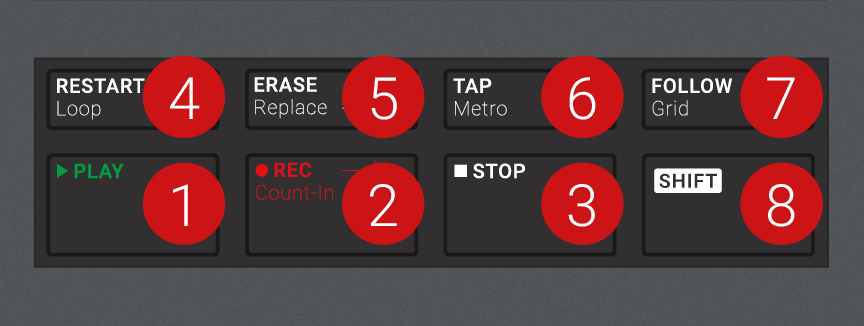 |
The Transport section
PLAY button: Press PLAY to activate playback. Press PLAY a second time to stop playback.
REC button: When playback is on, press REC to begin recording. Or when playback is off, press SHIFT + REC to begin recording with the Count-in. Press REC a second time to stop recording. Hold the REC button to access Pattern Preset mode. This allows you to select the desired Pattern Length before recording new Patterns.
RESTART button: Press the RESTART button at any time to restart from the beginning of the current loop range. Used together with SHIFT, the RESTART button enables you to easily adjust the Loop in many ways: Press SHIFT + RESTART to enable/disable looping. Hold SHIFT + RESTART and turn the 4-D encoder to move the entire Loop along the Timeline, or “push & turn” the encoder to adjust only the endpoint of the Loop. While you hold SHIFT + RESTART, the displays provide another useful set of looping controls.
ERASE button: During playback, hold ERASE and hold any number of pads or Group buttons to erase the events for the corresponding Sounds or Groups on the fly as the playback goes on. Use the shortcut ERASE + EVENTS + pad to quickly erase all events triggered by that pad in your Pattern. If you have automated a parameter, hold ERASE and turn the corresponding Knob under the displays to erase the automation of this parameter. Press SHIFT + ERASE + any pad or Group button to remove the Sound or Group in that slot.
TAP button: Repeatedly tap the TAP button to set the desired tempo. Press SHIFT + TAP to quickly enable/disable the metronome.
FOLLOW button: If you activate FOLLOW, time-related displays (like the Pattern Editor) will show the next part as the playhead goes beyond the current part so that you always see where the playhead is. Press SHIFT + FOLLOW to open Grid mode and adjust the grids to define how various Maschine objects can be moved or resized: Perform grid (for transitions between Sections), Arrange grid (for Pattern length and Section length), Step grid (for events), and Nudge grid (for events as well).
SHIFT button: While the essential features are accessible through dedicated buttons, many shortcuts are available by holding the SHIFT button and pressing pads 1–16 or several other buttons. You can also use the SHIFT button to change parameters in finer increments when entering values with the Knobs or use it to bypass, remove, and move Plug-ins from within the Plug-in List.
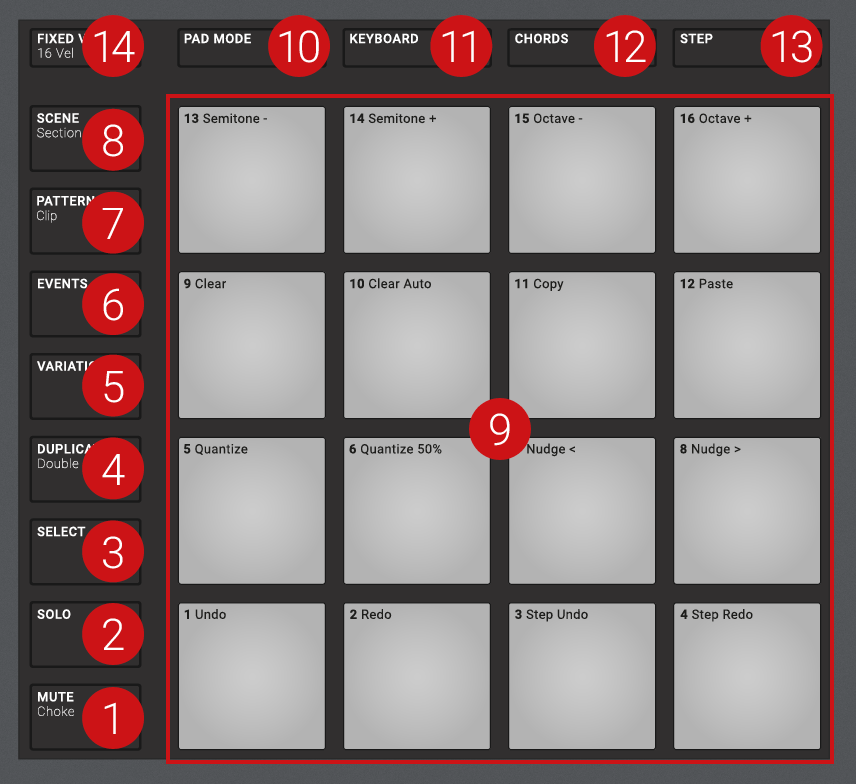
Pad Section
The Pad section includes numerous features. Use the 16 pads to play your Sounds. Above the pads, the Pad Input Mode buttons let you choose how the pads will react to your hits. For example, you can trigger all Sounds in your Group, play different notes of a single Sound, specific chords of that Sound, or create and edit events in the step sequencer.
Besides playing Sounds, the pads provide access to many editing and selection commands depending on the mode selected from the column of Mode buttons left of the pads.
Additionally, when you hold SHIFT , the pads provide you with useful shortcuts and commands for your everyday work with Maschine+.
 |
The Pad section
Mode Buttons and the Pads
The Mode buttons (1) to (8) are located in the column left of the pads. They switch the pads and your device to a series of modes dedicated to specific workflows:
Tip
All the Mode buttons left of the pads can be pinned: Press the desired button + Button 1 (above the left display) to pin/unpin the corresponding mode. For more information, refer to Modes and Mode Pinning.
MUTE button: Enters Mute mode. You can instantly mute Sounds and Groups in this mode by pressing the corresponding pads and Group buttons. This is good for getting on top of your production when you have many sounds playing and especially useful for performing live. Muted Sounds/Groups are represented by half-lit pads, while fully lit pads represent audible Sounds/Groups.
SOLO button: Enters Solo mode. In this mode, you can instantly solo any Sound or Group (equals muting all other Sounds/Groups) by pressing its pad or Group button. This is useful when you want to tweak a Sound or for performing live. The soloed. Sound or Group pad is fully lit, while all other pads (representing the muted Sounds/Groups) are dimmed.
SELECT button: Enters Select mode. This mode allows you to select a Sound without hearing it or select specific events of a particular Sound, which is helpful for limiting quantization, nudging notes, and other operations specific to the selected events. Press SHIFT + SELECT + pad to quickly select all events triggered by that pad in your Pattern or notes at that pitch when in Keyboard mode. Press ERASE + SELECT + pad to quickly erase all events triggered by that pad in your Pattern or notes at that pitch when in Keyboard mode.
DUPLICATE button: Enters Duplicate mode. Use Duplicate mode to swiftly create another instance of any Sound, Pattern, Group, or Scene. This can be useful for creating variations or trying out something new while preserving the current state of your work. For example, press SHIFT +DUPLICATE to quickly double the current Pattern.
VARIATION button: Enters Variation mode. This lets you introduce “happy accidents” in your Patterns. The Variation mode provides you with two features: Humanize adds natural rhythmic fluctuations to programmed sequences. In contrast, Random provides randomly generated variations of your beats and melodies based on adjustable settings. Press SHIFT + VARIATION to enter Navigate mode. In Navigate mode, you can use the pads and the displays to zoom in and out or scroll through Patterns and Scenes. Furthermore, the Buttons above the displays provide quick access to Channel properties and Plug-in parameters.
EVENTS button: Enters Events mode. Here you can select particular events in your Pattern or Clips and modify their position, pitch (key), Velocity, and length. Press EVENTS + pad to quickly select all events triggered by that pad.
PATTERN button: Enters Pattern mode. Pattern mode allows you to manage all Patterns in the selected Group: create new empty Patterns or duplicates of existing ones, switch between different Patterns, etc. Dimmed pads represent existing Patterns, the fully lit pad represents the selected Pattern. Press SHIFT + PATTERN to access Clip mode. For more information, refer to Recording Patterns and Working with Patterns and Clips.
SCENE button: Enters Scene mode (in Ideas view) or Section mode (in Song view). Use Scene mode to access your Scenes and Section mode to arrange your song.
Pad 1–16 : The sixteen velocity-sensitive pads can be used to play and select your Sounds. Their behavior can be configured by the Pad Input Mode buttons (10) to (14) described below. The pads also have many functions depending on the mode that is currently selected.
PAD MODE button: Press PAD MODE to switch the pads to Group mode (the default mode). In Group mode, each pad represents one Sound of the Group. Group mode is typically used for drum kits. You can adjust various parameters of the mode via the displays and the surrounding Buttons and Knobs. The right display shows you the Sound triggered by each pad. You can use Buttons 5 to 8 to adjust the Base Key, which sets the key (pitch) triggered for each Sound in the Group, and Knobs 1 to 4 under the left display to set the Choke and Link group settings. Please refer to the Maschine Manual for more information on these features. By pressing PAD MODE again, you can hide its parameters from the displays and return to your previous workflow while keeping Group mode activated on your pads; as a reminder, the PAD MODE button will stay lit as long as your pads are in Group mode. Press SHIFT + PAD MODE to switch your pads to Group mode without changing the displays to the mode parameters.
KEYBOARD button: Press KEYBOARD to switch the pads to Keyboard mode. In Keyboard mode, the pads represent 16 pitches of the chromatic scale for the selected Sound, ascending from the selected Root Note; this way, you can play the selected Sound like a melodic instrument. The right display shows you the pitch triggered by each pad. You can use Buttons 5 to 8 to adjust the Root Note (triggered by pad 1) and Knobs 1 to 4 to configure the Scale engine and limit the available pitches to a particular scale. By pressing KEYBOARD again, you can hide its parameters from the displays and return to your previous workflow while keeping Keyboard mode activated on your pads; as a reminder, the KEYBOARD button will stay lit as long as your pads are in Keyboard mode. Press SHIFT + KEYBOARD to switch your pads to Keyboard mode without changing the displays to the mode parameters.
CHORDS button: Press CHORDS to switch the pads to Chords mode. The Chords mode is similar to the Keyboard mode (see the KEYBOARD button (11) above) with the difference that each pad triggers a whole chord instead of a single note. You can use Knob 3 and 4 to configure the chord you want to play. By pressing CHORDS again, you can hide its parameters from the displays and return to your previous workflow while keeping Chords mode activated on your pads; as a reminder, the CHORDS button will stay lit as long as your pads are in Chords mode. Press SHIFT + CHORDS to switch your pads to Chords mode without changing the displays to the mode parameters.
STEP button: Press STEP to switch the pads to Step mode. Step mode turns your Maschine+ into a full-featured step sequencer. In this mode, each pad represents one step of the selected Step Grid resolution. During playback, a running light through the pads represents the current position of the step sequencer. Pressing the pads creates notes on the corresponding steps (causing them to light up) or removes them. By pressing STEP again, you can hide its parameters from the displays and return to your previous workflow while keeping Step mode activated on your pads; as a reminder, the STEP button will stay lit as long as your pads are in Step mode. Press SHIFT + STEP to switch your pads to Step mode without switching the displays to the mode parameters.
FIXED VEL button: Press FIXED VEL to enable/disable the Fixed Velocity option. By default, the pads are sensitive to Velocity: The harder you hit them, the louder the Sound. With Fixed Velocity activated, your pads play at the same volume no matter how hard you hit them. For example, this can be very handy when you are triggering slices of a loop from your pads and want to have all slices at the same volume. Fixed Velocity is available in all four pad input modes: Group, Keyboard, Chords, and Step. Press SHIFT + FIXED VEL to activate/deactivate the 16 Velocities option. In this mode, your pads play the same note (pitch) of the focused Sound but with 16 different velocity values. This can be useful to play, or program complex drum fills. The right display indicates the velocity values for each pad. The Base Key defines the pitch of the played note. The 16 Velocities option is only available in Group mode, for instance, when PAD MODE is activated.
Side Panel Overview
The left side panel of Maschine+ contains the SD memory card slot.
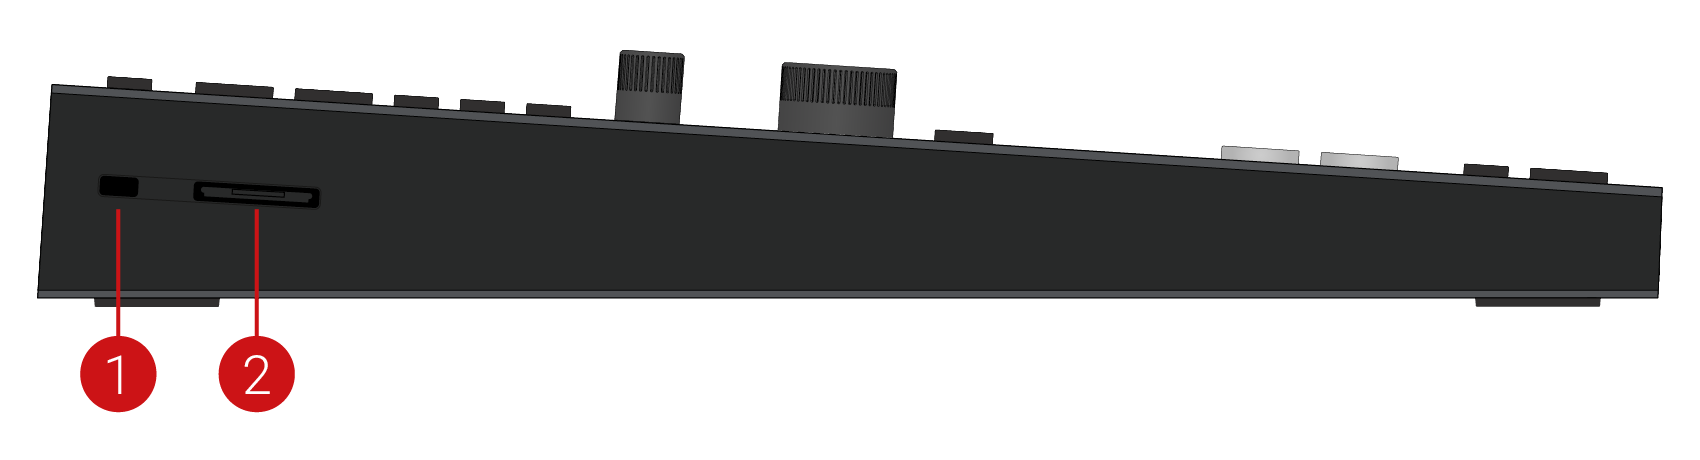
Left side panel view
Kensington Lock slot: Provides the means to attach a Kensington lock. Use this to sure your Maschine+.
SD Memory Card slot: Lets you insert an SD memory card to save files such as Projects and samples. In System Storage mode, these files can be transferred to your computer. For more information, refer to Opening Files from Your SD Card and Transferring Files to the SD Card.
Caution
Do not remove the SD memory card while saving or loading files as this could result in data loss or corruption of your SD card. Always eject the card from Maschine+. For more information, refer to Using the File Menu.
Caution
When using Storage mode to transfer files between Maschine+ and your computer, always eject the SD card drive from your computer before you disconnect Storage mode. Failure to do so could result in data loss and corruption of your SD card. For more information on Storage mode, and transferring files between your computer and Maschine+, refer to Transferring Files to the SD Card.
Rear Panel Overview
The rear panel of Maschine+ holds the various hardware knobs, and sockets of the integrated audio interface, power supply, and USB sockets.
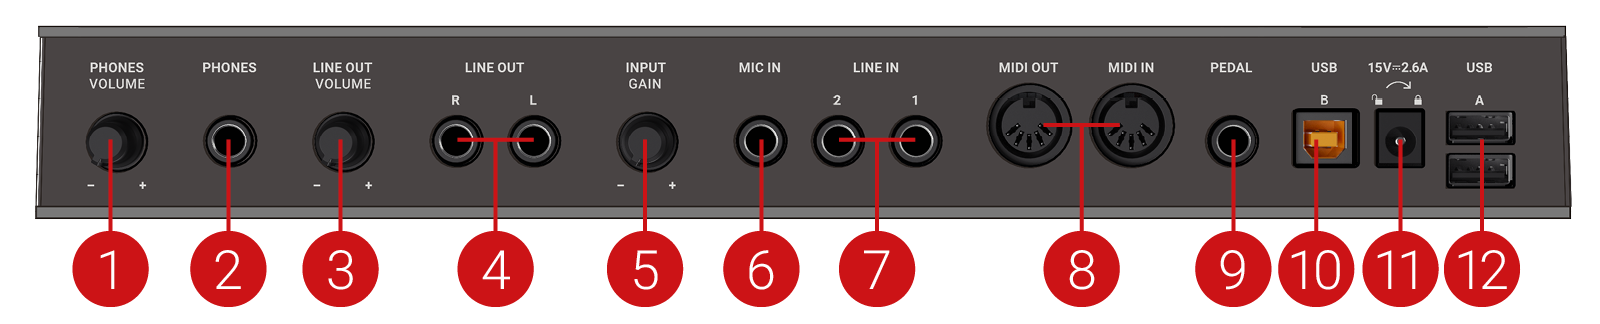
The rear panel
PHONES VOLUME knob: Adjusts the level of the PHONES output (2).
PHONES socket: Stereo output socket for plugging in headphones with a 1/4" TRS jack. In your music software, this stereo output appears as a pair of mono outputs labeled 3: Headphone Left and 4: Headphone Right. Turn the PHONES VOLUME knob (1) to adjust their output level.
LINE OUT VOLUME knob: Adjusts the level of the LINE OUT 1 and 2 outputs (4).
LINE OUT L and R sockets: These 1/4" TRS sockets are the main outputs of the audio interface. In your music software, they will appear as 1: Main Left and 2: Main Right. Turn the LINE OUT VOLUME knob (3) to adjust their output level.
MIC IN GAIN knob: Adjusts the level of the MIC IN input (6). Use this knob to raise the microphone signal until it reaches a level high enough for your music application without clipping. If the microphone signal sounds distorted, slowly turn this knob down until the artifacts have disappeared.
MIC IN socket: Balanced input socket for plugging in dynamic microphones with a 1/4" TRS jack. When a microphone is plugged into the socket, the LINE IN 1 and 2 sockets (7) are deactivated.
LINE IN 1 and 2 sockets: Pair of balanced 1/4" TRS input sockets accepting any line-level signal (for example,., a synthesizer or mixer output). In your music software they will appear as 1: Input Left and 2: Input Right. If a microphone is plugged in the MIC IN socket (6), the LINE IN 1 and 2 sockets are deactivated.
MIDI IN and OUT sockets: The MIDI input (IN) and output (OUT) sockets let you integrate Maschine+ into your MIDI setup. For example, you can connect a MIDI keyboard to the MIDI IN socket and play melodic Sounds via the keyboard. Connect your favorite hardware synth to the MIDI OUT socket and trigger its sounds from within your Maschine Project. You can synchronize Maschine with other tempo-related instruments by sending or receiving a MIDI Clock signal. Please refer to the Manual to discover all details on the various MIDI possibilities and how to set them up.
PEDAL socket: Allows you to use a footswitch to control the transport in Maschine. Note that this is a stereo socket, allowing you to plug in a double footswitch and control the PLAY and the REC buttons in Maschine. The PEDAL socket can also be configured to accept continuous pedals (“expression pedals”). For more details, please refer to the Maschine Manual available from the Help menu.
USB B socket: Connects Maschine+ to your computer via USB 2.0.
Power Supply socket: Supplies power to your Maschine+ when used in standalone mode. Connect the included power supply to the socket, then turn it to the right to lock it into place. Turn it to the right, and pull it out of the socket to remove it. It is not necessary to use the power supply when Maschine+ is connected to a computer via USB and in Controller mode. For more information on Controller mode, refer to Standalone vs. Controller Mode.
Note
Always use the power supply that was included with your Maschine+. Using another type of power supply could result in performance issues.
USB A sockets: Connects peripheral devices such as USB-activated keyboards, external audio devices, and external drives.