Using the Browser
The Browser is the central access point for all files of Maschine+. Learn about its filters, how to load and save content, and how to access user content.
The Browser provides access to all Maschine files: Projects, Groups, Sounds, presets for Instrument and Effect Plug-ins, Loops, and One-shots. Using the Maschine software, each of these can be stored, tagged, and categorized in a way that provides you with easy access to all of them. Maschine’s factory library is already completely tagged, as well as the factory libraries of all Native Instruments products installed on your Maschine+.
Once Maschine+ is up and running, your first stop is the Browser. You can access the extensive Library using the BROWSER button and navigate it using the 4D-encoder, the eight touch-sensitive knobs, and buttons above the displays.
The sections within this chapter cover the generic use of the Browser when using Maschine+. For detailed information on using the Browser with the Maschine software in Controller mode, please read the Maschine Software Manual.
Note
When using Maschine+ in Controller mode, the Browser will respect the following settings made in the Maschine Software such as; Prehear (audition), Preload, and the loading of Patterns with Groups. Please refer to the Maschine Software to configure these settings.
Browsing the Library
To access the Browser:
Press BROWSER to enter or leave the Browser.
The Browser on Maschine+ .
On the displays, the Browser is organized as follows:
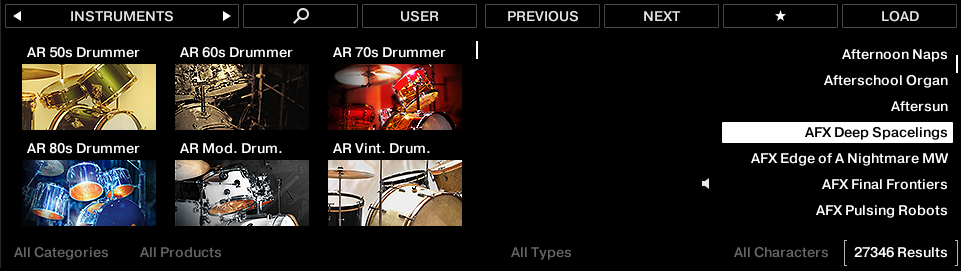
The left display enables you to narrow your search by selecting the file type, the content type (factory or user files), as well as a product category, a product, a bank, and a sub-bank.
The right display allows you to further refine your search by selecting the desired Type (and possibly Character) tags. It also shows you the corresponding result list. Turn the 4-D encoder or Knob 8 to select any entry from the list, and press the 4-D encoder or Button 8 (LOAD) to load it.
The above workflows are described in detail in the following sections. In addition, you will find most of the browsing aids available in the Maschine software also available here on Maschine+ , as described in section Additional Browsing Tools.
Browsing Your Library Using the 4-D Encoder
Each parameter (visible at the bottom of the displays) can be adjusted by the knob directly underneath. This is also true in Browse mode.
Browse mode additionally provides an alternate, unified method for adjusting any field appearing at the bottom of the displays: using the 4-D encoder.
Move the 4-D encoder left/right to select a field. The selected field is indicated by thin brackets:

Turn the 4-D encoder to change the value in the selected field.
Move the 4-D encoder right to select the Results list.
Turn the 4-D encoder to select an item from the Results list.
Press the 4-D encoder to load your selection from the Results list.
Loading Files from the Browser
To load a file using Maschine+:
Press BROWSER to display the Browser.
Press Button 1 or 2 to select a file type, from left to right: Projects, Groups, Sounds, Instrument and Effect Plug-ins presets, Loops and One-Shots.
Turn Knob 8 to select and items from the results list.
Press Button 8 to load the selected file.
The selected file is loaded.
With the Browser still open, you can continue to load the next or previous file.
To load the next or previous file:
Press Button 5 or 6 to load the next or previous file.
The next/previous file is loaded.
Tip
Press SHIFT and turn the Knob 8 to quickly scroll through the results list by ten items at a time.
Selecting a Product Category, a Product, a Bank, and a Sub-Bank
To filter your selection in Browse mode:
Turn Knob 1–4 under the left display to select a product category (if any), a particular product, a bank of that product (if any), and a sub-bank in that bank (if any), respectively. Turn a Knob fully left to remove any particular selection at this level (i.e. to select all items at this level).
Alternatively, move the 4-D encoder left or right to select a field and then turn it to adjust the value.
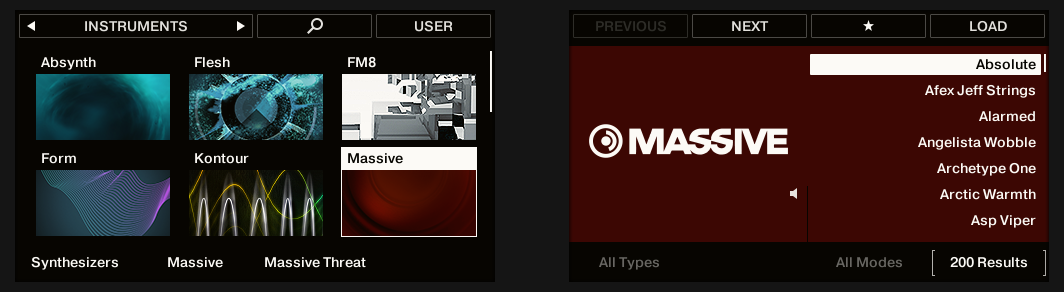
Selecting a product category, a product, a bank, and a sub-bank
Additionally, the left display shows you the name and icon of all products corresponding to the selected product category (Knob 1). The selected product (Knob 2) is highlighted.
If there are more than six products available, a scroll bar appears on the right of the left display. The display automatically scrolls to show the selected product. You can also use the Page buttons to just see the other products available:
Press the Page buttons to scroll the products on the left display without changing the selection.
Alternatively, move the 4-D encoder up or down to scroll through the products in the left display without changing the selection.
List and Tag Overlays in the Browser
When browsing your Library, the touch-sensitive Knobs 1 to 8 provide you with handy browsing aids.
List Overlays for Product Category, Bank, and Sub-Bank
As you select a product category, bank, or sub-bank via Knobs 1 to 3 (under the left display), the corresponding list overlay appears above. In each list, the selected item is highlighted.

The left display, when browsing Effects: Selecting the Creative Effects category via Knob 1, the 2.0 Library bank via Knob 3 (in the middle), and all sub-banks via Knob 4 (on the right).
Tip
These lists include an All… entry at the top allowing you to deselect any selected item. Turn the corresponding Knob at full left to select this entry.
Tag Overlays for Type, Sub-Type, and Mode
As you select a Type, Sub-Type(s), and/or Mode via Knobs 5 to 7 under the right display, a tag cloud appears above. It shows all tags for which items have been found in the Library. In this cloud, the selected tag is highlighted.
The Type and Sub-Type tags share the same tag cloud, while the Mode tag has its own cloud.
The highlighted tag indicates which one is currently displayed.
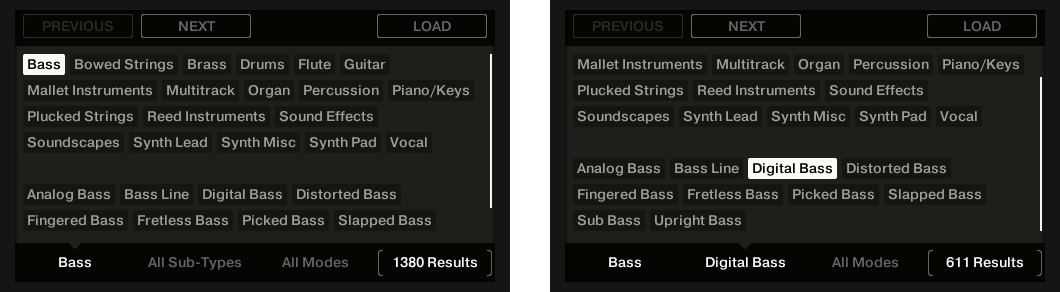
The right display, here when browsing Instruments: Selecting the Bass Type via Knob 5 (left picture) and the Digital Bass Sub-Type via Knob 6 (on the right).
Accessing User Content
The Browser enables you to filter and load content from your SD Card and external storage devices.
Your sample files (loops or one-shots) can typically be found under the product tile reflecting the name of the external drive they are stored on. All of your other files can be found under the Maschine product tile.
To access User content:
Press BROWSER.
Press Button 4 (USER).
Access to User content is available when Button 4 is lit and USER label is highlighted. Otherwise, you are viewing factory content.
Press Button 1 or 2 to select a file type (PROJECTS, GROUPS, SOUNDS, INSTRUMENTS, EFFECTS, LOOPS, or ONE-SHOTS).
If you are loading LOOPS or ONE-SHOTS (samples), turn Knob 2 to select the name of your SD card or external storage device.
Select the file you want to load by turning the 4-D encoder. If you are loading samples, you can activate or deactivate audition by pressing SHIFT + Button 8 (PREHEAR).
Press Button 8 (LOAD) or press the 4-D encoder to load the selected file.
Note
Samples (loops and one-shots) contained on external storage devices are only available when selecting the LOOPS and ONE-SHOTS file types. When these file types are selected you can then choose the storage device containing your samples using Knob 2. For information using storage devices, refer to Working with Storage Devices.
Tip
If new content from your SD card or external drives does not automatically appear in the Browser, press SHIFT + Button 1 (RESCAN) to scan for new content.
To learn more about transferring user content, for example, Projects, or samples, refer to Transferring Files to the SD Card and Opening Files from Your SD Card.
Filtering Favorites
Favorites in the Browser enable you to quickly view and browse your most frequently used items. This includes Projects, Groups, Sounds, Instrument presets, Effect presets, and Samples (Loops and One-shots). Any of these items can be assigned as a Favorite.
Favorites serve as an additional filter in the Browser. When activated, the results list will only show items that have been assigned as a Favorite and also match all other selected filters, including the search query entered into the search field. Favorites are available for both the Factory content and User content.
To filter by Favorites:
Press Browser.
Press Button 1 or 2 to select a file type (PROJECTS, GROUPS, SOUNDS, INSTRUMENTS, EFFECTS, LOOPS, or ONE-SHOTS).
Press Button 7.
The Results list on the right will now show only the files you have marked as favorites. Press Button 7 again to deselect the Favorites filter.
Adding an Item to the Favorites List
Items can be added to the Favorites list from the Browser search results.
To add an item to the Favorites list:
Press BROWSER.
Press Button 1 or 2 to select a file type (PROJECTS, GROUPS, SOUNDS, INSTRUMENTS, EFFECTS, LOOPS, or ONE-SHOTS).
Press Button 4 (USER) if the content you want to add is in your User folder.
Turn Knob 8 to select a file in the search results list.
Press SHIFT and Button 7 (SET★) to add the selected item to the Favorites list.
The item is added to the Favorites list as indicated by the highlighted icon next to its name.
Tip
To view your Favorite items for the selected file type, press Button 7 (★).
Removing an Item from the Favorites List
Items can be removed from the Favorites list.
To remove an item to the Favorites list:
Press BROWSER.
To see all Favourites, press Button 7 (★) to active the Favorites filter.
Turn Knob 8 to select an entry in the Results list.
Press SHIFT and press Button 7 (SET★) to remove the corresponding item from the Favorites list.
The item is removed from the Favorites list, and the Favorites icon next to its name is removed.
Using Quick Browse
Quick Browse is a feature that allows you to quickly recall a search query you performed to find a given file. Let’s say you have loaded a kick Sample after browsing the Library, then loaded a snare Sample to another Sound slot. You now realize you are not satisfied with that kick Sample, but you heard a nice kick Sample just before you chose the current one. Normally you would now have to try to remember the name or the tags you used to find it or browse all kick Samples (given that the Maschine Library already has several hundreds of kick Samples, this may take a considerable amount of time). With Quick Browse you can restore the query with just one click.
Quick Browse from Control Mode
You can easily access Quick Browse for Samples and Plug-in presets directly from Control mode:
Press PLUG-IN to enter Control mode and access your Plug-ins.
Navigate to the channel (Master, Group, or Sound) hosting the Plug-in for which you want to recall the search query.
In this channel, select the desired Plug-in (for a Sample, select the Sampler Plug-in in which it is loaded).
Press Button 8.
Button 8 is illuminated, and the result list that was used to find this file directly appears in the right part of the right display:
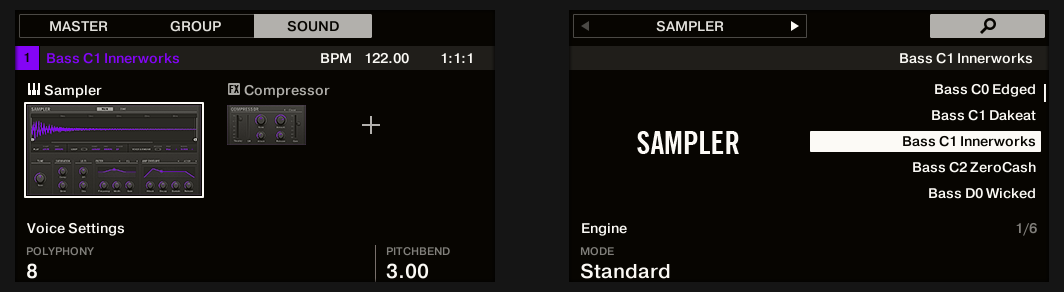
Turn the 4-D encoder to select the desired Plug-in preset or Sample from the list, and press the 4-D encoder to load it.
The selected file replaces the previous file in your Project.
Quick Browse from the Browse Mode
You can also access Quick Browse from the Browser. This notably allows you to perform Quick Browse on Sounds and Groups as well:
Press PLUG-IN to enter Control mode.
If you want to trigger Quick Browse for a Group or a Sound, set the focus to this Group or Sound.
If you want to trigger Quick Browse for a Sample or a Plug-in preset, additionally select the desired Plug-in (for a Sample, select the Sampler Plug-in in which it is loaded).
Once you have focused/selected the desired file, switch to Browse mode to continue:
Press BROWSER to enter the Browser.
Press Button 1 and 2 to select the file type corresponding to the file you have focused/selected above.
Press Button 3 (showing a magnifying glass) to trigger the Quick Browse function. The Browser automatically recalls the search query used when you loaded that file.
Turn the 4-D encoder or Knob 8 to select the desired Plug-in preset or Sample from the list, and press the 4-D encoder or Button 8 (LOAD) to load it.
The selected file replaces the previous file in your Project.
Additional Browsing Tools
Maschine+ provides various useful tools that will help you quickly find and check the files you need. Some of the tools are available only for specific file types. The next sections describe each of these tools.
Loading the Selected Files Automatically
Auditioning Instrument Presets
The Prehear function enables you to audition Instrument presets before you load them.
Auditioning Samples
The Prehear function enables you to audition samples before you load them.
Loading Groups with Patterns
Every Group from the factory library includes a set of Patterns that illustrate possible uses of that Group. Similarly, when you save a Group of your own to the Library for later use, all Patterns you have created for that Group will be saved with the Group.
When browsing Groups, you can choose to load each Group with or without its Patterns. This is done by selecting + PATTERNS:
+ PATTERNS button activated: Groups will be loaded together with their Patterns. This allows you to use the Patterns you have saved with the Groups. Upon loading, all Patterns of the focused Group will be replaced.
+ PATTERNS button deactivated: Groups will be loaded without their Patterns. This enables you to load another set of Sounds while keeping your current Patterns. Notably, this can be very useful to try another drum kit with your current Patterns.
Notice
+PATTERNS is only available when browsing Groups.
Loading Groups with Routing
When the file type Groups is selected, the +ROUTING button. When the +ROUTING button is activated the audio and MIDI routings stored in the Group are also loaded, potentially overwriting previous routings in the selected Group. When the +ROUTING button is off, any audio and MIDI routings saved in the Group will not be loaded, thus preserving any existing routings in the active Group.