Sampling and Sample Mapping
Sampling is an integral part of the Maschine environment. This section discusses Maschine+'s powerful Sample editor, from recording to slicing and layering.
Maschine+ enables you to record internal or external audio signals without even having to stop the sequencer. This is a useful feature if you want to record your own samples or rearrange loops that you have created yourself. You can apply various types of destructive processing to the recorded audio or to any sample you want to use in a Sound.
The slicing feature allows you to slice loops in order to make them playable at any tempo without changing their pitch or timing. It is also useful to quickly extract single samples from loops, for example, a snare sound from a drum loop, or to rearrange loops by editing or muting their Slices, changing the order of the Slices, applying a different quantization, or adding Swing.
Last but not least you can map your Samples to particular Zones, thereby creating multi-sample Sounds with individual velocity and note ranges, volume, and panning. This is useful to emulate the behavior of classic instruments and synthesizers but also allows for a large number of Samples in only one Sound. All this can be done in the Sample Editor.
Opening the Sample Editor
The Sampler can be opened using its dedicated button.
Recording Audio Overview
In the Sampler, Maschine+ provides everything you need to record audio. The initial Record page provides options for setting the recording source and mode for samples.
Opening the Record Page
The Record page tab only becomes visible once some audio has been recorded.
The initial Sample page
After recording a sample the Record page becomes available.
In the Sampler, press Button 1 to access the RECORD page.
The Record page appears.
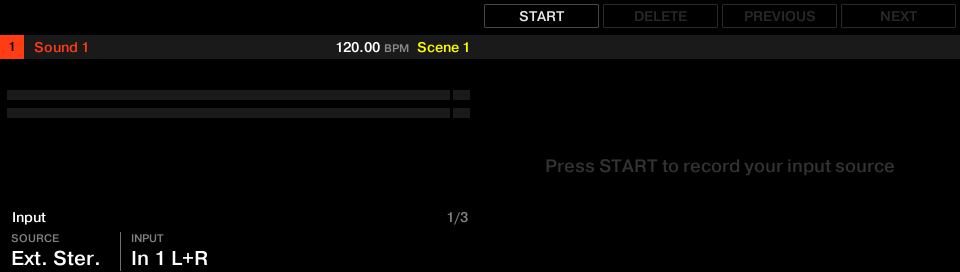
The Record page in the Sampler
Choosing a Recording Mode
The Recording mode option allows you to determine how Maschine+ records samples.
Detect: Records audio after the set threshold has been exceeded. This is useful when you want to record audio without the silence before the incoming sound is played. If the focused Sound Slot contains neither an Audio nor Sampler plug-in, the recorded audio will automatically be loaded into a Sampler plug-in for the first Take. After that, you must trigger the Sampler with MIDI Events, such as those in a Pattern, to playback the audio.
If Detect is selected, you can set a specific threshold using the level THRESHOLD control on the right. After you press Start, any input signal level exceeding this threshold will start the recording. You can then manually stop the recording by pressing Stop. You can also adjust the threshold on the horizontal input level meters: Any input level reaching the slider position will start the recording. To reset the threshold, set it to the default value of -12 dB.
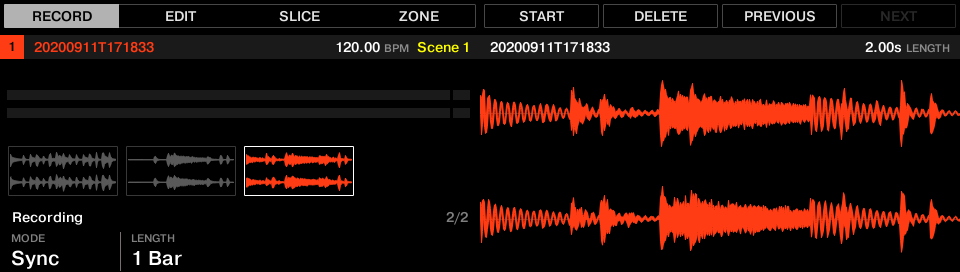
Sync: Starts recording audio in time with the Pattern Grid. If the focused Sound Slot contains neither an Audio nor Sampler plug-in, the recorded Sample will be loaded automatically into a Sampler plug-in as the first Take. After that, you must trigger the Sampler with MIDI Events, such as those in a Pattern, to playback the audio.
When Sync is selected, recording starts in sync with the sequencer after clicking Start. The recording will begin at the start of the next bar. The LENGTH control on the right allows you to choose a length for the recording: either 1, 2, 4, 8, or 16 bars, or choose Free if you do not want to set a duration limit to the recording. You can press Stop to end recording at any time, and the recording will stop at the next bar.
Loop: Records audio that you intend to play back in sync with your Project using the Audio plug-in. It records audio in the same way as Sync; however, when Loop mode is selected, an additional parameter appears called Target. In Loop mode, the recording is loaded into an Audio plug-in so that you can immediately hear the results. The Target parameter dictates how Maschine+ loads new recordings into the Audio plug-in:
Take: Records each new Take into the focused Sound slot. After a Take is recorded, it will become visible in the Audio Pool and is automatically selected for playback. You can review all the Takes you've captured in the Audio Pool, and you can also select any of these Takes to make it the one that actively plays back in the Audio plug-in.
Sound: Provides a layered workflow similar to that achieved with guitar loop pedals. When using this mode, each recording that you make will be loaded into an empty Sound Slot in the current Group and Pattern and will begin playing back. Therefore, each recording that you make will playback layered on top of all the previous recordings made in that particular Group and Pattern. By layering each new Take onto a new Sound, you can quickly build a whole pattern. You can continue this process until all empty Sound slots in the Group are used up. After that, each additional recording will be recorded as a new Take into the last Sound of the Group that contains an Audio plug-in (and the previous Takes will still be preserved if you want to switch back to them).
Pattern: Records similar to the Sound Target described above, except that each new recording will also be assigned to a new Pattern on its own. This mode can be helpful when you want to record different variations of a part and then review the variations quickly by playing each Pattern. For example, the first recording will be placed into an Audio plug-in in the first available Sound Slot in the Group, and then a new Pattern will be created where only this new recording is playing back. Making another recording will result in the recording being loaded into another unused Sound Slot, and another new Pattern will be made where only this most recent recording is playing. If you switch back to the previous Pattern, you'll hear only the previous recording (the newest will automatically be deactivated in the previous Pattern).
Auto: Select this recording mode if you want to automatically sample an external or internal synthesizer. After selecting this mode, addtional options are available for setting the notes' stride (interval), key range, and velocity. You can also choose to let Maschine+ batch process the samples to automatically find the best loop points, trim silence from the start and endpoints, and normalize the sound level. Refer to Auto Sampler.
Selecting the Source to Record
Here you can select the type of source you want to record.
Monitoring the Input Signal
The level meters in the RECORD section show you at any time the level of the selected audio source. For example, this can come in handy to adjust the appropriate threshold in Detect mode. For this purpose, in Detect mode the level meters additionally provide a fader adjusting the threshold level, this fader is a strict equivalent to the THRESHOLD control described above. This way, you can easily visualize when the input signal exceeds the current threshold (and hence, when it would start the recording) and adjust it accordingly.
Furthermore, if you have selected an external signal (Ext. Ster. or Ext. Mono selected in SOURCE), an additional MONITOR section appears on page 3. In this section, activate the MONITOR to send the input signal to the Cue bus of Maschine, allowing you to hear on a separate channel (for example, your headphones) the audio source that is about to be recorded.
Arming, Starting, and Stopping the Recording
In the Sampler, you can arm, start, and stop the recording of the Sampler.
When recording in Detect mode:
The recording will start as soon as the input signal exceeds the THRESHOLD value. Until then the START button turns to a WAITING button and the Waiting for input… message appears. During this waiting phase, you can also start the recording manually by clicking the WAITING button or cancel the recording by clicking CANCEL.
Once the recording has started, you can press STOP to stop the recording (it stops immediately) or CANCEL to cancel the recording (the recorded audio will not be saved).
When recording in Sync mode:
The recording will start at the next bar. Until then the START button reads a flashing WAITING label and the Waiting for the next bar… message appears in the information bar above the waveform display.
Once the recording has started, the audio is recorded for the duration set by the LENGTH control (refer to Choosing a Recording Mode). You can also press STOP beforehand to stop the recording at the next bar or CANCEL to cancel the recording (in that case the recorded audio will not be saved).
When recording in Loop mode:
The recording will start at the beginning of the Pattern. Until then the START button reads a flashing WAITING label and the Waiting for end of Pattern… message appears in the information bar above the waveform display.
Once the recording has started, the audio is recorded for the duration set by the LENGTH control (refer to Choosing a Recording Mode. You can also click STOP beforehand to stop the recording at the next bar or Cancel to cancel the recording (in that case the recorded audio will not be saved).
Tip
To start and stop the recording manually, set the MODE to Detect, dial the THRESHOLD down to OFF, and start the recording by pressing START. To stop recording, press STOP.
In any case, the recorded audio will be stored in the selected Sound as you started the recording.
When Recording is Complete
When the recording is done, the following things happen:
Each Take is named and stored as a file on your hard disk (refer to Location and Name of Your Recorded Samples).
Its waveform appears in the waveform display and its name appears in the information bar above.
The recording is automatically appended to the Audio Pool of the Sound and selected (refer to Checking Your Recording).
A Sampler Plug-in is automatically loaded in the first Plug-in slot of the Sound, ready to play your new recording. All Plug-ins previously loaded in that Sound are removed. However, when recording in Loop mode, an Audio plug-in will be loaded. If there was already a Sample Plug-in in the Slot when engaging Loop recording, it will not change the Sampler to an Audio plug-in, it will remain as a Sampler and you will need to manually change the plug-in to Audio if you wish. In this case, all recorded takes will be preserved.
The Sound slot takes the name of your recording.
If the Sampler Plug-in was used in Detect mode or Sync mode, the recording is mapped to a new Zone covering the entire key and velocity ranges in the Zone page, which makes your new sample directly playable from the pad of its Sound slot (or from all your pads if pads are in Keyboard mode). Any existing Zones will be replaced. The sample must then be triggered using MIDI Events in the Pattern Editor. For more information on Zones, refer to section Mapping Samples to Zones.
If the Audio Plug-in was used in Loop mode, the last recorded Take will automatically play back with the Pattern.
Note
Note that any MIDI events for that Sound in the current Pattern will remain. As a consequence, your recording might directly start to play at the pitch defined by the existing MIDI events.
Using the Footswitch for Recording Audio
Maschine+ has an input for a footswitch that can be used to control the sampler while keeping your hands free to play your instruments. In order to use the footswitch for audio loop recording, you must first go to the SAMPLING page to pin the recording mode. You can then set the recording parameters as described in the section: Choosing a Recording Mode. When all the recording parameters are set, simply depress the footswitch. Once the sync point is reached, the recording will start. It will then stop after the pre-determined length or, especially in the cases where you have selected Free for the LENGTH, press the footswitch again to stop recording on the next bar. When the recording is done, the recording will be loaded according to the setting of the Target parameter.
In most instances the footswitch provides the following control:
Cancel: If a recording is standing by to start (awaiting the sync point), you can simply press the footswitch once again to cancel the recording. No new recordings will be made, nor new Patterns.
Abort: If a recording has started, “double-click” the footswitch to abort the current recording. Any audio recorded will be discarded, no loops will be loaded, and no new Pattern created.
Undo: If a recording finished before you could cancel it, then simply press and hold the footswitch to trigger Undo.
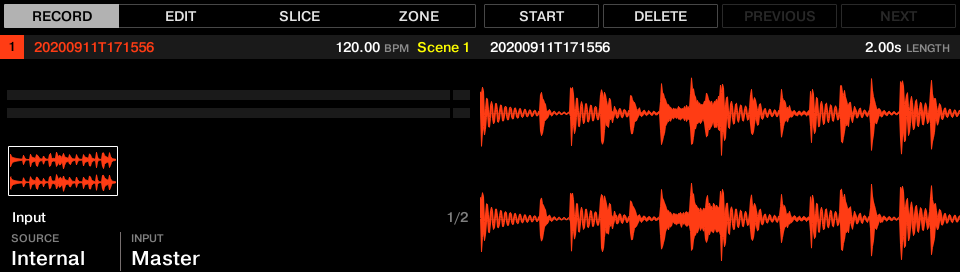
Checking Your Recording
After recording a sample the recordings you have made are visualized on the displays. The highlighted sample is the sample selected for the current Sound.
The Record page in the Sampler
Using the Audio Pool
All the recordings (takes) you have made since you opened the current Project are stored in the Audio Pool and displayed as mini waveforms on the left display. The following actions are available:
To navigate your recordings, press Button 7 (PREV) and Button 8 (NEXT).
If you are using the Sampler plug-in:
The selected recording is automatically loaded in the Plug-in and ready to be played.
You can further edit the selected recording via the other pages of the Sampling mode. When selected, a recording is also automatically mapped to a new Zone covering the entire key and velocity ranges in the ZONE page. Any existing Zones will be replaced.
You can press the fully lit pad (the focused Sound slot) to listen to the displayed recording on the Cue bus (refer to Configuring the Master and Cue Outputs).
If you are using the Audio plug-in:
The last take will automatically playback.
You can set the Playback mode, the Engine mode, and Source Tempo and Length.
Press Button 6 (DELETE) to delete the selected take.
Note
All recordings (takes) in the Audio Pool are saved with the Project. When you close the current Project, all of your takes are saved as audio files and available for later use unless you explicitly delete them (via the Maschine software or in your operating system).
Location and Name of Your Recorded Samples
By default, recorded (takes) are saved in the Recordings subfolder of your SD memory card: Native Instruments\Maschine2\Recordings. You can access them when using Maschine+ in Storage mode. For more information on Storage mode, refer to Transferring Files to the SD Card.
Recorded samples (takes) are automatically named using the following scheme:
[YYMMDD]T[HHMMSS].wav
In the name above, [YYMMDD] stands for the current date (year, month, day, all 2-digit numbers) and [HHMMSS] for the current time (hours, minutes, seconds, all 2-digit numbers).
Auto Sampler
Auto Sampler makes it easy to create sampler instruments that you can use in Maschine+. You can create a sampler instrument from a MIDI-capable hardware synthesizer, a software instrument, or a combination of synthesizers, hardware effects, and effect plug-ins.
Sampling instruments is a great way to capture other instruments and save on CPU resources, especially when sampling instruments that have effects. Used creatively, you could also turn any monophonic synthesizer into a polyphonic powerhouse.
Note
Using effects when creating a sampler instrument is a creative process but is different from using effects in realtime in two ways: first, effects are applied to each sampled note, not on multiple notes or chords; and second, effects parameters cannot be edited or automated to produce changes in the sound over time.
An instrument created with Auto Sampler can be saved as a Sound with all its samples. This is a great way to share your sampled instruments with other Maschine users or between Maschine+ and your desktop computer. Refer to Saving a Sound.
Before using the Auto Sampler, you must first set up the devices you want to record and access the Recording mode of the Sampler. Refer to Setup Examples and Creating a Sampled Instrument using Auto Sampler.
Creating a Sampled Instrument using Auto Sampler
To create a sampled instrument using Auto Sampler:
Click the Sample icon to access the Sampler. Refer to Opening the Sample Editor.
Select Auto from the Recording mode. Refer to Recording.
Recording an External Instrument
If you are sampling an external device such as a synthesizer, connect the instrument to your Maschine (audio and MIDI), then select Input Source to External. Refer to Input.
Ensure that Maschine can receive audio input from the external device on the correct audio input. Refer to Monitor.
Recording an Internal Instrument
If you want to sample a Plug-in select Input Source to Internal and the Input to Group and Sound of the plug-in you want the Auto Sampler to capture. Refer to Input.
Once you have set up the Auto Sampler, you can make settings regarding the notes, velocities, and batch processing you want Auto Sampler to perform. Refer to Note Map, Velocity Map and Batch Process.
Recording
The recording section enables you to set the recording mode, the sample length, and the note length of the sample you want to record.
Setting | Description |
|---|---|
MODE | Sets the recording mode of the Sampler. Select Auto to use Auto-Sampler. |
SAMPLE | Sets the length of time Auto-Sampler records samples. For example, choose short times for percussive sounds or bass stabs, and longer times for strings and pads. If you want to loop your sound, it is helpful to record for longer to give Maschine enough material to find the best loop points. For the best results, use this parameter in conjunction with the NOTE ON parameter. |
NOTE ON | Sets the length of time Auto-Sampler triggers the instrument it is recording. For the best results, use this parameter in conjunction with the SAMPLE parameter. |
Input
The Input section lets you set the source you want to record and select the MIDI device and channel when triggering external MIDI instruments.
Setting | Description |
|---|---|
SOURCE | Ext. Ster.: Selects external stereo inputs as the recording source type. Ext. Mono: Selects external mono inputs as the recording source type. Internal: Selects the internal output Maschine as the recording source type. |
INPUT | Ext. Mono: Selects either of Maschine’s eight external mono inputs: the left (L) or right (R) channel of each input pair In 1–4. Ext. Ster.: Selects either of Maschine’s four external stereo inputs In 1–4. Internal: Selects the output of any available Group or the Master channel. |
MIDI TO | Sets the MIDI port you want to use when connecting to external MIDI equipment. All available devices are displayed here. |
CHANNEL | Sets the MIDI channel to match the MIDI channel of the external equipment you want to sample. Maschine will use this to trigger the sound when making recordings. |
Note Map
The Note Map section enables you to set the number of notes and the range of the keyboard covered by each sample.
Setting | Description |
|---|---|
STRIDE | Sets the number of notes that each sample will cover. For example, a Stride value of 1 records every note within the Key Lo and Key Hi range in the Key Lo and Key Hi range. Alternatively, you could set a higher Stride value, resulting in fewer samples. A value of 12, for example, would cover 12 notes, meaning one sample covers a range of 12 notes. This value could result in possible pitch artifacts that might be ideal for certain genres of music. However, the value you select depends on the sound you want to achieve. |
KEY LO | Sets the lowest note of the sample note range. |
KEY HI | Sets the highest note of the sample note range. |
EXTEND | Extends the highest and lowest samples to include the whole range of the keyboard. |
Velocity Map
The Velocity Map section lets you set the velocity covered by each sample within the velocity range.
Setting | Description |
|---|---|
STRIDE | Sets the velocity range each sample will cover as the Auto-Sampler triggers sounds. If, for example, you wanted to capture every nuance of sound, you could use a Stride value of 1 to record every velocity set within the Vel Lo and Vel Hi range. Alternatively, you could set a higher Stride value, resulting in fewer samples for a broader sample of the sound. |
VEL LO | Sets the lowest velocity value you want to sample. |
VEL HI | Sets the highest velocity you want to sample. |
EXTEND | Extends the upper and lower velocity values to include the full velocity range of the instrument. |
Batch Process
The Batch Process section provides a set of time-saving tools that help you by automating the process of looping, trimming, and normalizing your samples.
Setting | Description |
|---|---|
FIND LOOP | Automatically finds the best loop point in your samples. This feature is useful if you want to create sustained sounds such as pads or strings. |
TRIM SILENCE | Automatically removes unwanted silence from the beginning and end of each sample. |
NORMALIZE | Adjusts the level of each sample to the maximum possible value without clipping. Normalizing is useful for making samples more consistent in volume. |
Monitor
The Monitor section enables you to hear the output of the Auto-Sampler.
Setting | Description |
|---|---|
MONITOR | Activates the monitor, which enables you to hear the Auto-Sampler as it works through the process of capturing samples. |
Editing a Sample
The Edit page of the Sampler enables you to adjust the start and endpoint of a sample or slice and apply various destructive audio processing functions.
Note
Sample editing can only be done in the Sampler plug-in, not using the Audio plug-in. If you want to edit a sample in the Audio plug-in, you must first switch it to a Sampler plug-in, make the edit, and then switch back to the Audio plug-in again.
The Edit page always displays the Sample of the Zone currently selected (refer to Selecting and Managing Zones), and all your actions on that page will affect this particular Sample. For example:
If you have just recorded a Sample, it will directly appear here. If you have recorded more than one sample, the sample selected in the Recording History (by default the last recorded Sample) will appear here, refer to section Checking Your Recording for more information on the Recording History.
If the sample in that Sound is already split into slices, each slice has its own Zone and the slice of the focused Zone will appear here. See section Slicing a Sample Overview for more information on slicing samples.
Using the Edit Page
The Edit page enables you to adjust the start and endpoints of a Sample or Slice and to apply various destructive audio processing functions to any part of the Sample.
To edit a sample:
In the Sampler, press Button 2 (EDIT) to access the Edit page.
The Edit page is displayed.
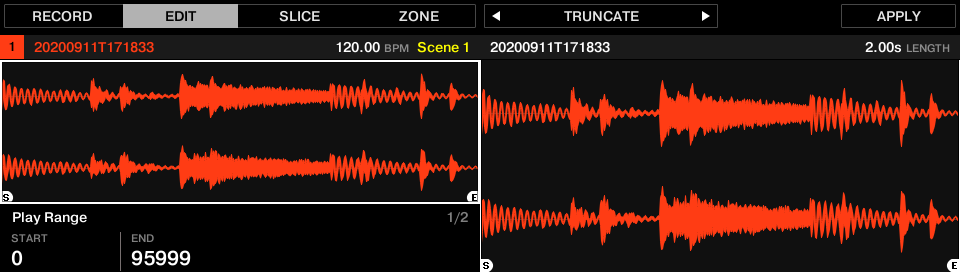
The Edit page
The right display shows the waveform of the selected Sample:
Turn Knob 5 to zoom in on the waveform of the Sample and Knob 6 to scroll through it.
Above the waveform, the information bar indicates the name and length of the Sample.
The Sample can be played back at any time by pressing the corresponding pad. When the sample is played back, the playhead indicator (vertical line) shows you the current play position within the waveform on the right display.
The parameters available at the bottom of the left display are spread over two pages.
Use the Page buttons to the left of the displays to select the desired page.
Page 1 – Play Range Parameters
The parameters in the Play Range section allow you to adjust the range that will be played back when you trigger a note.
Parameter | Description |
|---|---|
Knob1 (START) | Adjusts the start point of the play range in the Sample. |
Knob 2 (END) | Adjusts the end point of the play range in the Sample. |
Page 2 – Selection Range Parameters
The parameters in the Selection Range section allow you to adjust the range to which audio processing functions will be applied.
Parameter | Description |
|---|---|
Knob1 (START) | Adjusts the start point of the selection range in the Sample. |
Knob 2 (END) | Adjusts the end point of the selection range in the Sample. |
Tip
Hold SHIFT when turning the Knobs to adjust the parameters in finer increments.
On the right display, the selection range is highlighted.
The Edit page provides several audio editing functions to process your Sample. Available via Buttons 5–8 above the right display, these functions are described in detail in the following section: Audio Editing.
Audio Editing
On the Edit page, the Audio Toolbar provides various audio functions. These will be performed on the selected region of the Sample, as defined by the START and END parameters of the Selection Range section (refer to Using the Edit Page).
The Audio Toolbar provides the following audio processing functions:
Command | Description |
|---|---|
TRUNCATE | Deletes the part of the Sample that is outside of the selected region. |
NORM. (Normalize) | Adjusts the level of the selected region to the maximum possible value without clipping. |
REVERSE | Reverses the selected region of the Sample. |
FADE IN | Applies a fade in to the selected region of the Sample. |
FADE OUT | Applies a fade out to the selected region of the Sample. |
DC CORRECT | Removes the DC offset. DC offset (“Direct Current offset”) is an undesirable asymmetry of the signal that might be introduced by some audio processing units. This offset can notably waste some of the available headroom. |
SILENCE | Silences the selected region of the Sample. |
CUT | Deletes the selected region from the Sample and places it into the clipboard for later use. |
COPY | Copies the selected region of the Sample to the clipboard for later use. |
PASTE | Pastes the cut/copied region of the Sample, replacing the region of the Sample currently selected. |
DUPL. (Duplicate) | Duplicates the selected region of the Sample. The copy is placed right after the original region. |
STRETCH | Applies time-stretching and/or pitch shifting to the selected region of the Sample. See below for a detailed description. |
Time Stretching / Pitch Shifting
When STRETCH is selected, pressing Button 7 (SETTINGS) enables you to adjust the parameters of the time-stretching / pitch-shifting function before applying it to the selected region. Use Knobs 1 to 8 to adjust the parameters. Pitch shifting and time-stretching can be applied independently.
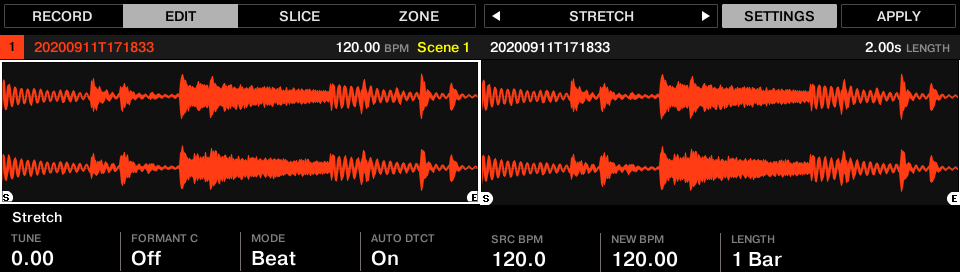
The Stretch controls at the bottom of the Edit page.
The following parameters are available:
Parameter | Description |
|---|---|
STRETCH section | |
TUNE | Adjusts the detuning (pitch shifting) to be applied (in semitones and cents). Leave this value to 0.00 to leave the original pitch untouched. |
FORMANT C (Formant Correction) | Activates/deactivates the formant character. Formant correction allows the pitch-shifted audio to retain the timbre (or “color”) of the original audio as much as possible. This is especially useful for melodic instruments. |
MODE | Selects between Beat and Free mode: In Beat mode, the new tempo is defined relative to the time signature (the beats and bars) of the original audio. This can be useful if you sampled a loop with a clearly defined rhythm (for example, a drum loop). In Free mode, the new tempo is defined independently from the time signature of the source. This is more suited for non-rhythmic Samples. In this mode only one parameter is available: SPEED (refer to below). |
AUTO DTCT (Auto Detection, Beat mode only) | Automatically detects the tempo of the original audio. |
SRC BPM (Source BPM, Beat mode only) | Defines the tempo of the original audio (in BPM). This tempo is defined in different ways according to the AUTO DTCT value: When AUTO DTCT is activated, you can set the length (in bars) of the original audio. You can choose between 1/2, 1, and 2 bars. The number between brackets indicates the resulting tempo (in BPM) derived from the number of bars you have set and the computed tempo value. When AUTO DTCT is deactivated, you can directly define the tempo of the original audio (in BPM). |
NEW BPM (Beat Mode only) | Defines the target tempo of the time-stretched audio (in BPM). |
LENGTH (Stretch Length, Beat mode with Auto Detection activated only) | Defines the length of the time-stretched audio (in bars) if AUTO DTCT is activated. Please note that any change to the SRC BPM value (refer to above) will be automatically mirrored by this LENGTH value. Once you have set the number of bars in the source audio, you can set here another number of bars, thereby dividing or multiplying the tempo of the target audio. Available values are 1/16, 1/8, 1/4, 1/2, 1, 2, 4, and 8 bars, as well as the corresponding triplet values. |
SPEED (Free mode only) | Adjusts the target tempo relative to the original tempo (in percentage). The minimum value is 10%. |
Note
In Beat mode, if you set a target tempo (NEW BPM) that is smaller than a tenth of the original tempo (SRC BPM), Button 8 (APPLY) will be grayed out and deactivated. Set a higher target tempo to activate the button again.
Slicing a Sample Overview
Slicing enables you to chop up loops to extract single Sounds (the drum sounds of a drum loop for example), but it's also good for preparing a loop to be played back at another tempo without changing its pitch or timing. The resulting Slices can then be exported to different notes of the same Sound or to different Sounds of the same Group.
The Slice page of the Sample Editor enables you to slice your Samples in various ways.
Slicing a Sample
The typical workflow for slicing your Samples is as follows:
Open the Slice page: Opening the Slice Page.
Choose a method for slicing along with a few settings depending on the chosen method: Adjusting the Slicing Settings.
If you wish, manually adjust the proposed Slices: Manually Adjusting Slices.
Apply the slicing to your Sample and export the Slices, whether in place or to another Sound/Group: Applying the Slicing.
Which Sample Is Shown in the Slice Page?
The Slice page always displays the Sample of the Zone currently selected (refer to Selecting and Managing Zones for more information on selecting Zones), and all your actions on that page will affect this particular Sample. For example:
If you have just recorded a Sample, it will directly appear here. If you have recorded more than one Sample, the Sampled selected in the Recording History (by default the last recorded Sample) will appear here, refer to section Recording Audio Overview for more information on how to record Samples.
You can also drag a Sample onto the focused Sound slot or directly to the Slice page from the Browser or from your operating system. It will then appear on the page and replace any Sample already loaded in that Sound.
Opening the Slice Page
Slicing a Sample is done on the Slice page of the Sample Editor.
In Sampling mode, press Button 3 (SLICE) to access the Slice page.
The Slice page appears and you can adjust its parameters.
The Slice page looks as follows:
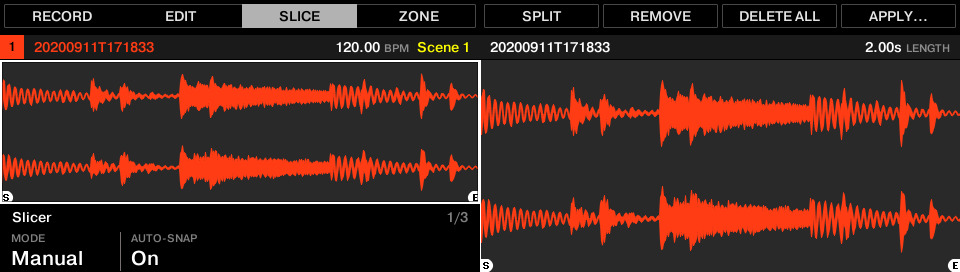
The Slice page (1 of 3)
Adjusting the Slicing Settings
At the bottom of the left display, you can adjust the settings to define where the various Slices will be created in the sample.
Any change to these settings will directly affect the number and position of the Slice markers shown in the waveform on the displays.
Selecting and Auditioning Slices using the Pads
At any time, the proposed Slices are also available on your pads: The fully lit pad indicates the selected Slice, while the dimmed pads indicate the other Slices.
Slicing Parameters
The following parameters are available:
Parameter | Description |
|---|---|
Slicer Section | |
MODE | Here you can select either Detect, Split, Grid, or Manual: Detect mode: The Sample will be sliced according to its transients. Split mode: The Sample will be sliced into equally spread Slices. Grid mode: The Sample will be sliced according to note values. Manual mode: Manually enter slice points using the pads, and edit the start and endpoints of a slice. For more information, refer to Manually Adjusting Slices. |
SLICES (Split and Grid mode only) | When MODE is set to SPLIT (see above), SLICES lets you choose the amount of Slices: 4, 8, 16 or 32. When MODE is set to GRID (see above), SLICES lets you choose the length of the Slices in note values: 4th, 8th,16th or 32nd notes. |
AUTO-SNAP (Manual mode only) | The Auto-Snap feature automatically aligns Slice points to the nearest transient as you manually trigger the slicing from the pads. It can be turned off so that slice points are instead placed exactly where you trigger them. To use Auto-Snap, you must wait for the analysis to be performed on the sample you are slicing. The analysis is quick but will take longer for long audio files. |
SENSITIVITY (Detect mode only) | When MODE is set to DETECT SENSITIVITY enables you to adjust the sensitivity of the transient detection. Higher values will cause more Slices to be detected because more transients will be recognized, lower values will result in fewer Slices. This parameter should be adjusted until all the musically significant slices are being detected in the waveform. |
BPM (BPM Mode) | Selects how the tempo is defined: If you select AUTO, Maschine will calculate the tempo automatically. If you select MANUAL, you can enter the tempo in BPM manually. |
ADJUST | If BPM is set to AUTO, you can choose between the tempo that Maschine+ detected, or half or double of that tempo. If BPM is set to MANUAL, you can adjust the tempo manually. |
When MODE is set to DETECT, the second section of parameters is available at the bottom of the left display: the Engine section.
When MODE is set to DETECT, press the Right Page button to show the Engine section.
The Engine section contains a single parameter: ZERO-X.
Parameter | Description |
|---|---|
Engine Section | (Detect mode only) |
ZERO-X (Zero Crossing, Detect mode only) | When MODE is set to DETECT, activate ZERO-X to force the detected Slices to be created on the closest locations where the audio signal crosses the zero value. This can be helpful to avoid clicks when playing back Slices in another sequence. |
Live Slicing
Live Slicing is a quick and intuitive way to add slices to a sample using the pads. The first pad is used to trigger the sample and the subsequent pads are used to add slice points as required. If necessary, the start and endpoints of the slices can then be fine-tuned using Edit mode.
Delete All Slices
The DELETE ALL option in Sampler Edit mode is a quick and convenient way to delete all Slices at once from a sample.
Manually Adjusting Slices
In addition to the Detect, Split, Grid, and Manual modes that create Slices automatically (refer to section Adjusting the Slicing Settings above), you can also adjust Slices manually using your mouse, the waveform display, and the various edit tools at your disposal.
Tip
You can directly adjust your Slices manually by selecting Manual in the MODE menu or start from the proposed Slices and fine-adjust these Slices manually. In that case, the MODE menu automatically switches to Manual.
Applying the Slicing
Once you are satisfied with the proposed manually adjusted Slices (refer to section Adjusting the Slicing Settings), you can apply the slicing in order to actually cut the original Sample and create these Slices.
Choosing a Destination for the Slices
Press Button 8 (APPLY…) to export the Slices to any Sound or Group in your Project.
The displays switch to a Selection mode allowing you to choose a destination for the exported Slices.
Exporting Single Slices
Instead of exporting all Slices, you can also export the selected Slice only:
Mapping Samples to Zones
Mapping Samples is a way to create Sounds with more than one Sample across the MIDI keyboard and with different velocities. You can create and adjust zones that define a key (or pitch) range and a velocity range for each Sample included in the Sound. In other terms, the Sample will be triggered only if the played note is within its Zone’s key range and velocity range. The Zones can overlap, allowing you to trigger different Samples at once or triggering different Samples depending on how hard you hit the pads. You can adjust various playback settings for the Sample of each Zone individually. The set of all Zones define the Sample Map (or Map) of the Sound.
Opening the Zone Page
Mapping is created in the Zone page of the Sample Editor.
In Sampling mode, press Button 4 (ZONE) to access the page.
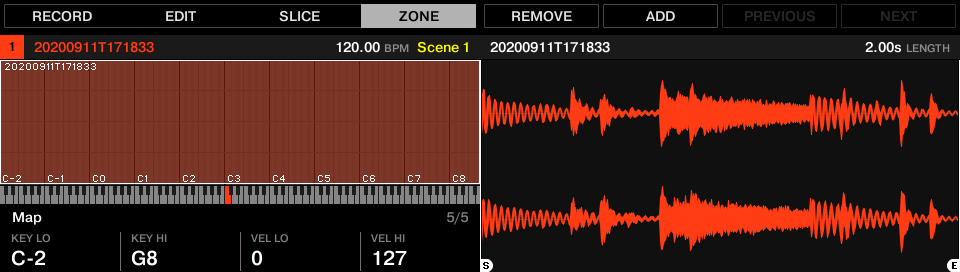
The Zone page
Editing Zones
At the bottom of the left display, the Zone settings allow you to adjust how each Zone should be played back.

The Zone settings
The various parameters always display the values for the focused Zone.
The parameters available in the Zone settings are spread over five pages.
Use the Page buttons on the left of the displays to select the desired page.
Page 1 – Play Range Parameters
The parameters in the Play Range allow you to adjust the portion of the Sample that will be played back when the Zone is triggered.
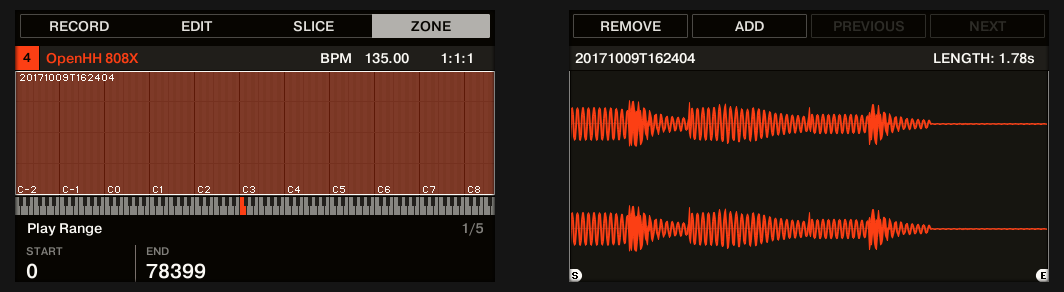
The Zone, page 1 of 5: Play Range parameters
Parameter | Description |
|---|---|
START (Knob 1) | Adjusts the playback’s start point in the Sample of the focused Zone. |
END (Knob 2) | Adjusts the playback’s end point in the Sample of the focused Zone. |
Hold SHIFT when turning the Knobs to adjust the parameters in finer increments.
In the waveform on the right display, the regions outside the play range are grayed out.
Page 2 – Loop Parameters
The parameters in the Loop page allow you to define and adjust a portion that will play in a loop while the note is held.
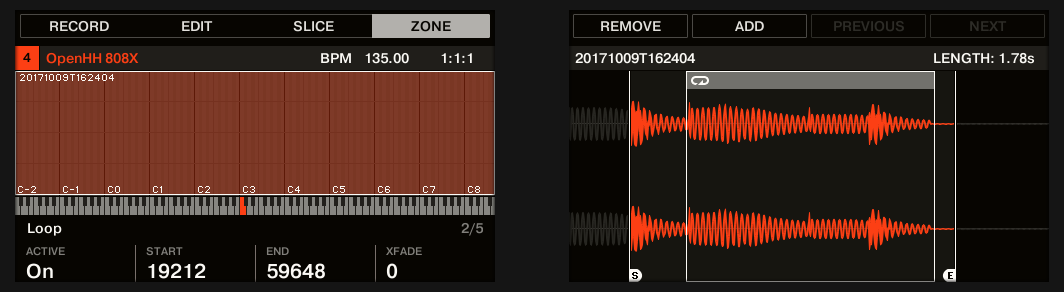
The Zone, page 2 of 5: Loop parameters.
Parameter | Description |
|---|---|
ACTIVE (Knob 1) | Enable this to define a loop in the Sample of the focused Zone. When the play position reaches the loop, the playback is looped as long as the note is held. This can be useful to loop either a whole Sample or part of it, e.g., to simulate a longer tone. Note: this technique requires that you set the Sampler’s TYPE selector to AHD or ADSR in the PITCH / GATE section (Parameter page 2, refer to Page 2: Pitch / Envelope). |
START (Knob 2) | Adjusts the start point of the loop. |
END (Knob 3) | Adjusts the end point of the loop. |
XFADE (Knob 4) | Allows you to blend a little of the material near the loop start and end points in order to get a smoother, less abrupt loop. This is particularly helpful if the loop playback is producing any clicks. |
Tip
Hold SHIFT when turning the knobs to adjust the parameters in finer increments.
Tip
By moving the loop’s start and end points closer to each other you can shrink the loop to very small values on-the-fly, thereby creating very interesting glitch effects in a live situation.
Page 3 – Tune / Mix Parameters
The Tune/Mix page contains parameters controlling pitch- and level-related aspects of the Sample playback.
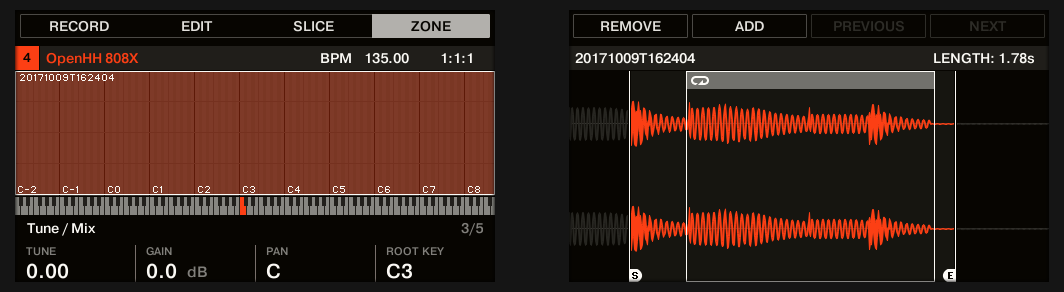
The Zone, page 3 of 5: Tune/Mix parameters
Page 4 – Envelope Parameters
This amplitude envelope can be used to shape the contour of the wave and remove clicks after slicing: you can either apply it to the Zone of the whole Sample or to individual Zones for selected Slices.

The Zone, page 4 of 5: Envelope parameters
Parameter | Description |
|---|---|
ATTACK (Knob 1) | Adjusts how quickly the Sample/Slice reaches full volume level after being triggered. |
DECAY (Knob 2) | Adjusts how fast the Sample/Slice fades out. |
Tip
Hold SHIFT when turning the knobs to adjust the parameters in finer increments.
Page 5 – Map Parameters
The Map page contains the parameters defining the key and velocity ranges of the Zone.
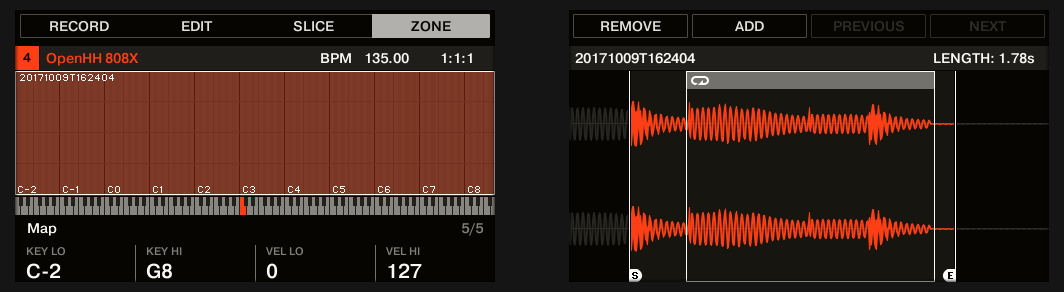
The Zone, page 5 of 5: Map parameters.
Parameter | Description |
|---|---|
KEY LO (Lowest Key, Knob 1) | Sets the lowest note (key) of the focused Zone. |
KEY HI (Highest Key, Knob 2) | Sets the highest note (key) of the focused Zone. |
VEL LO (Lowest Velocity, Knob 3) | Defines the lowest velocity of the focused Zone. |
VEL HI (Highest Velocity, Knob 4) | Defines the highest velocity of the focused Zone. |
Adding Samples to the Sample Map
You can add Samples directly to the Map view of the ZONE page.