Common Operations
Learn about the most used workflows and operations of your Maschine+.
This section introduces a few very common operations in Maschine+ you will encounter in numerous situations.
Using the 4-Directional Push Encoder
The 4-Directional Push Encoder (referred to as the 4-D encoder) combines the functionalities of a conventional joystick, of a button, and of a continuous encoder. These aspects make it into a multi-functional control element that can be used for navigation, for adjusting values of parameters and controlling instruments. Hence, it can be moved to the four directions: up, down, left, and right, as well as being pushed and rotated.
 |
The 4-D encoder situated to the left of the VOLUME, SWING , and TEMPO buttons
Depending on the menu or context, the available actions differ:
The displays are navigated by moving the 4-D encoder in a direction indicated by the surrounding LEDs.
Entries in a list are browsed by turning the 4-D encoder.
The value of a highlighted parameter is adjusted by turning the 4-D encoder.
A selection is confirmed by pushing the 4-D encoder.
Modes and Mode Pinning
Maschine+ has many different modes of operation.
In addition to the default Control mode (in which the pads trigger your Sounds), there are many other modes for accomplishing various tasks. These modes are activated by specific buttons, for example, SCENE, CHORDS, BROWSER, etc.
For some of these modes, you need to hold the button to keep the mode active. For example, when you press the SOLO button, the displays will show Solo-specific control options; when you release the button, Maschine+ switches back to the previous mode.
The buttons that are required to be held are in the middle column (left of the pads) along with the NOTE REPEAT and AUTO button:
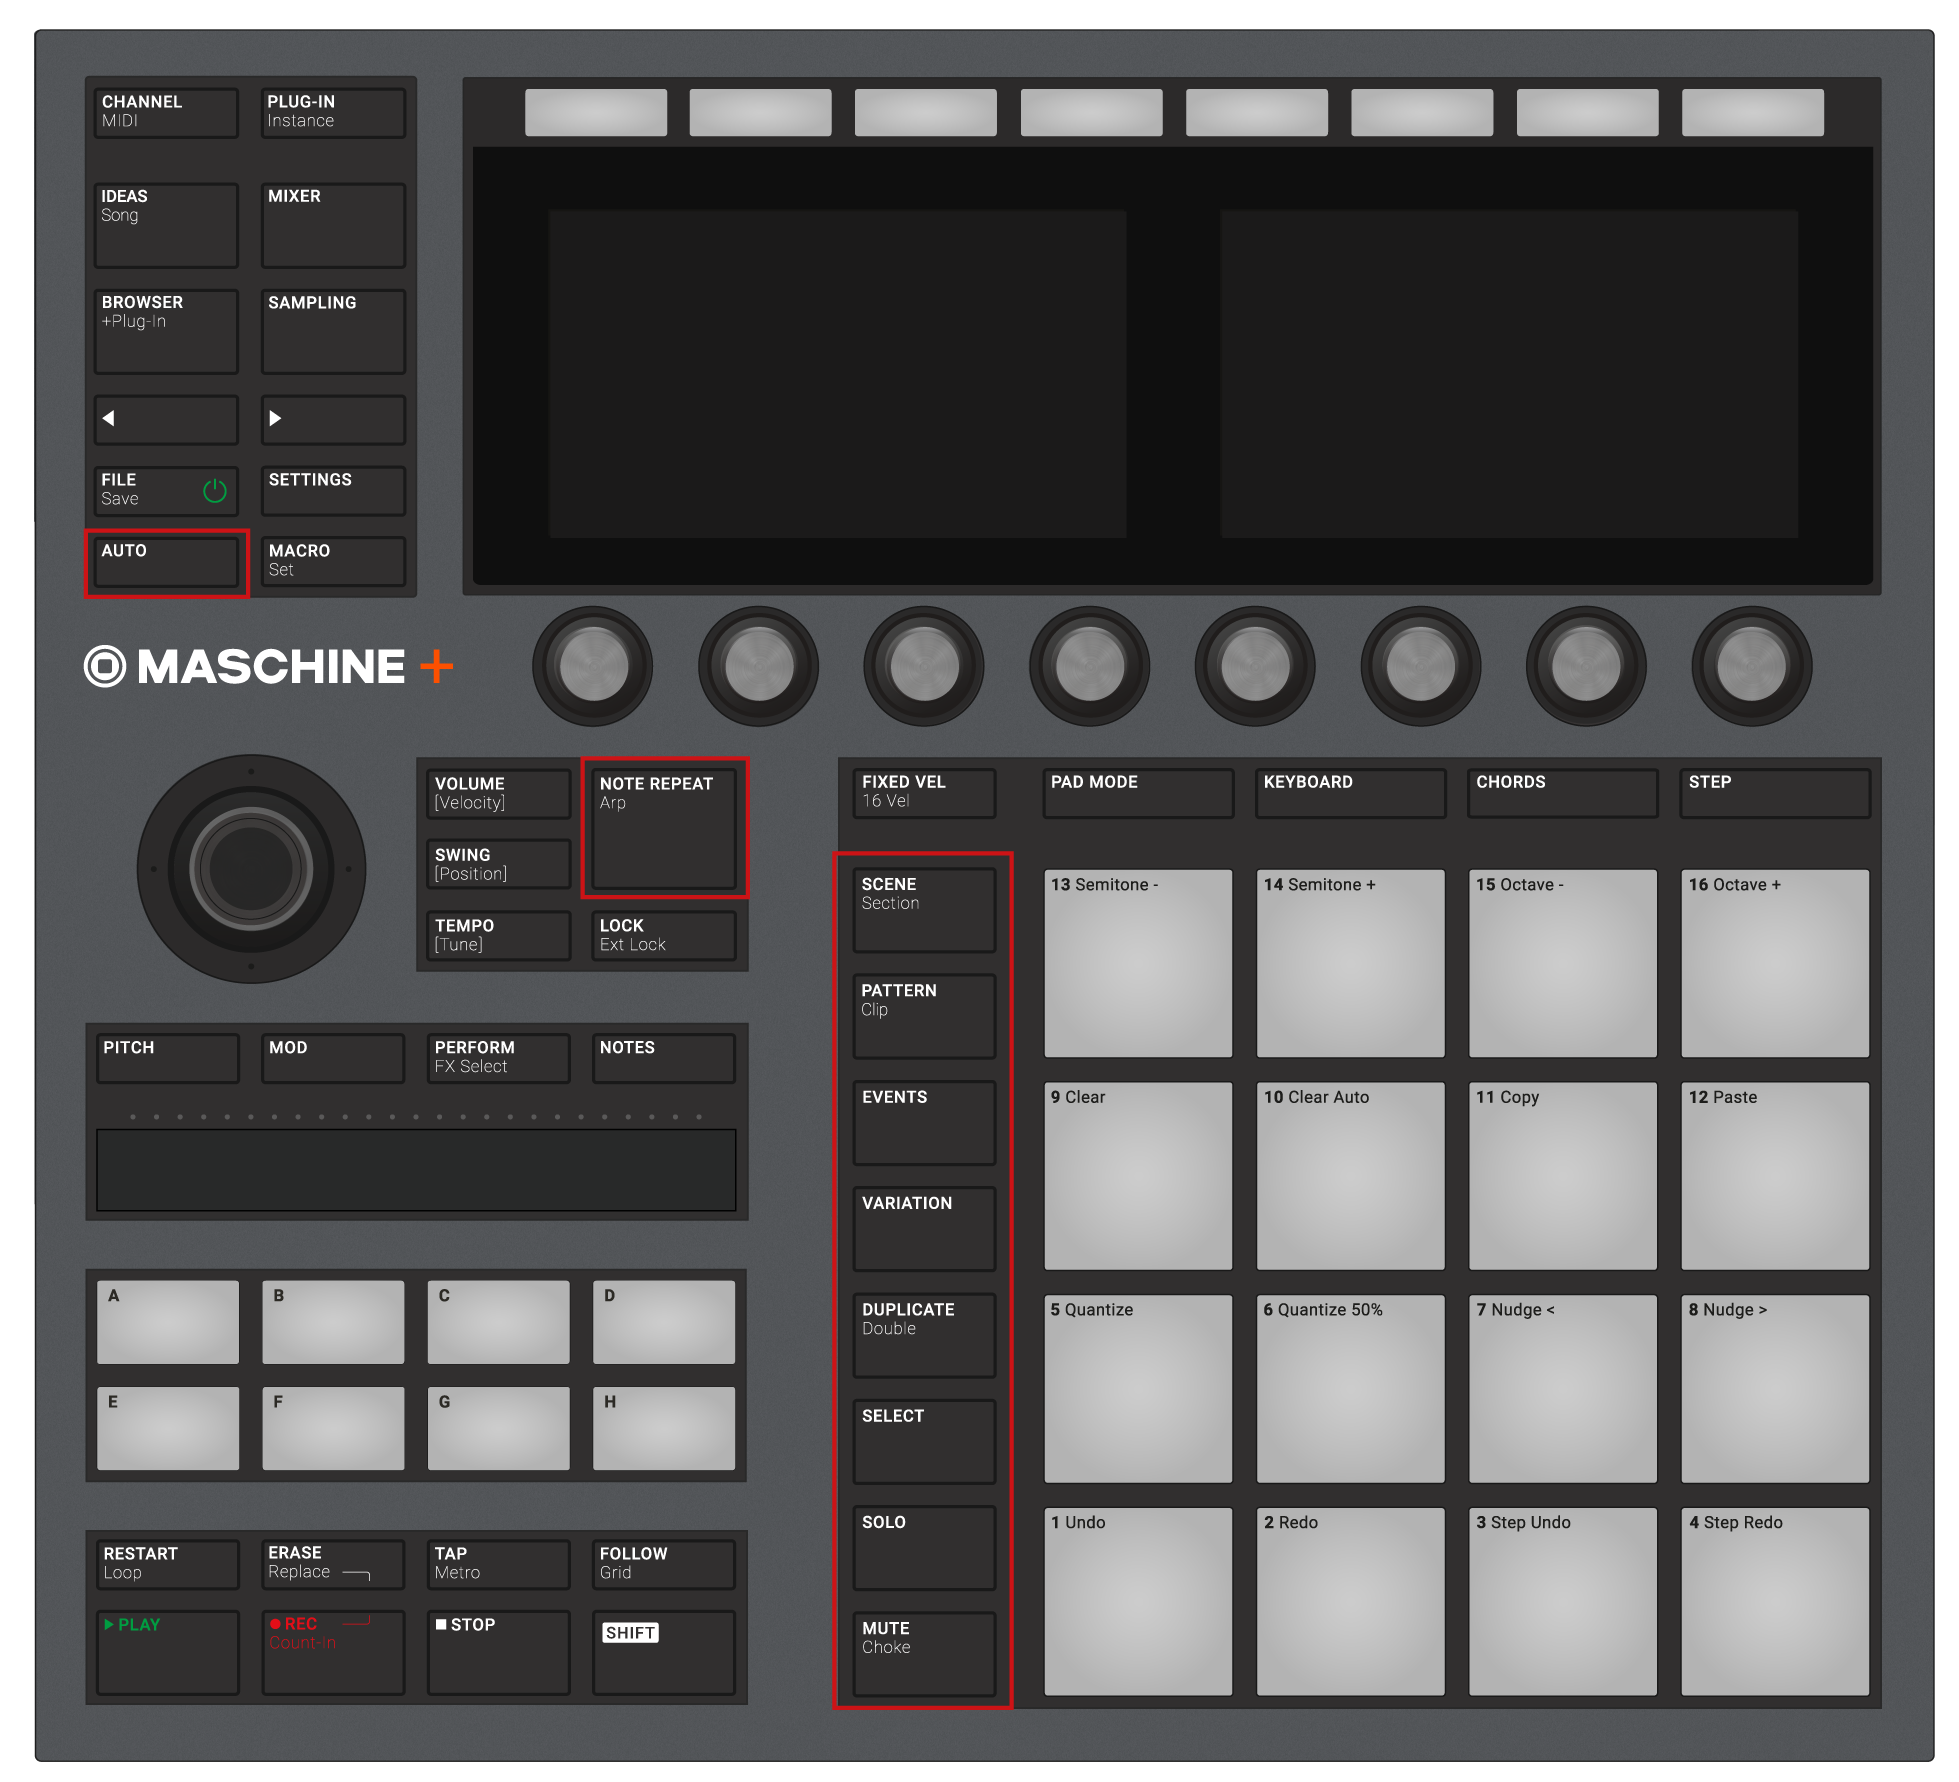
By default, each of these buttons needs to be held in order to use the corresponding mode.
Pinning Modes
You can also pin (lock) modes on Maschine+, so they do not switch back when releasing a mode button:
Press and hold a mode button, for example, PATTERN.
Press Button 1 above the left display.
On the left screen, the PATTERN label under Button 1 gets highlighted. You can release the PATTERN button: Maschine+ will remain in Pattern mode until you press PATTERN again.
Notice
Once a mode has been pinned Maschine+ will automatically pin the mode next time it is pressed.
You can unpin the active mode by pressing Button 1 again.
Here is a list of all buttons that you can pin by simultaneously pressing Button 1:
All buttons in the column at the left of the pads (SCENE, PATTERN, …, SOLO, MUTE).
NOTE REPEAT (Arp) button: Both Note Repeat mode (for pads in Group mode) and Arp mode (for pads in Keyboard or Chords mode) can be pinned.
FOLLOW (Grid) and VARIATION buttons: These buttons respectively switch to Grid and Navigate mode when pressed with SHIFT simultaneously. These modes are already pinned by default. You can unpin them and pin them again as usual by pressing Button 1.
AUTO button: Instead of using Button 1, press SHIFT + AUTO to pin the AUTO mode. Moreover, when you leave this mode it is automatically unpinned, it will be temporary again next time you press AUTO.
Undoing and Redoing Actions
Undoing and re-doing your last actions can be a useful way to cancel operations you have performed or to compare two versions before and after a change. You can undo most of the actions you have made since loading or creating your Project.
Step Undo/Redo is the classic undo/redo. It cancels or re-executes each action you have made, step by step.
On your Maschine+:
To undo the last action, press SHIFT + Pad 3 (Step Undo).
To redo the last action, press SHIFT + Pad 4 (Step Redo).
Focusing on a Group or a Sound
To display the content and parameters of a particular Sound or Group, you first need to put it in focus.
Setting the focus on a Sound or Group is slightly different than selecting it: The focus defines what will be displayed, whereas the selection defines what will be affected by your edits.
Switching Between the Master, Group, and Sound Level
At any time you can quickly switch the Control view between the parameters of the Master, the focused Group, or the focused Sound.
Press the CHANNEL or PLUG-IN button to enter Control mode.
Press Button 1 (MASTER), Button 2 (GROUP), or Button 3 (SOUND) above the left display to show the Plug-in parameters and Channel properties of the Master, the focused Group, or the focused Sound, respectively.
The selected tab lights up. The name of your Project, the focused Group, or the focused Sound appears on the left display (under the MASTER, GROUP, and SOUND tabs), and the displays show the Plug-in parameters and Channel properties of the Master, the focused Group, or the focused Sound, respectively.
Navigating Channel Properties, Plug-ins, and Parameter Pages
This section describes how to display/edit any Plug-in parameters or Channel properties located in a Sound, Group, or Master.
Navigating Channel Properties, Plug-ins, and Parameter Pages
To navigate Channel Properties, Plug-ins, and Parameter Pages:
Set the focus on the Sound, Group, or Master. For more information, refer to section Focusing on a Group or a Sound).
Press the CHANNEL button to display the Channel properties or the PLUG-IN button to display the Plug-in slots of the selected Sound, Group, or the Master.
Press Button 1 (MASTER), Button 2 (GROUP), or Button 3 (SOUND) to display the Plug-ins and Channel properties of the Master, the focused Group, or the focused Sound.
Use the 4-D encoder or press Button 5/6 to navigate the Channel properties or Plug-ins (the name of the selected Channel properties or Plug-in appears between the left and right arrows under Button 5 and 6). The parameters of the selected Channel properties or Plug-in are shown on the displays.
Use the Page buttons (underneath the BROWSER and SAMPLER buttons) to navigate through the Parameter pages of the selected Channel properties or Plug-in. Moreover, if there is another page available to the left or to the right of the current page, the corresponding Page button will be half-lit.
Use Knobs 1–8 under the displays to adjust the value of the parameters available on the selected page. For continuous parameters, hold SHIFT while turning the Knobs to adjust the values in finer increments.
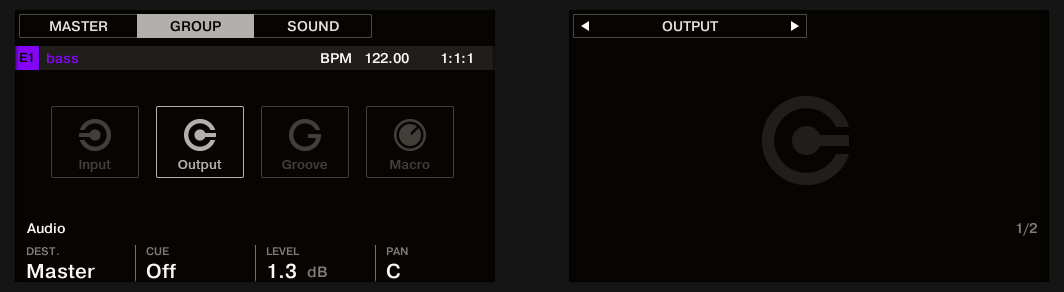
The displays showing the Audio page from the Group’s OUTPUT properties.
Using the Navigate Mode
Alternatively, you can also navigate Channel properties and Plug-ins along with their Parameter pages via the Navigate mode:
Press SHIFT + VARIATION to enter Navigate mode (or pin it by pressing NAVIGATE + Button 1).
Hold SHIFT + VARIATION, then Button 2 (PAGE NAV) to enter Page Navigation mode.
Press the CHANNEL button to display the Channel properties or the PLUG-IN button to display the Plug-in slots of the selected Sound, Group, or the Master.
Press Button 5/6 to navigate the Channel properties or Plug-ins. The name of the selected Channel properties or Plug-in appears between the left and right arrows under Button 5 and 6. Furthermore, this Plug-in or set of Channel properties is highlighted on the left display.
Press the dimmed pads to select the desired Parameter pages. The names of the available Parameter pages are shown on the right display along with the corresponding pads.
Upon your selection, the corresponding pad turns fully lit and the page name is highlighted on the right display.
If there are more than 16 Parameter pages, press Button 7/8 to switch to the previous/next 16 pages.
Release the VARIATION button to get back to Control mode (or press VARIATION) a second time if you pinned the Navigate mode).
The selected Parameter page now appears on the displays. Use Knobs 1–8 under the displays to adjust the parameters.
Performing with Scenes and Sections
Maschine+ provides you with settings to fine-tune the timing of the jump between the Scenes and Sections:
The Perform Grid lets you quantize the Scene transitions: You can choose the point at which the playback will leave the current Scene (Ideas view) or Section (Song view). For example, you might not want a newly selected loop to fire off immediately, you might want it to wait until the next bar line. The available quantization values are: one bar, one-half note, one-quarter note, one-eighth note, one-sixteenth note, the whole Scene/Section, and Off. If you choose Off, the Scene/Section change will be performed immediately after you select the next loop.
The Retrigger setting lets you decide where the next loop will start:
If Retrigger is activated, the next Section (Ideas view) or Section (Song view) that is selected will be forced to play from the start. This is useful if you always want your Scenes or Sections to play from the beginning regardless of what’s happening elsewhere in the music.
If Retrigger is deacrivated (default setting), the next Scene or Section that is selected will play from the same offset to the beginning: for example, leaving the current Section on beat 3 will cause the new Section to start playing on its beat 3. This ensures that the global groove of your track is not interrupted.
Jumping between Scenes and Sections
In Ideas view, the Perform Grid and the Retrigger control the setting for the jump between Scenes, and in Song view, it sets the grid for the jump between Sections.
To set the Perform Grid and the Retrigger settings:
Press SHIFT + IDEAS , then press Button 1 or 2 to select Ideas view or Song View.
Press SHIFT + FOLLOW (Grid) to enter Grid mode (or pin it by pressing SHIFT + FOLLOW (Grid) then Button 1).
Press Button 2 to select PERFORM.
Press a pad to select the desired value, for example, pad 9 (for 1/4, a quarter note).
The next time you select a new Scene/Section or loop range, the switch will happen on the next quarter note.
Adjusting the Scene Retrigger Setting
To adjust the Scene Retrigger setting:
Press SHIFT + IDEAS (Song), then press Button 1 to select Ideas view.
Press SCENE (Section) to enter Scene mode (or pin it by pressing SCENE + Button 1).
At the bottom left corner of the left display, you see the current RETRIGGER value (Off by default).
Turn Knob 1 to select On.
The next time you select a new Scene or loop range, it will start from the beginning.
Adjusting the Section Retrigger Setting
To adjust the Section Retrigger setting:
Press SHIFT + IDEAS (Song), then press Button 2 to select Song view.
Press SCENE to enter Section mode (or pin it by pressing SCENE + Button 1).
Press the Right Page button to access page 2.
At the bottom left corner of the left display, you see the current RETRIGGER value (Off by default).
Turn Knob 1 to select On.
The next time you select a new Section or loop range, it will start from the beginning.
Adjusting Volume, Swing, and Tempo
At any time you can quickly adjust volume levels, swing, and the overall tempo of your Project using the Quick Edit buttons.
Mute and Solo
Muting allows you to bypass a Sound or a Group, whereas Soloing is pretty much the opposite; it mutes all other Sounds or Groups so that only the soloed Sound or Group is played.
The combination of muting and soloing is a useful means play live and test different sequences together.
In a live set, you can mute and solo Groups and Sounds at the same time. Since soloing a Sound mutes all Sounds except one, the MUTE button can then be used to “release” Sounds that have been muted. You can use this technique to create a breakdown: solo a given Sound such as a kick drum, then build the track up again by bringing the muted Sounds back in one at a time with the MUTE button.
To enter solo mode:

The Solo mode
To enter mute mode:

The Mute mode
Press and hold MUTE to enter Mute mode. You can also press MUTE + Button 1 to pin this mode and make it permanent.
Mute Sounds by pressing their pads, and mute Groups of the current Group bank by pressing their Group buttons. Press Button 3 and 4 to switch to the previous/next Group bank, respectively.
In both Solo and Mute modes, you will note the following:
The unmuted pads and Group buttons are fully lit on your controller, while the muted ones are dim-lit (and the empty ones are off).
On the displays, the unmuted Sounds and Groups are highlighted while the muted ones are not (and the empty ones are… empty).
In both modes, the displays provide a few more functions:
Press ALL ON (Button 5) to activate all Sounds in the selected Group.
Press NONE (Button 6) to deactivate all Sounds in the selected Group.
Hold Button 8 (AUDIO) to view the Sounds that are muted: Sounds with audio mute activated have fully lit pads, while Sounds with only event mute have dim-lit pads. This is also indicated on the right display (Sounds with audio mute are highlighted). While holding Button 8 (AUDIO), press any pad to switch the audio mute for this Sound on or off.
Notice
Enabling/disabling audio mute for a Sound does not mute/unmute it! It only sets this Sound to get both its events and its audio muted when you will mute it via the usual way (pressing MUTE + its pad).
Tip
Since soloing a Sound mutes all Sounds except one, the MUTE button can then be used to “release” Sounds that have been muted. You can use this technique to create a breakdown: Solo a given Sound such as a kick drum, then build the track up again by bringing the muted Sounds back in one at a time while holding the MUTE button.
Using the Smart Strip
The Smart Strip puts control of several parameters at your fingertips: You can use the Smart Strip to apply pitch bend or modulation to the sound you are playing on the pads, tweak Perform FX in real-time, or play Sounds by strumming on the Smart Strip.
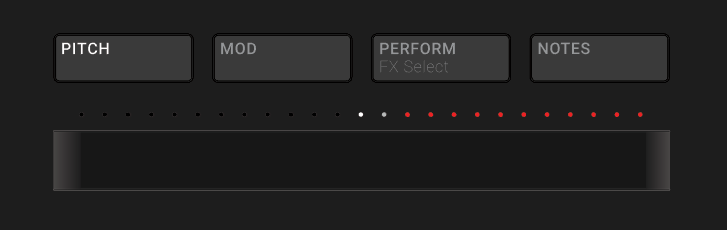 |
Smart Strip with PITCH mode activated.
When the Smart Strip modes are not in use the LEDs show the playhead position within a pattern or song.
In Ideas view, the Smart Strip LEDs indicate the playhead position within the selected pattern during playback and recording.
In Song view, the Smart Strip LEDs indicate the playhead position within the song.
This feature provides great visual feedback to aid your timing when recording or switching up patterns during a live set.
Note
This feature is not available when the Smart Strip modes (Pitch, Mod, Perform, and Notes) are in use.
Pitch Mode
In Pitch mode, sliding your finger on the Smart Strip “bends” the pitch of the notes you play on the pads, i.e., it detunes the sound by a certain amount. If you have used the pitch bend wheel on a synthesizer or standard MIDI keyboard before, you are probably familiar with this effect.
In Pitch mode, the scale on the Smart Strip is centered, as indicated by a white LED in the middle of the Smart Strip. Sliding your finger to the left will flatten the pitch. Sliding your finger to the right will sharpen the pitch. The amount of pitch bend applied to the Sound is indicated by the LED dots above the Smart Strip. Once you lift your finger off the Smart Strip, the pitch of the sound will return to standard tuning.
To enable Pitch mode, press the PITCH button.
Modulation Mode
In Modulation mode, sliding your finger on the Smart Strip modulates the sound of the notes you play on the pads. The Smart Strip always controls the parameter that is assigned to the standard MIDI CC #1. This MIDI Continuous Controller is reserved for the modulation wheel. If you have used the modulation wheel on a synthesizer or standard MIDI keyboard before, you are probably familiar with the effect.
In Modulation mode, the scale starts at the left side of the Smart Strip, as indicated by a white LED. Sliding your finger to the right will apply an increasing amount of modulation, as indicated by the LED dots above the Smart Strip. When you lift your finger off the Smart Strip, the modulation value will remain at the position where the strip was last touched; the LED dots above remain lit to indicate this position.
To enable Modulation mode, press the MOD button.
Notes Mode
In Notes mode, sliding your finger on the Smart Strip plays the pads you hold one after the other. Sliding your finger on the Smart Strip while no pad is held will play all Sounds mapped to the pad matrix in Pad Mode or Keyboard mode. If you slide your finger from left to right, the pads will be played in an ascending manner. If you slide your finger from right to left, the pads will be played in a descending manner. This applies regardless of which pads (if any) are held.
To play notes using the Smart Strip:
Load a Group (in Pad mode) or Sound (in Keyboard/Chords mode) so they are mapped to the pads.
Press the NOTES button to enable Notes mode.
Press and hold the pads you want to play.
Slide your finger on the Smart Strip to “strum” the sounds mapped to the pads.
Entering Text
At certain times when using Maschine+ you will need to enter text in order to, for example, name files, projects, or enter passwords. In such situations the following text entry dialog will appear:
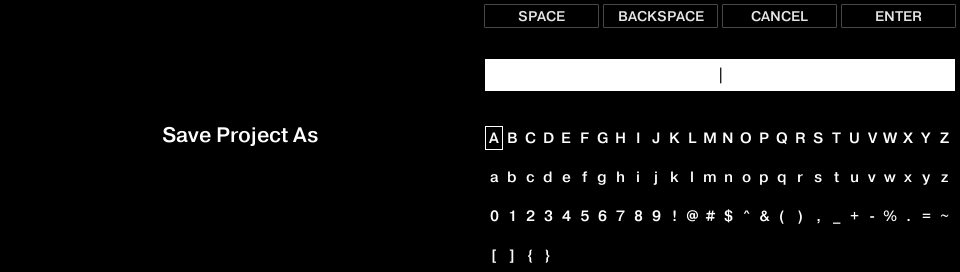
Save Project As text entry dialog