Recording Patterns
Recording patterns is the primary way of building a song in Maschine. From playing to programming beats, learn everything you need to know about patterns here.
This chapter provides an overview of the necessary steps required to record and edit a Pattern. It explains the generic process of creating both a beat and melodic content. It also describes the various ways this can be accomplished with Maschine+ through real-time input or using the sequencer.
Here's an overview of this chapter:
Setting Recording Options: This section provides information on how to set up your own recording options, from setting the tempo. pattern length and count-in and metronome. For more information, refer to Setting Recording Options .
Playing and Programming Beats: This section will guide you through the process and features that can be used to create a beat-based pattern. For more information, refer to Playing and Programming Beats.
Creating Melodies and Harmonies: This section explains how to create melodic content. For more information, refer to Creating Melodies and Harmonies.
Recording Modulation: This section explains how recording modulation enables you to record changes for a chosen parameter over time, to add movement, life, and depth to the sounds and effects in your songs. For more information, refer to Recording Modulation.
Now it’s time to get creative!
Setting Recording Options
Before you begin recording there are several options you may want to configure to help you get the most from Maschine+. You can of course start recording straight away using the default settings, but if you are an experienced user and have a preferred recording setup you can configure your own settings. However, regardless of your experience with Maschine+, you can revisit these features at any time to optimize your setup.
The recording options include:
Tempo: The tempo of your track can be changed at any time, but setting it upfront can often give your track a certain feel that helps create the “vibe” or foundation of your track as you are recording. Additionally, you may even want to use Tap Tempo to sync up with other musicians when recording or playing live. For more information, refer to Setting the Tempo.
Pattern Length: Set the length of the Pattern you want to record in Bars. By default as you record a Pattern Maschine+ will automatically grow the Pattern to accommodate the length of your recording, but if you have a certain length in mind, you can change this default setting, refer to Adjusting the Pattern Length.
Step Grid: Step Grid affects both the size and number of steps and the quantization resolution in your Pattern. This is useful when recording and also when editing your Pattern. For more information see Setting the Step Grid.
Record Settings: These options enable you to adjust Metronome parameters (Level, Time signature, and Auto-on), Count-In Length, and automatic Quantize mode via the onscreen overlay, Input velocity, and Pattern Follow. The Metronome is a precise musical reference that can help you keep time when recording live input. The Quantize mode options allow you to set various options related to when and how quantization is applied to the input of your recording. Pattern Follow will set Maschine+ to move with the Playhead through the various parts of your Pattern when step sequencing. For more information see General Settings.
Setting the Tempo
The TEMPO button enables you to change the tempo of the track in beats per minute (BPM).
To change the tempo of the song:
Press the TEMPO button.
Turn the 4-D encoder right to increase the tempo, or turn it left to decrease the tempo.
The tempo of the song changes and the current BPM is visible on the left display.
Tapping the Tempo
You can also use Tap Tempo to set the tempo at any time. This is an intuitive way to match another beat or sync with other musicians. As you tap the tempo once every beat, Maschine+ will follow the tempo of your tapping and set the BPM accordingly.
To use Tap Tempo:
Press and hold SHIFT + tap the TAP (Metro) button at the desired tempo.
The tempo is adjusted to your tapping.
Setting the Step Grid
The Step Grid defines regularly spaced-out timings (the “steps”) at which your events/notes can be created, moved, etc. The Step Grid resolution corresponds to the step size, which directly affects the precision of all Pattern and Clip editing actions, including quantization.
Adjusting the Pattern Length
You can adjust the length of your Patterns to fit your needs. The Pattern Length is measured in bars and beats, and Patterns can be up to 256 bars long. When you create a new empty Pattern, the Pattern will automatically grow as you record. However, you can set a defined length or change the length of an existing pattern.
Playing and Programming Beats
This chapter explains the process and features that can be used to create a beat-based pattern using Maschine+. It covers the basics of loading a group (a kit) and takes you through the two common ways of creating patterns: recording in real-time and step programming. For information on creating melodic content, refer to Creating Melodies and Harmonies.
Maschine+ provides two modes that are ideal for creating beat-based patterns:
Pad mode : In Pad mode you can assign one Sound from a Group to each of the Pads labeled 1-16. The Pads can be used to record in real-time as you finger drum or simply trigger each Sound individually. By default, the pads are sensitive to velocity: The harder you hit them, the louder the sound will be. You can have many Groups, each containing up to sixteen Sounds each. Switch between your Groups and record several Patterns in order to create a set of Scenes, and ultimately a Song. For more information on recording in realtime, refer to Recording Beats in Real-time.
Step mode : In Step mode, is similar to a traditional step sequencer, where each of the Pads represents a step in the Step Grid. Just as on classical drum machines, a light representing the sequence runs across the Pads, highlighting each step during playback. Select a Sound and put events at chosen steps in the sequence by pressing the corresponding pads. By repeating the process sound by sound you can build up a whole Pattern. For more information on Step mode, refer to Sequencing Beats with Step Mode.
However, before you begin to create a beat you must first load a drum kit using the Browser.
Loading a Drum Kit
To create a beat you must first load a kit from the Maschine factory library. In Maschine+ a drum kit can be made of a collection of Sounds. These are referred to as a Group.
To load a Group.
Press button A on the left to select the first Group slot. This is where you are going to load the drum kit. Button A should be lit to indicate that it is selected.
Press the BROWSER button.
The BROWSER button lights up. In the left display, you now are presented with a selection of choices.
Press Button 1 or Button 2 above the displays to select GROUPS.
A list of Groups appears on the right display:
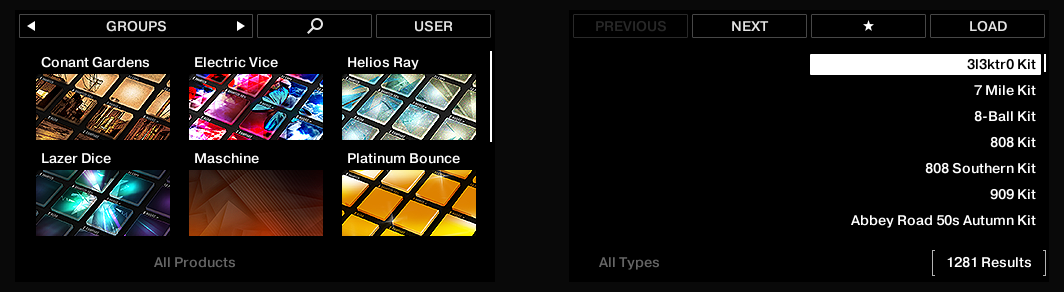
Check that Button 4 above the displays is not fully lit and that the USER label underneath is not highlighted; if necessary, press Button 4 to disable it.
This will now allow you to select only Native Instruments factory content.
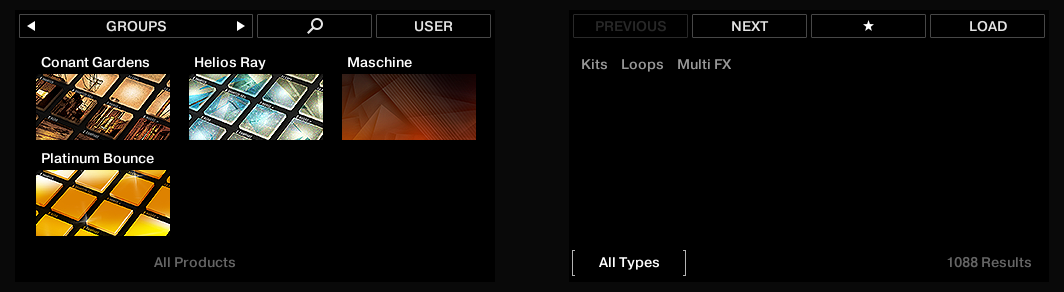
Move the 4-D encoder to the left or to the right in order to put the focus (indicated by the brackets) on All Types.
Press and hold the 4-D encoder to view which Group types are available.
The right display shows the various types of Groups available (Kits, Loops, Multi FX) as long as the 4-D encoder is pressed:
While holding the 4-D encoder, turn it to select Kits.
When you release the encoder, the right display shows the list of Groups again, but now this list contains only drum kits. Note that you can also turn the 4-D encoder without holding it to select the desired entry (the available types of Groups will not be displayed).
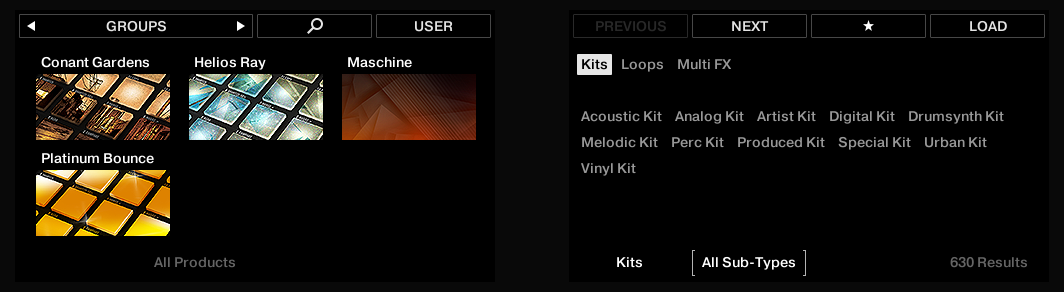
Move the 4-D encoder one step to the right to put the focus (the brackets) on the All Sub-Types label that just appeared.
Press and hold the encoder.
The right display shows the various sub-types of drum kits available as long as the 4-D encoder is pressed:
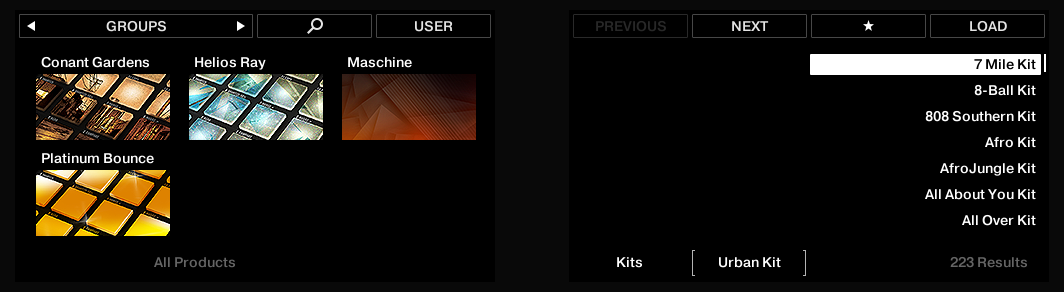
Turn the 4-D encoder until, for example, Urban Kit is selected.
When you release the encoder, the result list on the right display is further reduced to the kits of that particular sub-type:
Move the 4-D encoder another step to the right to put the focus on the Results list.
Turn the 4-D encoder to scroll down the list and until, for example, EK-TL A KIT is selected.
If you want to hear the kits as you scroll through them, Press SHIFT + Button 8 (PREHEAR).
Now press SHIFT + Button 4 above the displays so that +PATTERNS is deselected.
Press the 4-D encoder to load the selected entry.
The drum kit is loaded into Group A.
Recording Beats in Real-time
In Pad mode the sixteen pads representing the Sounds of a Group can be used to jam or record beats in real-time as the Sounds are triggered.
The kit you have loaded using the Browser is now assigned to the pads 1 to 16.
To enter Pad mode:
Press the PAD MODE button.
Select a Group A to H containing the Sounds you want to play.
Press any of the sixteen pads to hear their Sound.
Press REC + PLAY at any time to record a Pattern.
Press STOP to stop recording.
For information on changing Pattern Length, or Step Grid settings, refer to Setting Recording Options.
Using Note Repeat
Note Repeat is a really handy way to play and program beats: it plays the selected Sound or note repeatedly at a given rate. You just need to hold a pad and its Sound/note will be steadily repeated until you release the pad.
When using Note Repeat all pads will be both velocity and pressure-sensitive, allowing for expressive drum rolls or dynamic basslines.
Note Repeat is a great way to play percussion and drums live to create build-ups and breaks.
Note Repeat can also come in handy to quickly record a regular beat when creating Patterns.
Note Repeat is also interesting to use with tonal Sounds and you can access it from Keyboard mode to create synthesizer-like arpeggios.
General Notes on Note Repeat
The output of the Note Repeat is recorded into the Pattern Editor.
The Note Repeat cannot be modulated or automated.
You can use Note Repeat even if the transport is not running: In this case, the Note Repeat engine will use its own central clock.
This clock will be reset as soon as you start the playback.
Tip
Note Repeat is great for programming your Pattern, especially things like a continuous hi-hat, and in performances for doing big rolls and fills.
Sequencing Beats with Step Mode
If you are familiar with classic drum machines you may want to program your Pattern using the step sequencer. In Step mode, you progressively build up the Pattern by programming a sequence for each individual Sound of the selected Group. Notably, the sequencer does not even need to be playing.
In Step mode each pad represents one step of a 16-step sequence: you can activate each step by pressing its pad once, lighting it up. If you press the pad again, the step is removed. This way it’s quick and easy to create a drum pattern. If you press play you will hear the sequence and see a light chasing through the pads, starting from pad 1, going up all four rows from left to right, and ending at pad 16. You may continue to activate or deactivate pads to build your sequence during playback.
Adding Swing
Swing controls the rhythmic relationship between events in the selected channel (Sound, Group, or Master). By shifting some of the events, you can for example give a shuffling, ternary touch to your Patterns. The groove created by swing can be adjusted for each channel individually via the on-screen overlay or using the Smart Strips. A groove configured for a channel affects all its contained channels:
On the Master channel, the Groove properties affect all Sounds of all Groups. The Master’s swing is added to the groove set for each individual Group and Sound via their own Groove properties.
On the Group channel, the Swing settings of a Group affect all Sounds of the Group. The Group’s swing is added to the Swing setting for each individual Sound.
On the Sound channel, the Swing settings of a Sound affect that single Sound.
Applying Groove
The groove controls the rhythmic relationship between events in the selected channel (Sound, Group, or Master). By shifting some of the events, you can, for example, give a shuffling, ternary touch to your Patterns.
The groove can be adjusted for each channel individually via its Groove properties.
A groove configured for a channel affects all its contained channels:
At the Sound level, the Groove properties settings of a Sound affect that single Sound.
At the Group level, the Groove properties settings of a Group affect all Sounds of the Group. The Group’s swing is added to the groove set for each individual Sound via its own Groove properties.
At the Master level, the Groove properties affect all Sounds of all Groups. The Master’s swing is added to the groove set for each individual Group and Sound via their own Groove properties.
The Groove properties have a single Parameter page: Swing.
Notice
Please refer to section Navigating Channel Properties, Plug-ins, and Parameter Pages to know how to display and navigate sets of Channel properties.
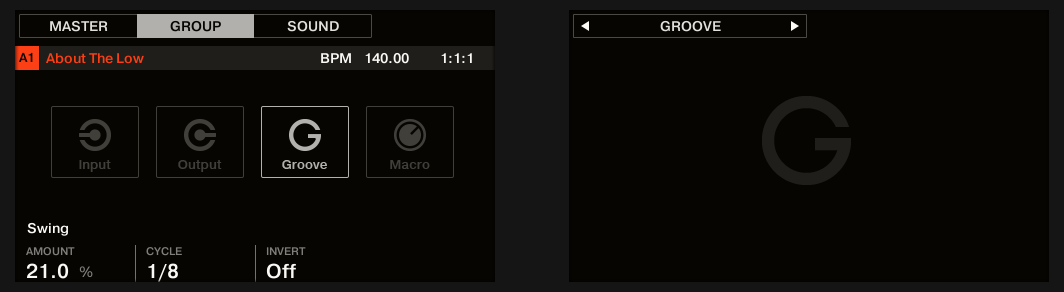
The Groove properties for a Sound
Controls | Description |
|---|---|
SWING Section | |
Amount | Adjusts the amount of swing, i.e. the amount by which some events are shifted. At 0 % events are not shifted. Raise the Amount value to increase the strength of the swing. |
Cycle | Determines on what musical resolution the groove is applied. This directly affects which events will be shifted. Values are measured in fractions of a whole note. |
Invert | Allows you to invert the groove so that instead of being delayed in the Pattern events will be triggered ahead of time. |
Applying Choke
The Choke All Notes feature allows you to cut off any note or event currently playing in your Project. This affects the audio coming from all Plug-ins
To choke all notes:
Press SHIFT + MUTE to choke all playing notes.
Choke All Notes can be useful in various situations:
As a creative tool in a live performance, for example, to create stutter breaks.
As a workflow aid, to stop long one-shot Samples that continue playing after you have stopped the sequencer.
As a first panic button, if you are not sure where in your Project a particular sound is coming from, and you want to get rid of it.
Tip
Contrary to the Mute function, Choke All Notes is not turning any Group/Sound into another state. Instead, all audio voices currently playing are instantaneously cut off. The cut voices cannot be reactivated and are freed up for subsequent notes according to the polyphony setting. Voices triggered by subsequent notes will play normally.
Creating Melodies and Harmonies
This chapter explains how to create melodic content using Maschine+.
Maschine+ offers several ways to do this:
Keyboard mode: In Keyboard mode, the pads enable you to play notes of the focused Sound at different pitches.
Chord Mode: In Chord mode, the pads enable you to play the selected chords
The following subsections will now explain how to create melodic content using these two modes.
Tip
For information on creating a beat, refer to Playing and Programming Beats.
Loading an Instrument
Before you begin to record a melody you must first load an instrument. You can load a sound from the Maschine factory library or a plug-in from the Maschine+ Selection that came with your Maschine+. For more information about installing content on your Maschine+, refer to Using the Library.
Recording Melodies and Harmonies in Real-time
In Keyboard mode, the pads enable you to play notes of the focused Sound at different pitches. This is well suited for playing melodic instruments. The right display indicates the pitches played by each pad. If you press the pads you will hear that they all play the same Sound, but each with a different pitch.
Step Sequencing Melodies and Harmonies
In Step Mode, the pads turn your Maschine+ into a step sequencer for melodies and chords. You can progressively build a Pattern by programming a sequence for each individual note. Furthermore, the integrated Piano Roll mode is set to allow one individual Sound to be programmed using the pads. Select a Sound and a Scale and you’re ready to go!
Selecting Scales and Chords
Maschine+ comes equipped with a vast amount of scales and chords that you can select and use to play your Sounds. This opens up possibilities to play an instrument in key without hitting a wrong note or playing chords that always fit by just hitting a single pad.
When you select a scale from the on-screen overlay, the scale gets mapped onto the pads. This means that regardless of which pads you actually press, or what MIDI notes you send, the notes that are being played back are always mapped onto the closest notes contained in the scale that you select.
By default Maschine+ is set to the chromatic scale of C and the pads represent each semitone. The displays provide an overview of the current settings and allow you to set a new root note for the scale, a scale type, and a chord mode; including harmonic, or one of the predefined chord sets that can be triggered using a single pad.
Setting the Root Note of a Scale
Use the SCALE parameter Root Note to set the root note of a scale. This means deciding what key the scale will begin with. The following notes of the scale depend on which scale pattern you select with the SCALE Type parameter. You can transpose any scale pattern up or down by selecting a different Root Note.
Tip
The Root Note of a scale is visible via brightly lit pads.
Setting the Scale Type
Use the Scale parameter Type to set the scale pattern according to which the notes will be mapped onto the pads. For example, using the default Root Note value C combined with the default Scale Type value Major, you get the scale C major, which spans over one octave and contains the notes C, D, E, F, G, A, and B (followed by C again). If instead, you select G as your Root Note, the G major scale contains the notes G, A, B, C, D, E, and F# (followed by G again). You will notice that the distance between each note follows the same pattern of “whole step–whole step–half step– whole step–whole step–whole step–half step,” which is the pattern of the Major scale. If you are triggering an instrument via an incoming MIDI pattern, the notes of the MIDI pattern will be mapped onto the closest keys belonging to the selected Scale Type. This means that for example (with Root Note set to C) a MIDI pattern consisting of the notes C-D-D# will be played back as such if Scale Type is set to Chromatic (named Chrom in the on-screen overlay), but instead as C-D-E if Scale Type is set to Major.
Chords Mode
Use the Chords mode to generate chords from single notes.
To enter Chords mode:
Press the CHORDS button.
Chords mode has the following parameters:
Chord Mode | Description |
|---|---|
Page 1 | |
Harm | If CHORD Mode is set to Harm, the CHORD Type menu allows you to specify the interval of notes in the selected SCALE Type that will constitute the chord. For example, a triad in the form of the root note, the third note, and the fifth note (CHORD Type value 1-3-5). |
Chord Set | If CHORD Mode is set to Chord Set, the CHORD Type menu allows you to choose from a selection of predefined major and minor chords depending on the current Root Note. Chords can be triggered using the twelve illuminated pads. |
Page 2 | |
Position | Spreads the notes of a chord generated from a single note to aid a more musical transition between chords. |
Fix Vel | Sets the value for the fixed velocity function, activated using the FIXED VEL button. |
Scale and Chord Parameters
This section describes the Scale and Chord engine and its parameters and provides a list of all available scales and chords.
General Notes on Scales and Chords
The Scale and Chord parameters are the same for all Sound slots in a particular Group, you can have different Scale and Chord parameters for each Group. The Scale and Chord parameters of each Group are saved with the Project. However, when you save a Group the Scale and Chord parameters are
notsaved with the Group.The Scale and Chord engine processes live input from the pads only. Input from MIDI and events recorded in the Pattern Editor are not processed by the Scale and Chord engine.
The output of the Scale and Chord engine is recorded into the Pattern Editor.
The Scale and Chord parameters cannot be modulated or automated.
Available Scales
The Scale engine is controlled via two parameters:
Root Note (C3 by default): Defines both the root note of the scale and the particular key triggered by Pad 1. As a direct consequence, Pad 1 always triggers the root note of the selected scale.
Scale Type (Chromatic by default): Selects the scale pattern whose notes will be mapped onto the pads: The Root Note is on pad 1, the 2nd note of the selected Scale Type is on pad 2, etc. Once all notes are mapped, the next pad triggers the root note in the next octave. The Root Note and its octaves are indicated by fully lit pads, while other pads are dimmed.
The following scale types are available:
Main Scales
Scale | Bank | Type | Degree Formula |
|---|---|---|---|
Chromatic | Main | Chrom | 1 ♭2 2 ♭3 3 4 ♭5 5 ♭6 6 ♭7 7 |
Major | Main | Major | 1 2 3 4 5 6 7 |
Minor | Main | Minor | 1 2 ♭3 4 5 ♭6 ♭7 |
Harm Min | Main | Harm Min | 1 2 ♭3 4 5 ♭6 7 |
Maj Pent | Main | Maj Pent | 1 2 3 5 6 |
Min Pent | Main | Min Pent | 1 ♭3 4 5 ♭7 |
Blues | Main | Blues | 1 ♭3 4 ♯4 5 ♭7 |
Japanese | Main | Japanese | 1 2 ♭3 5 ♭6 |
Freygish | Main | Freygish | 1 ♭2 3 4 5 ♭6 ♭7 |
Gypsy | Main | Gypsy | 1 2 ♭3 ♯4 5 ♭6 7 |
Arabic | Main | Arabic | 1 ♭2 3 4 5 ♭6 7 |
Altered | Main | Altered | 1 ♭2 ♯2 3 ♯4 ♭6 ♭7 |
Whole Tone | Main | WH Tone | 1 2 3 ♯4 ♯5 ♭7 |
H-W Dim | Main | H-W Dim | 1 ♭2 ♯2 3 ♯4 5 6 ♭7 |
W-H Dim | Main | W-H Dim | 1 2 ♭3 4 ♯4 ♯5 6 7 |
Modes Scales
Scale | Bank | Type | Degree Formula |
|---|---|---|---|
Ionian | Modes | Ionian | 1 2 3 4 5 6 7 |
Dorian | Modes | Dorian | 1 2 ♭3 4 5 6 ♭7 |
Phrygian | Modes | Phrygian | 1 ♭2 ♭3 4 5 ♭6 ♭7 |
Lydian | Modes | Lydian | 1 2 3 ♯4 5 6 7 |
Mixolydian | Modes | Mixolyd | 1 2 3 4 5 6 ♭7 |
Aeolian | Modes | Aeolian | 1 2 ♭3 4 5 ♭6 ♭7 |
Locrian | Modes | Locrian | 1 ♭2 ♭3 4 ♭5 ♭6 ♭7 |
Ionian b2 | Modes | Ion b2 | 1 ♭2 3 4 5 6 7 |
Dorian b5 | Modes | Dor b5 | 1 2 ♭3 4 ♭5 6 ♭7 |
Harm Phryg | Modes | Har Phry | 1 ♭2 ♭3 4 5 ♭6 7 |
Phryg Major | Modes | Phry Maj | 1 ♭2 ♭3 4 5 6 7 |
Lydian b3 | Modes | Lyd b3 | 1 2 ♭3 ♯4 5 6 7 |
Major Locrian | Modes | Maj Loc | 1 2 3 4 ♭5 ♭6 ♭7 |
Minor Locrian | Modes | Min Loc | 1 2 ♭3 4 ♭5 ♭6 ♭7 |
Super Locrian | Modes | Sup Loc | 1 ♭2 ♭3 ♭4 ♭5 ♭6 ♭7 |
Jazz Scales
Scale | Bank | Type | Degree Formula |
|---|---|---|---|
Lydian ♭7 | Jazz | Lyd ♭7 | 1 2 3 ♯4 5 6 ♭7 |
Altered | Jazz | Altered | 1 ♭2 ♯2 3 ♯4 ♭6 ♭7 |
Diminished | Jazz | Diminshd | 1 ♭2 ♯2 3 ♯4 5 6 ♭7 |
Mixo b13 | Jazz | Mix b13 | 1 2 3 4 5 ♭6 ♭7 |
Mixo b9 b13 | Jazz | Mixb9b13 | 1 ♭2 3 4 5 ♭6 ♭7 |
Lydian ♭7 b2 | Jazz | Lyd ♭7b2 | 1 ♭2 3 ♯4 5 6 ♭7 |
Bebop | Jazz | Bebop | 1 2 3 4 5 6 ♭7 7 |
Whole Tone | Jazz | Whole Tn | 1 2 3 ♯4 ♯5 ♭7 |
Blues Maj | Jazz | Blues Ma | 1 2 ♭3 3 5 6 |
Blues Min | Jazz | Blues Mi | 1 ♭3 4 ♯4 5 ♭7 |
Blues Combined | Jazz | BluesCmb | 1 2 ♭3 3 4 ♯4 5 6 ♭7 |
Lydian #5 | Jazz | Lyd #5 | 1 2 3 ♯4 ♯5 6 7 |
Jazz Minor | Jazz | Jazz Mi | 1 2 ♭3 4 5 6 7 |
Half Dim | Jazz | Half Dim | 1 2 ♭3 4 ♭5 ♭6 ♭7 |
Augmented | Jazz | Augmentd | 1 ♭3 3 5 ♯5 7 |
World Scales
Scale | Bank | Type | Degree Formula |
|---|---|---|---|
Hungarian Min | World | Hung Min | 1 2 ♭3 ♯4 5 ♭6 7 |
Hungarian Maj | World | Hung Maj | 1 ♯2 3 ♯4 5 6 ♭7 |
Neapolitan | World | Neapoltn | 1 ♭2 ♭3 4 5 ♭6 7 |
Spanish | World | Spanish | 1 ♭2 ♭3 3 4 5 ♭6 ♭7 |
Greek | World | Greek | 1 2 ♭3 ♭4 5 ♭6 ♭7 |
Jewish 1 | World | Jewish 1 | 1 ♭2 3 4 5 ♭6 ♭7 |
Jewish 2 | World | Jewish 2 | 1 2 ♭3 ♯4 5 6 ♭7 |
Indian 1 | World | Indian 1 | 1 ♭2 ♭3 ♯4 5 ♭6 7 |
Indian 2 | World | Indian 2 | 1 2 ♭3 ♯4 5 6 7 |
Indian 3 | World | Indian 3 | 1 ♭2 2 4 5 ♭6 6 |
Indian 4 | World | Indian 4 | 1 ♯2 3 4 5 ♯6 7 |
Mid East 1 | World | M East 1 | 1 ♭2 3 4 5 ♭6 7 |
Mid East 2 | World | M East 2 | 1 ♭2 3 4 ♭5 ♭6 7 |
Mid East 3 | World | M East 3 | 1 ♭2 ♭3 4 ♭5 6 ♭7 |
Mid East 4 | World | M East 4 | 1 ♭2 3 4 ♭5 6 ♭7 |
5-Tone Scales
Scale | Bank | Type | Degree Formula |
|---|---|---|---|
Penta I | 5-Tone | Pent I | 1 2 3 5 6 |
Penta II | 5-Tone | Pent II | 1 2 4 5 ♭7 |
Penta III | 5-Tone | Pent III | 1 ♭3 4 ♭6 ♭7 |
Penta IV | 5-Tone | Pent IV | 1 2 4 5 6 |
Penta V | 5-Tone | Pent V | 1 ♭3 4 5 ♭7 |
Hirajoshi | 5-Tone | Hira | 1 2 ♭3 5 b6 |
Insen | 5-Tone | Insen | 1 ♭2 4 5 ♭7 |
Kokin Joshi | 5-Tone | Kokin | 1 2 4 5 b6 |
Akebono | 5-Tone | Akebono | 1 2 ♭3 5 6 |
Ryukuan | 5-Tone | Ryukuan | 1 3 4 5 7 |
Abhogi | 5-Tone | Abhogi | 1 2 ♭3 4 6 |
Bhupkali | 5-Tone | Bhupkali | 1 2 3 5 b6 |
Hindolam | 5-Tone | Hindolam | 1 ♭3 4 ♭6 ♭7 |
Bhupalam | 5-Tone | Bhupalam | 1 ♭2 ♭3 5 b6 |
Amritavarshini | 5-Tone | Amrita | 1 3 ♯4 5 7 |
Modern Scales
Scale | Bank | Type | Degree Formula |
|---|---|---|---|
Octatonic | Modern | Octatonc | 1 2 ♭3 4 ♯4 ♯5 6 7 |
Acoustic | Modern | Acoustic | 1 2 3 ♯4 5 6 ♭7 |
Augmented | Modern | Augmentd | 1 ♭3 3 5 ♯5 7 |
Tritone | Modern | Tritone | 1 ♭2 3 ♭5 5 ♭7 |
Leading Wh Tone | Modern | Lead Wh | 1 2 3 ♯4 ♯5 ♯6 7 |
Enigmatic | Modern | Enigmatc | 1 ♭2 3 ♯4 ♯5 ♯6 7 |
Scriabin | Modern | Scriabin | 1 2 3 ♯4 6 ♭7 |
Tcherepnin | Modern | Tcherepn | 1 ♯1 ♯2 3 4 5 ♯5 6 7 |
Messiaen I | Modern | Mes I | 1 2 3 ♯4 ♯5 #6 |
Messiaen II | Modern | Mes II | 1 ♭2 ♯2 3 ♯4 5 6 ♭7 |
Messiaen III | Modern | Mes III | 1 2 ♭3 3 ♯4 5 ♭6 ♭7 7 |
Messiaen IV | Modern | Mes IV | 1 ♭2 2 4 ♯4 5 ♭6 7 |
Messiaen V | Modern | Mes V | 1 ♭2 4 ♯4 5 7 |
Messiaen VI | Modern | Mes VI | 1 2 3 4 ♯4 ♯5 ♯6 7 |
Messiaen VII | Modern | Mes VII | 1 ♭2 2 ♭3 4 ♯4 5 ♭6 6 7 |
Major Scales
Scale | Bank | Type | Degree Formula |
|---|---|---|---|
Natural | Major | Natural | 1 2 3 4 5 6 7 |
Lydian | Major | Lydian | 1 2 3 ♯4 5 6 7 |
Mixolydian | Major | Mixolyd | 1 2 3 4 5 6 ♭7 |
Major Minor | Major | Maj Min | 1 2 3 4 5 ♭6 ♭7 |
Harmonic Major | Major | Har Maj | 1 2 3 4 5 ♭6 7 |
Dbl Har Major | Major | Dbl Maj | 1 ♭2 3 4 5 ♭6 7 |
Neapolitan Maj | Major | Nea Maj | 1 ♭2 3 4 5 6 7 |
Major Locrian | Major | Maj Loc | 1 2 3 4 ♭5 ♭6 ♭7 |
Blues Major | Major | Blues Ma | 1 2 ♭3 3 5 6 |
Bebop Major | Major | Bebop Ma | 1 2 3 4 5 ♯5 6 7 |
Hexa 1 | Major | Hexa 1 | 1 2 3 5 6 7 |
Hexa 2 | Major | Hexa 2 | 1 2 3 4 5 6 |
Penta 1 | Major | Penta 1 | 1 2 3 5 6 |
Penta 2 | Major | Penta 2 | 1 3 4 5 7 |
Penta 3 | Major | Penta 3 | 1 3 5 6 7 |
Minor Scales
Scale | Bank | Type | Degree Formula |
|---|---|---|---|
Natural | Minor | Natural | 1 2 ♭3 4 5 ♭6 ♭7 |
Dorian | Minor | Dorian | 1 2 ♭3 4 5 6 ♭7 |
Phrygian | Minor | Phrygian | 1 ♭2 ♭3 4 5 ♭6 ♭7 |
Minor Major | Minor | Min Maj | 1 2 ♭3 4 5 6 7 |
Harmonic Minor | Minor | Har Min | 1 2 ♭3 4 5 ♭6 7 |
Dbl Har Minor | Minor | Dbl Min | 1 2 ♭3 ♯4 5 ♭6 7 |
Neapolitan Min | Minor | Nea Min | 1 ♭2 ♭3 4 5 ♭6 7 |
Minor Locrian | Minor | Min Loc | 1 2 ♭3 4 ♭5 ♭6 ♭7 |
Blues Min | Minor | Blues Mi | 1 ♭3 4 ♯4 5 ♭7 |
Bebop Minor | Minor | Bebop Mi | 1 2 ♭3 4 5 ♭6 ♭7 7 |
Hexa 1 | Minor | Hexa 1 | 1 2 ♭3 5 ♭6 ♭7 |
Hexa 2 | Minor | Hexa 2 | 1 2 ♭3 4 5 b6 |
Penta 1 | Minor | Penta 1 | 1 2 ♭3 5 b6 |
Penta 2 | Minor | Penta 2 | 1 ♭3 4 5 ♭7 |
Penta 3 | Minor | Penta 3 | 1 ♭3 5 ♭6 ♭7 |
By default, the Chromatic scale is selected — in other terms, by default your pads play every semitone, however, the last selected Scale is automatically assigned when a new Group is created.
Notice
The Scale Type parameter is not available if the Chord Mode parameter is set to Chord Set.
Available Chords
The Chord engine can automatically generate chords depending on the selected scale and the pads you press. The Chord engine is controlled via two parameters:
Chord Mode (Off by default): Selects from three different modes for generating chords:
Off: No chords will be generated. Only the notes corresponding to the pads that you hit will be played.
Harmonizer: Generates chords based on the pads you hit and using notes from the selected scale, as specified by the Root Note and Scale Type parameters (see above). Use the Chord Type parameter to choose the particular notes to be used in the chord (see below). As the chord is triggered, pads of all included notes flash.
Chord Set: This special mode maps a set of chords onto the first 12 pads. These chords are not bound to any scale type, they are only affected by the selected Root Note. Use the Chord Type parameter to choose a particular set of chords to be mapped onto the pads (see below). In this mode, only the pad you actuate flashes.
Chord Type: Selects which chords will be mapped to your pads. The available chord types depend on the selected Chord Mode and Scale Type:
If Chord Mode is set to Harmonizer, the Chord Type parameter offers different chords depending on whether Scale Type is set to Chromatic or to any other scale. All available chords are listed in the tables below.
If Chord Mode is set to Chord Set, the Chord Type parameter provides 16 different sets of 12 chords each (8 major sets and 8 minor sets): Major 1, Major 2, …, Major 8, and Minor 1, Minor 2, …, Minor 8. The 12 chords are mapped onto the first 12 pads. Pads 13–16 are deactivated.
Position: Spreads the notes of a chord generated from a single note to aid a more musical transition between chords. Refer to Position.
Fixed Velocity: Sets the value for the fixed velocity function, activated using the FIXED VEL button.
When Chord Mode is set to Harmonizer and Scale Type is set to Chromatic, since this scale includes all semitones the chords can use any of them. Chord Type offers the following chords:
Chord Type | Semitones Added above Played Note |
|---|---|
Octave | 12 |
Perfect 4 | 5 |
Perfect 5 | 7 |
Major | 4 and 7 |
Minor | 3 and 7 |
Suspended 4 | 5 and 7 |
Major 7 | 4, 7, and 11 |
Minor 7 | 3, 7, and 10 |
Dominant 7 | 4, 7, and 10 |
Dominant 9 | 4, 7, 10, and 14 |
Minor 7♭5 | 3, 6, and 10 |
Diminished 7 | 3, 6, and 9 |
Augmented | 4 and 8 |
Quartal | 5, 10, and 15 |
Trichord | 5 and 11 |
When Chord Mode is set to Harmonizer and Scale Type is set to any other scale than Chromatic, the chords are bound to the particular notes included in the specified scale. Chord Type offers the following chords:
Chord Type | Notes Added to Played Note |
|---|---|
Octave | Octave |
1-3 | 3rd |
1-5 | 5th |
1-3-5 | 3rd and 5th |
1-4-5 | 4th and 5th |
1-3-5-7 | 3rd, 5th, and 7th |
1-4-7 | 4th and 7th |
Position
If all chords are played in their root position, they can sound quite choppy, especially if you play chords with large distances between each other in the scale. However, the Position parameter changes the order and spreads the notes of a chord generated from a single note to create chord inversions. These inversions create a more pleasing and musical transition between chords, with the Auto option providing the best results.
The Position parameter contains the following options:
Position | Description |
|---|---|
Root | The root position of the selected chord is always played. |
-1 to -8 | Decreasing Position with negative values moves the highest note of the current chord down by an octave. This inverts the chord to a lower position in the selected scale. |
+1 to +8 | Increasing Position with positive values moves the lowest note of the current chord up by an octave. This inverts the chord to a higher position in the selected scale. |
Auto | This provides a more human feel in the transition from one chord to another. The notes used to form each chord are automatically selected to provide the best inversion. |
Scales and Chords: Visual Feedback on the Pads
When scales and/or chords are activated, the LEDs of the pads keep you informed at any time on the current scale and chord configuration. The default lighting behavior of your pads is modified by the Scale and Chord engine as follows:
When Chord Mode is set to Off or Harmonizer, pads of root notes are fully lit:
Type of Pad (for Selected Scale) | LED in Default State | LED when Pad Triggered |
|---|---|---|
Root notes | Fully lit | Flash |
Other pads | Dimly lit | Flash |
Note that if Chord Mode is set to Harmonizer, pads triggered as part of the chord will also flash.
When Chord Mode is set to Chord Set, pad 1 is fully lit:
Type of Pad | LED in Default State | LED when Pad Triggered |
|---|---|---|
Pad 1 | Fully lit | Flash |
Pads 2–12 | Dimly lit | Flash |
Pads 13–16 | Off (pad inactive) |
Enharmonic Spelling of the Root Note
Depending on the Scale Type, Chord Mode, and Chord Type you have selected, the enharmonic spelling of the Root Note will vary in order to optimize the spelling of the entire scale/chord set:
Condition | Enharmonic Spelling | |||||||||||
|---|---|---|---|---|---|---|---|---|---|---|---|---|
Scale Type: Chromatic | All Keys | C | C# | D | D# | E | F | F# | G | G# | A | A# |
Scale Type: not Chromatic | C | C# | D | E♭ | E | F | F# | G | A♭ | A | B♭ | B |
Chord Mode: Chord Set Chord Type: Major 1-8 | C | D♭ | D | E♭ | E | F | F# | G˝ | A♭ | A | B♭ | B |
Chord Mode: Chord Set Chord Type: Minor 1-8 | C | C# | D | D# | E | F | F# | G | G# | A | B♭ | B |
Erasing Notes
When erasing notes, the notes effectively deleted vary with the Chord Mode currently selected:
If Chord Mode is set to Off, the notes with the pitch corresponding to the pressed pad are deleted.
If Chord Mode is set to Harmonizer, only the notes with the pitch of the pressed pad are deleted. The other notes in the triggered chord are not deleted.
If Chord Mode is set to Chord Set, no notes are deleted, in other words erasing is deactivated.
Creating Arpeggios
Maschine+ includes a flexible and versatile Arp engine, an arpeggiator that effectively lets you play your Sounds in note sequences. The arpeggios are created according to both the pads you hold and the chords configured with the Scale and Chord engine.
Tip
If you have activated chords, you can even press more than one pad to include the notes of all corresponding chords into your arpeggio!
Like the Scale and Chord engine, the Arp engine is dedicated to Keyboard mode. The Arp engine can be seen as a melodic extension of the Note Repeat: Actually, Arp replaces and extends Note Repeat in Keyboard mode. Instead of playing repeated notes at a constant pitch, you can play sequences of notes at different pitches. Depending on whether your pads are in Pad Mode or Keyboard mode, pressing NOTE REPEAT will switch to Note Repeat mode or Arp mode. Arp mode simply adds a few parameters to those found in Note Repeat mode.
General Notes on the Note Repeat and Arp Engine
The Note Repeat / Arp parameters are the same for all Sound slots in all Groups of your Project. These parameters are saved with the Project.
The Note Repeat / Arp engine processes live input from the pads. MIDI Input and data recorded in the Pattern Editor are not processed by the Scale and Chord engine.
The Note Repeat / Arp engine detects and makes use of any changes in the pressure you apply on every pad you hold (Polyphonic Aftertouch). This allows you to generate arpeggios and repeated notes with varying velocities.
The output of the Note Repeat / Arp engine is recorded into the Pattern Editor.
The Note Repeat / Arp parameters cannot be modulated or automated.
You can use Note Repeat and Arp even if the transport is not running: In this case, the Note Repeat / Arp engine will use its own central clock. This clock will be reset as soon as you start the playback.
Playing Notes with Smart Strips
Notes mode lets you play Sounds using the Smart Strip, for an inspiring playing experience. Sliding your finger on the Smart Strip while no pad is held will play all Sounds mapped to the pads in Pad Mode or Keyboard mode. If you slide your finger from left to right, the pads will be played in an ascending manner. If you slide your finger from right to left, the pads will be played in a descending manner. This applies regardless of which pads (if any) are held.
In Pad mode, you can use the Smart Strip to strum a set number of Sounds based on the Sounds you select. Press the pads to add or remove Sounds from the selected Group.
In keyboard mode, you can use the Smart Strip to strum a set number of notes based on the notes you select. Press the pads to add or remove notes. Notes will be constrained by the selected scale if a scale has been selected. Use in conjunction with the Chord settings to play whole chords instead of single notes.
Tip
Using Notes in Keyboard mode produces more useful results when a Scale Type is selected. For detailed information on selecting a scale, refer to Setting the Scale Type.
Recording Modulation
Recording modulation enables you to record changes for a chosen parameter over time. This adds movement, life, and depth to the sounds and effects in your songs.
Recording Modulation in Step Mode
You can also record modulation in Step mode. This is helpful when you want to set value changes at a specific time in a Pattern.
Which Parameters Are Modulatable?
All the modulatable parameters are found in Plug-ins or Channel properties (for example, you cannot modulate the Pattern Length or the Step Grid resolution). This means that all modulatable parameters are found in a Parameter page of the Control area (when the software is in Arrange view).
In order to be modulatable, parameters of Plug-ins and Channel properties have to meet the following requirements:
The parameter must be controlled by a knob or a button in the software. Most parameters controlled by selectors (for example, for selecting an operating mode or a filter type) cannot be modulated, however, there are a few exceptions.
The parameter must be at the Group or Sound level. Parameters at the Master level cannot be modulated.
Notice
This second rule is also true for Plug-ins: if a Plug-in is loaded at the Master level, its parameters will not be modulatable, but the same Plug-in loaded at the Group or Sound level will have its parameters modulatable.
Almost all parameters meeting these requirements can be modulated, the only exceptions being:
Plug-ins:
Saturator: in Tube mode, the Bass Overload button (MAIN section), and Bypass button (EQ section).
Percussion (Drum Synth): in Fractal mode, the Tune Hold button in the Main page.
Channel properties:
Sound’s and Group’s Output properties: the Cue button in the Audio page.
Group’s Input properties: the Root Note knob in the MIDI page.
Using Lock Snapshots
Tip
To learn how to trigger Lock snapshots using notes or Program Change messages, refer to MIDI Change.
Creating a Lock Snapshot
Use the Lock button to capture, update, or recall a single Lock snapshot.
Using Extended Lock
Extended Lock presents an overview of all your Lock snapshots. Here you can recall, update, or clear your snapshots. You can also set options for morphing between snapshots.
Updating a Lock Snapshot
If you have created a Lock snapshot but find better settings you can update the Lock snapshot. There are two ways to achieve this, you can use the Lock option or Update option directly within Extended Lock. Please note, both methods will overwrite the selected in Extended Lock mode.
Recalling a Lock Snapshot
Within Extended Lock, you can recall a stored Lock snapshot.
Tip
To learn how to trigger Lock snapshots using MIDI notes or Program Change messages, refer to MIDI Change.
Morphing Between Lock Snapshots
When switching between two stored snapshots you can set Maschine to morph between them, adding movement and interest to a song. Within Extended Lock, you can switch on morphing, and set the morph sync and timing parameters.
Deleting a Lock Snapshot
Within Extended Lock, you can delete a stored Lock snapshot.