Working with Plug-ins
Maschine hosts a variety of Plug-ins, both Maschine exclusive and external VST instruments and effects. Learn everything you need to know about working with Plug-ins here.
Plug-ins are the building blocks of all sound in Maschine+. They can be used at all three levels of the Maschine+ audio routing system: in Sounds, in Groups, and in the Master.
This chapter includes the following Plug-in topics:
An overview of Plug-ins and how to handle them. For more information, refer to Plug-in Overview.
An extensive description of an essential Internal Instrument Plug-in in charge of playing back all sample content in Maschine: the Sampler. For more information, refer to Sampler Plug-in.
An overview of the Audio plug-in, that enables you to playback Samples (drums, percussion, basslines, guitar riffs, etc.) in sync with the tempo of your Project. For more information, refer to Audio Plug-in.
An overview of the DrumSynth, and Basssynth plug-ins that were specifically designed for Maschine. For more information, refer to Drum Synths and Bass Synth.
Specific information on Native Instruments Plug-ins. For more information, refer to Using Native Instruments Plug-ins.
Plug-in Overview
This section describes general Plug-ins topics such as: where you can find them, how you can adjust their settings, and how you can manage them.
Plug-in Basics
In the Plug-in view, the content and settings of the focused Sound/Group or the Master are displayed.
Sounds, Groups, and the Master can each hold any number of Plug-ins. These are listed left to right:
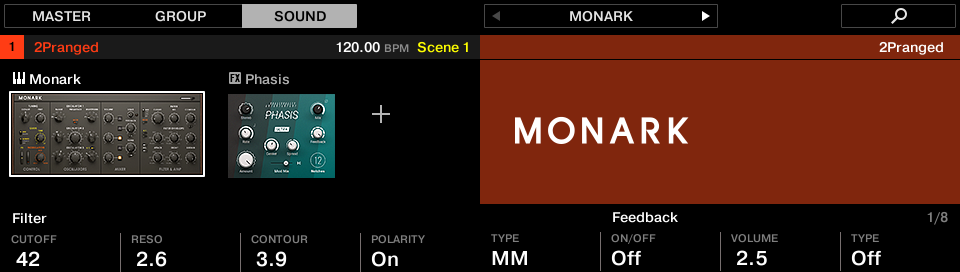
The Plug-in view
In the Plug-in List, the processing order is always from top to bottom.
Tip
In addition to Plug-ins, each Sound, each Group, and the Master also provide a set of global settings called Channel properties. For more information, refer to Applying Groove and Audio Routing, Remote Control, and Macro Controls.
Different Types of Plug-ins
There are two types of Plug-ins:
Instrument Plug-ins | Effect Plug-ins | |
|---|---|---|
Internal Plug-ins | Audio, Sampler, Drum Synth, Bass Synth | Maschine internal effects |
Native Instruments Plug-ins | VST/AU instrument plug-ins from Native Instruments included in the Maschine+ Selection | VST/AU effect plug-ins from Native Instruments included in the Maschine+ Selection |
Instruments: These Plug-ins generate sound. Instrument Plug-ins can only be loaded in the first Plug-in slot of Sounds. The following Plug-ins are available:
Audio: The Audio Plug-in allows audio loops to play back in time with the tempo of your Project. Adding audio with the Loops tag from the Browser to the Sound slot will automatically load the Audio Plug-in in the first Plug-in slot of the Sound. Refer to Audio Plug-in.
Sampler: The Sampler Plug-in allows the selected Sound to play back Samples. Adding a Sample to the Sound slot will automatically load the Sampler in the first Plug-in slot of the Sound. Refer to Sampler Plug-in.
Drum Synths: These Plug-ins are mini-synths specialized in generating drum sounds. Refer to Drum Synths.
Bass Synth: This Plug-in is a monophonic synthesizer specialized in generating bass sounds. Refer to Bass Synth.
Native Instruments: You can use all Native Instruments Maschine+ Selection instruments installed on your Maschine+ as VST/AU plug-ins (for example, Massive, and FM8, etc.). Products from Native Instruments are tightly integrated into Maschine+.
Effects: These Plug-ins modify the audio coming from the previous Plug-in slot (or from the incoming audio if the Effect is loaded in the first Plug-in slot of a Sound). Effect Plug-ins can be loaded in any Plug-in slot. The following Plug-ins are available:
Internal Effects: These are the Effect Plug-ins included with Maschine. For more information, refer to chapter Audio Routing, Remote Control, and Macro Controls and Effect Reference.
Native Instruments: You can use the Native Instruments Maschine+ Selection effects installed on your Maschine+ as VST/AU plug-ins. Products from Native Instruments are tightly integrated with Maschine+.
What to Load, and Where
The type of Plug-in that you can load depends on the selected level (Sound, Group, or Master) and slot:
Instrument Plug-ins (both internal and external) can only be loaded in the first Plug-in slot of Sounds.
Effect Plug-ins (both internal and external) can be loaded in all Plug-in slots at all levels (Sound, Group, Master).
Loading, Removing, and Replacing a Plug-in
The procedure to load a Plug-in with its default settings is common to all levels (Sound, Group, and Master) and all Plug-in types:
First Plug-in Slot of Sounds: Choosing the Sound’s Role
The Plug-in loaded in the first Plug-in slot of a Sound will determine the general role of this Sound:
If the first Plug-in slot holds an Instrument Plug-in (Sampler, Drum Synth, Native Instruments, refer to Plug-in Overview), the Sound will generate its own audio.
If the first Plug-in slot holds an Effect Plug-in, the Sound will be available as a bussing point for other signals (from within Maschine+, and possibly from the outside world). This notably allows you to build up send effects or to apply effects to external audio. See section Step 1: Set Up a Sound or Group as Send Effect for more information.
Tip
You can also sample directly to a Sound slot. This will automatically load a Sampler in its first Plug-in slot. Read chapter Effect Reference for more details on this.
Browser Plug-in Slot Selection
Select a plug-in slot directly from the Browser using the SHIFT button. The SHIFT button provides temporary access to the Plug-in mode allowing you to select a plug-in slot from the Plug-in List. This can be accomplished from the Browser when loading content into all three levels of the Maschine audio routing system: in Sounds, in Groups, and in the Master.
Loading, Removing, and Replacing a Plug-in
The procedure to load a Plug-in with its default settings is common to all levels (Sound, Group, and Master) and all Plug-in types:
Adjusting the Plug-in Parameters
The procedure for adjusting the Plug-in parameters is common to all types of Plug-ins and all sets of Channel properties. It is described in section Navigating Channel Properties, Plug-ins, and Parameter Pages.
Bypassing Plug-in Slots
You can bypass (mute) any Plug-in slot. When a Plug-in slot is bypassed, the Plug-in it contains is temporarily removed from the signal flow and does not process the audio passing through the slot. Instead, the incoming audio is directly sent to the next Plug-in slot for further processing (or to the channel’s output if you bypass its last Plug-in slot).
Bypassing Plug-in slots can be very useful in various situations, for example:
Bypassing and re-enabling an effect during a live performance.
Comparing the sound with and without an effect.
Troubleshooting complex effect chains and routings.
Bypassing a Plug-in Slot
Press the PLUG-IN button to enter Control mode and display Plug-in slots.
If you want to bypass a Plug-in of the Master, press Button 1 to select the MASTER tab.
If you want to bypass a Plug-in of a Group, press Button 2 to select the GROUP tab and press the Group button A–H corresponding to the desired Group. If necessary, first press SHIFT + the desired Group button A–H to switch to the Group bank containing that Group.
If you want to bypass a Plug-in of a Sound, press Button 3 to select the SOUND tab, select its parent Group as described in the previous step, and press SELECT + the pad of that Sound (or simply hit its pad if pads are in Pad Mode).
Press Button 5/6 to select the desired Plug-in slot. The name of the selected Plug-in appears in the field between the left and right arrows under Button 5 and 6. If there are no Plug-ins in the channel this will read EMPTY.
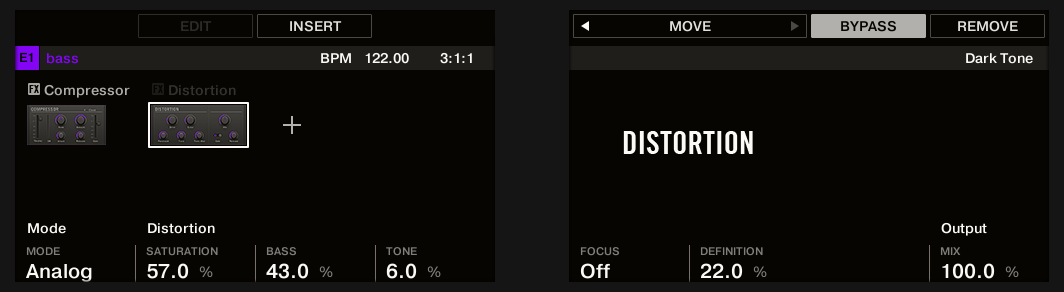
Press SHIFT + Button 7 (BYPASS) above the right display to bypass the selected Plug-in slot.
The Plug-in is bypassed and does not affect the sound anymore. In the left display, the Plug-in icon and name are grayed out. When you hold SHIFT, Button 7 is fully lit and the BYPASS label on the right display is highlighted to indicate that this Plug-in slot is now bypassed:
Use the same method to unmute the effect:
To unmute the effect, press SHIFT + the lit Button 7 (BYPASS).
Notice
In most cases, the first Plug-in slot contains an Instrument Plug-in (for example, a Sampler). Be careful: bypassing the slot will mute the whole Sound.
Using Side-Chain
Some Plug-ins provide side-chaining. This allows you to control their influence on the audio via another audio signal sent to their secondary, side-chain input. This extra routing feature is described in detail in section Using the Side-Chain Input.
Moving Plug-ins
Maschine+ allows you to move Plug-ins across the Plug-in List and across Sounds and Groups.
Sampler Plug-in
The Sampler Plug-in allows you to playback any Sample in Maschine+, including all Groups, Sounds, and Samples of the factory library. The Sampler comes with an extensive set of parameters that offer various ways to further shape each of your Sounds. You can tune, change basic dynamics, and apply effects as well as different modulation options.
Tip
Many of these parameters can be modulated and automated! For more information, refer to section Recording Modulation.
This section describes the specific parameters found in the Sampler. For a general description of the features and characteristics of Plug-ins (including the Sampler), please refer to section Plug-in Overview.
Here the Sampler parameters are shown as they appear in the Plug-in view. The parameters are organized into 6 pages:
Page 1: Voice Settings / Engine: Page 1: Voice Settings / Engine.
Page 2: Pitch / Envelope: Page 2: Pitch / Envelope.
Page 3: FX / Filter: Page 3: FX / Filter
Page 4: Modulation: Page 4: Modulation
Page 5: LFO: Page 5: LFO.
Page 6: Velocity / Modwheel: Page 6: Velocity / Modwheel
Pages can be selected for display and parameter editing using the Page buttons.
Page 1: Voice Settings / Engine

Sampler parameters – page 1 of 6: VOICE SETTINGS and ENGINE
Parameter | Description |
|---|---|
VOICE SETTINGS | |
Polyphony | Here you can define a voice limit for the Sound, that is the maximum number of voices (notes) the Sampler can play simultaneously. Once this polyphony has been reached, triggering any additional note will kill the “oldest” note still playing (i.e. the note that was triggered first). The available values are 1, 2, 4, 8 (default), 16, 32, and 64. You can also set this to Legato — in that case the polyphony is set to 1 and the Sampler performs a continuous pitch transition between consecutive notes. |
Glide | If Legato is selected for the Polyphony parameter, this enables you to adjust the duration of the transition between consecutive notes. |
Pitchbend | Here you can adjust how the Sound reacts on incoming MIDI Pitchbend messages from an external MIDI controller or your host application. For more information on how to setup your Sounds to receive MIDI, refer to section Triggering Sounds via MIDI Notes. |
ENGINE | |
Mode | This allows you to select between different models for the sampling engine. Besides the default Standard setting, the other options MP60 and S1200 emulate the sound of two legendary Samplers that are often used in Hip-Hop and similar genres of music. The latter comes in various flavors offering different filtering: S1200 (no filtering), S1200 L (for Low, i.e. low-pass filtering), S1200 LM (for Low-Mid, i.e. low-mid-pass filtering), S1200 HM (for High-Mid, i.e. mid-high-pass filtering), and S1200 High (for High, i.e. high-pass filtering). |
Page 2: Pitch / Envelope
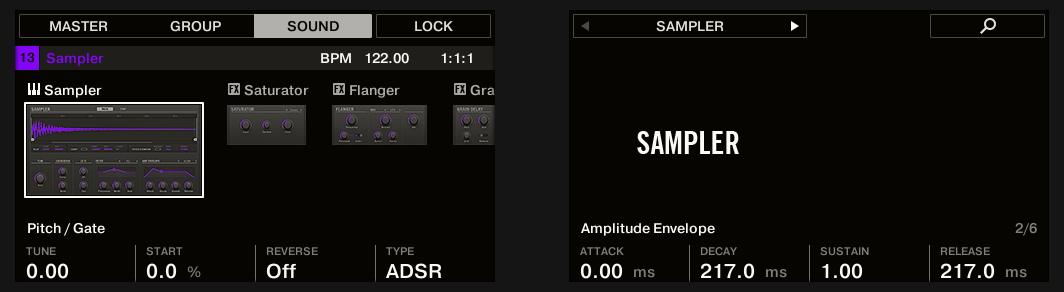
Sampler parameters – page 2 of 6: PITCH / GATE and AMPLITUDE ENVELOPE
Parameter | Description |
|---|---|
PITCH / GATE | |
Tune | Defines the basic pitch of your Sample: turn the knob to the right for a higher pitch and to the left for a lower pitch. |
Start | Determines the start point of the Sample. This parameter can also be modulated by the Velocity control, refer to Page 5: LFO. |
Reverse | Plays the Sample backwards when activated. |
Type | Selects from three different types of amplitude envelopes. See below for more information. |
AMPLITUDE ENVELOPE
The AMPLITUDE ENVELOPE section allows you to tailor your Sample in terms of its loudness over time.
The Type selector allows you to choose from three different types of amplitude envelopes. Depending on the selected type, the available parameters in the AMPLITUDE ENVELOPE section will differ (see table below):
One-shot: This is typical vintage drum machine behavior, where the sample is played in its entirety from beginning to end with no envelope.
AHD: AHD mode deactivates the Sustain and Release controls of the ADSR envelope, and replaces them with the Hold parameter. AHD mode is ideal for “fire and forget” behavior, when you would like to have the sound trigger for a certain amount of time regardless of how long you hold the pad down.
ADSR: Typically, the ADSR envelope is used for longer, sustained Samples that require complex dynamic control.
Tip
Unlike many other hardware devices, the pads on Maschine+ are sensitive not only to being hit but also to being held — so using the ADSR envelope, you can make the pads behave like a MIDI keyboard and sustain a note only for as long as it is held down.
Parameter | Description |
|---|---|
AMPLITUDE ENVELOPE | |
Attack (AHD and ADSR) | Determines how quickly the Sound reaches full volume after being triggered. |
Hold (AHD only) | Determines how long the envelope will stay at its maximum level. |
Decay (AHD and ADSR) | Determines how fast the envelope drops to the Sustain level in ADSR mode; in AHD mode, it is used to adjust how fast the Sound dies down. This parameter can also be modulated by the Velocity control, refer to Page 5: LFO. |
Sustain (ADSR only) | Determines the constant level being kept after Decay until the note ends. This can also be controlled by an external MIDI controller or keyboard using the MIDI Control Change 64. |
Release (ADSR only) | Determines how long the sound takes to fade out after the note has ended. |
Page 3: FX / Filter
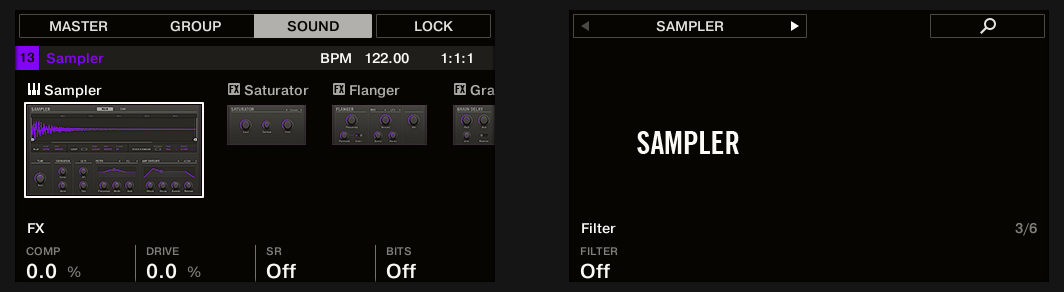
Sampler parameters – page 3 of 6: FX and FILTER
FX
This is a small selection of basic effects, not to be mixed up with the collection of Effect Plug-ins covered in depth in chapter Using Effects.
Parameter | Description |
|---|---|
FX | |
Comp | Basic compressor allowing you to give a Sound more density. |
Drive | Defines the amount of saturation applied to a Sound. |
SR | SR stands for “sample rate”: you can use it to lower the original sample rate in order to make the Sound more lo-fi. |
Bits | Allows you to lower the original bit depth of the Sound, resulting in a more rough, digital sounding lo-fi effect. |
FILTER
The Filter selector in the FILTER section gives you access to a set of different filters. Using the arrows or clicking the type currently displayed, you can choose from different filter type settings: Off, LP2 , BP2 , HP2 , and EQ . Each type results in different parameters displayed to the right of it:
Filter Modes | Description |
|---|---|
Off | No filter. |
LP2 | LP2 is a low-pass filter with Cutoff and Resonance parameters. Cutoff can be modulated by Velocity, the Modulation Envelope, the LFO or the MIDI Modulation Wheel. |
BP2 | BP2 is a band-pass filter with a Cutoff parameter. Cutoff can be modulated by Velocity, the Modulation Envelope, the LFO or the MIDI Modulation Wheel. |
HP2 | HP2 is a high-pass filter with Cutoff and Resonance parameters. Cutoff can be modulated by Velocity, the Modulation Envelope, the LFO or the MIDI Modulation Wheel. |
EQ | EQ is an equalizer with Frequency, Bandwidth and Gain parameters. |
Page 4: Modulation

Sampler parameters – page 4 of 6: MODULATION ENVELOPE and DESTINATION
MODULATION ENVELOPE
The MODULATION ENVELOPE section offers an additional envelope allowing further modification (or “modulation”) of specific Sampler parameters according to the way you play on the pads. Its parameters are matched to those of the AMPLITUDE ENVELOPE section on page 2 (see Page 1: Voice Settings / Engine, so that you have either an ADSR (Attack, Decay, Sustain, Release) envelope or an AHD (Attack, Hold, Decay) envelope to modulate your parameters. If you choose One-shot mode, only the AHD envelope (pictured) will be available for modulation.
Envelope Controls | Description |
|---|---|
Attack | Adjusts the time the envelope takes to reach the peak level. Turned fully left, the envelope starts immediately, and turning the knob right increases the Attack time. |
Hold | Determines the fixed amount of time that the peak level of the envelope is held between the end of the Attack stage and the start of the Decay stage. |
Decay | Adjusts the amount of time it takes to fall from the attack's maximum peak level to the level defined by the Sustain control. Turned fully left, the Decay stage starts immediately, and turning the knob right increases the Decay time. |
Sustain | Sets the amplitude of the Sustain stage. |
Release | Defines the amount of time it will take for the envelope to fall from the set Sustain level and fade to zero. |
DESTINATION
This is where you can define modulation targets for the MODULATION ENVELOPE, for instance, the parameters you want this envelope to control. The knobs adjust the amount of modulation for the following targets:
Parameter | Modulation Destination |
|---|---|
Pitch | Tune parameter of the PITCH / GATE section on the Pitch / Envelope page (page 2). |
Cutoff | Cutoff parameter of the FILTER section (with filter types LP2, HP2, BP2 only) on the FX / Filter page (page 3). |
Drive | Drive parameter of the FX section on the FX / Filter page (page 3). |
Pan | Pan parameter on the Audio page of the Sound’s Output properties (see Configuring the Main Output of Sounds and Groups for more information). |
Page 5: LFO
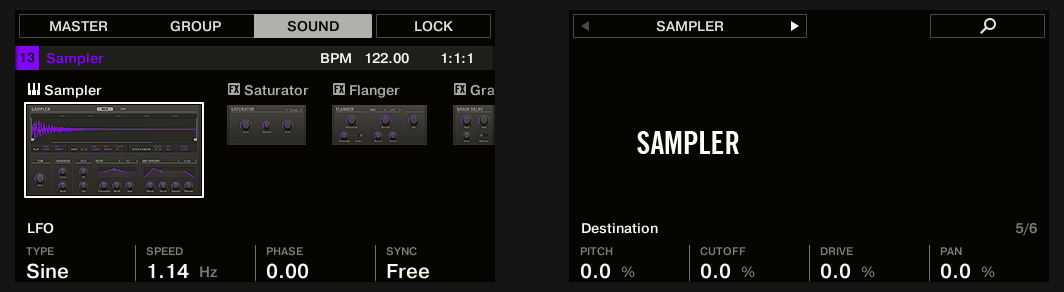
Sampler parameters – page 5 of 6: LFO and DESTINATION
LFO
The LFO (Low Frequency Oscillator) is another modulation source based on waveforms with different shapes.
LFO Controls | Description |
|---|---|
Type | Selects the shape of the LFO waveform. Available shapes are Sine, Tri (Triangle), Rect (Rectangle), Saw,and Random. |
Speed | Controls the rate of the LFO measured in hertz (Hz). If you choose to synchronize the Speed by activating Sync, it will show note values instead of hertz. |
Phase | Defines the initial phase of the LFO waveform, from -0.50 to 0.50. |
Sync | Determines the type of synchronization that is used to synchronize the LFO to the tempo of your Project. If Free is selected, the LFO rate is independent of the Project tempo. If Retrig or Lock is activated, the values of the Speed parameter will change into note values ranging from 16/1 (= one modulation cycle in 16 bars) to 1/32 (one cycle in 1/32nd note) and be synced with the Project tempo. While Retrig restarts the LFO at each new note (each note has another LFO phase), Lock keeps the LFO phase synchronized to the song position for all notes. |
DESTINATION
This is where you define modulation targets for the LFO, i.e. the parameters you want this LFO to control. The knobs adjust the amount of modulation for the following targets:
Parameter | Modulation Destination |
|---|---|
Pitch | Tune parameter of the PITCH / GATE section on the Pitch / Envelope page (page 2). |
Cutoff | Cutoff parameter of the FILTER section (with filter types LP2, HP2, BP2 only) on the FX / Filter page (page 3). |
Drive | Drive parameter of the FX section on the FX / Filter page (page 3). |
Pan | Pan parameter on the Audio page of the Sound’s Output properties (see Configuring the Main Output of Sounds and Groups for more information). |
Page 6: Velocity / Modwheel
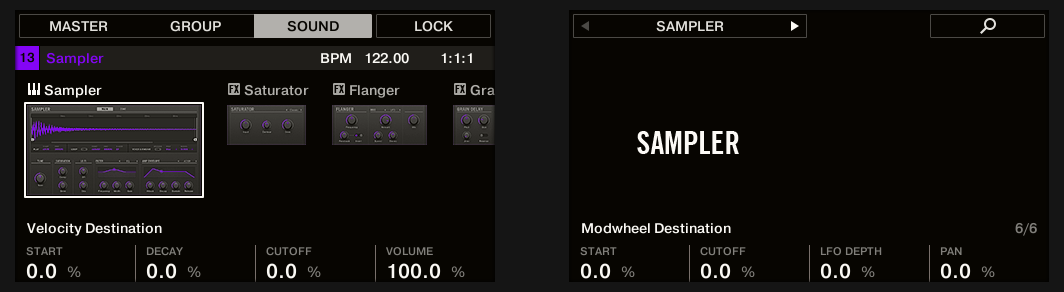
Sampler parameters – page 6 of 6: VELOCITY DESTINATION and MODWHEEL DESTINATION.
VELOCITY DESTINATION
This section allows you to use the input velocity in order to modulate various parameters.
Parameter | Modulation Destination |
|---|---|
Start | Start parameter of the PITCH / GATE section on the Pitch / Envelope page (page 2). Positive values shift the Sample start position later in time as you play harder, negative values shift it closer to the beginning of the Sample as you play harder. Tip: a typical example for this parameter is setting it so that the initial attack transient of a snare drum is heard only at high velocity values. This makes it sound “snappier” when you play hard, and “muffled” or muted when you play softly. |
Decay | Decay parameter of the AMPLITUDE ENVELOPE section on the Pitch / Envelope page (page 2). |
Cutoff | Cutoff parameter of the FILTER section (with filter types LP2, HP2, BP2 only) on the FX / Filter page (page 3). |
Volume | Enables you to modulate the volume, which is what velocity normally is used for. |
MODWHEEL DESTINATION
Here you can determine how incoming MIDI data sent by the Modulation Wheel affects various parameters.
Parameter | Modulation Destination |
|---|---|
Start | Start parameter of the PITCH / GATE section on the Pitch / Envelope page (page 2). |
Cutoff | Cutoff parameter of the FILTER section (with filter types LP2, HP2, BP2 only) on the FX / Filter page (page 3). |
LFO Depth | Adjusts how much the Modulation Wheel affects the depth of the LFO modulation (for all targets) defined on the LFO page (page 5). |
Pan | Pan parameter on the Audio page of the Sound’s Output properties (see Configuring the Main Output of Sounds and Groups for more information). |
Audio Plug-in
The Audio Plug-in can playback Samples (drums, percussion, basslines, guitar riffs, etc.) in sync with your project's tempo. It has two modes: Loop mode and Gate mode.
Loop mode is the default setting where the loaded loop will play continuously whenever there is an active Pattern or Clip in the Group. You can see the waveform of the Sample in the Pattern Editor to understand how it aligns with the Pattern.
Gate mode is similar to the Loop mode, where the loaded loop will play continuously. However, the loop will only be audible in locations where you place notes in the Pattern. Furthermore, when using Stretch mode, the loop's pitch will be transposed based on the note's pitch (for example, note C3 will play the Sample at its original pitch, while C4 plays the Sample one octave higher than normal).
The Audio plug-in specializes in keeping audio loops playing in sync with your Project and has the optional ability to do so without influencing the key of the loop. Furthermore, you can transpose the loop while it plays to fit the key of your song.
You can quickly audition your Samples from within the Browser and then load them directly onto a Sound. If you load a Sample containing the Loops tag onto an empty Sound, the Audio module will load automatically.
Once a loop has been loaded, it will appear as a waveform in the Pattern Editor, allowing you to edit the Sample by adjusting the Patten Length and add MIDI events to regions of the loop for selective playback and pitching. For finer adjustments, you can edit events in a magnified view by toggling the close-up view in the Pattern Editor. In the Plug-in view, you can adjust the overall tuning, the source tempo, and Sample length.
Tip
For more information on recording your own loops, refer to Sampling and Sample Mapping.
Loading the Audio Plug-in
The Audio Plug-in can be loaded onto any Sound within a Group. As a Maschine Plug-in, it supports all the usual Plug-in workflows. Hence, to know how to load, remove, replace, insert, move, copy/paste the Audio Plug-in, and adjust the Audio Plug-in parameters and load/save default presets, refer to the section Working with Plug-ins.
Once an Audio Plug-in is loaded, it becomes visible in both displays.
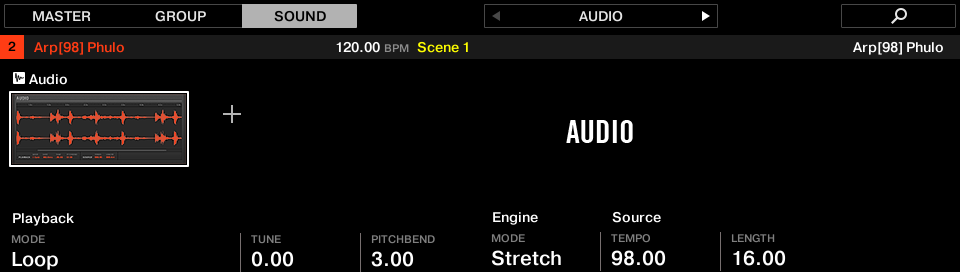
Audio Plug-in
The Audio Plug-in contains the following parameters:
Loading a Loop into the Audio Plug-in
You can use the Sampler Plug-in to record sound directly from a microphone, or from an electric instrument (such as an electric guitar) connected to your soundcard, to create your own loops. Alternatively, you can quickly audition loops within the Maschine Library by using the Loops tag in the Browser to find one you want. To learn how to filter for loops using the Browser, refer to the section Browsing the Library.
It is possible to load a Sample tagged as Loops directly from the Browser into empty Sound, which will place the Sample directly within the Pattern. As the sample is loaded into the Pattern a waveform of the Sample will become visible and Maschine+ will determine tempo information from the Sample and automatically time-stretch it to fit the tempo of your Project. You can begin playback immediately after it has loaded.
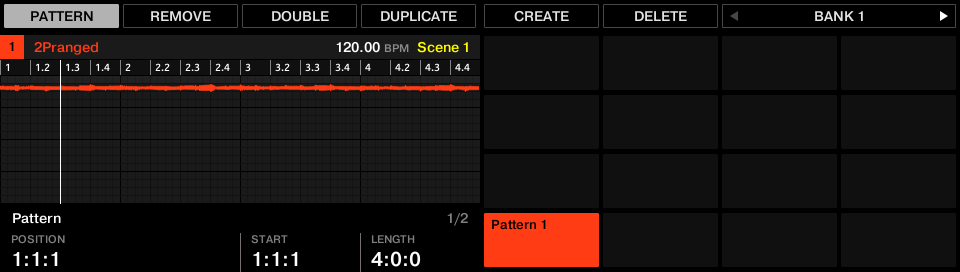
Pattern Editor with the Audio Plug-in in Loop mode loaded on Sound 2.
By default the Audio Plug-in will playback in Loop mode, meaning the Sample will be repeated for the duration of the Pattern regardless of the length of the Sample. If you want to chop the loop and pitch it, switch to Gate mode. For more information on Gate mode, refer to the following section Using Loop Mode.
Using Loop Mode
Loop mode is the default mode for the Audio Plug-in and is used to playback an audio file in time with your Project. When loaded into a Sound, the audio appears as a waveform in the Pattern Editor and is repeated for the entirety of the Pattern.
If the Pattern Length is decreased to a length shorter than the audio, Pattern playback will end up looping back to the start before the entire audio has played, the Pattern Length must be at least as long as the audio in order to hear the entire audio playing in the Pattern. If the Pattern Length is increased to a length longer than the audio, the audio will be automatically looped as needed to fill the entire length of the Pattern, and these iterations will be visualized with darker versions of the waveform. For more information on changing the Pattern Length, refer to the section Adjusting the Pattern Length.
The process of using Loop mode is as follows; load an audio file onto a Sound, select Loop mode from the parameters of the Audio Plug-in.
Using Gate Mode
Gate mode is used to chop and pitch selected parts of your Sample by applying MIDI note events in the Keyboard view of the Pattern Editor or by recording them with the pads. Each event is a gate for the Sample; the length determines the duration of playback, and placement on the scale determines the pitch. By chopping and pitching the loop you can create melodies or even use it for effect on drums.
In Keyboard view, MIDI note events are visually layered on top of the Samples’ waveform and can be edited or deleted at any time. More importantly, the Sample can be changed at any time while retaining the MIDI note events in the Pattern, meaning you can keep the phrasing and melody but use a different Sample for the playback.
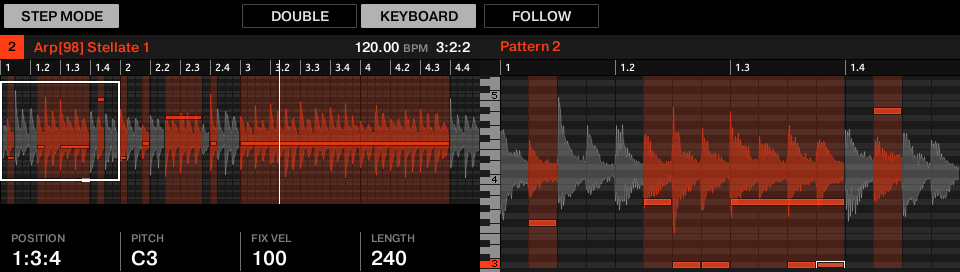
Audio plug-in Gate mode with a sample and MIDI events.
The process of using Gate mode is as follows; load a loop onto a Sound, select Gate mode from the parameters of the Audio Plug-in, and then add MIDI events in the Pattern in the regions where you want to chop and pitch your Sample, or press play and use the pads to pitch the Sample. For more information on recording and editing events, refer to chapter Recording Patterns.
Tip
To zoom into a Pattern, double-click on the vertical scroll bar to the right of the Pattern Editor.
Drum Synths
Drum Synths are a powerful set of monophonic Internal Instrument Plug-ins that allow you to generate individual, fine-tuned drum sounds for your music productions. Like any other Instrument Plug-in, you can load them only in the first Plug-in slot of Sounds.
Drum Synths have been designed for extreme playability, both from the high-quality pads of your Maschine+ and from any velocity-sensitive MIDI keyboard. They allow you to quickly build custom drum kits and give you full control over the various drum sounds' characteristics. Don’t hesitate to tweak them during your live performance or automate them like any other Plug-in.
Tip
For more information on automation, refer to Recording Modulation
The Drums Synth plug-in contains the following engines:
Kick
Snare
Hi-hats
Toms
Percussion
Cymbal
In this chapter, you will find an overview of the Drum Synths and a presentation of their common features: Using Drum Synths
Tip
For a detailed description of each Drum Synth and its parameters, please refer to the Maschine Software Manual available from the Native Instruments website. For a description of the features and characteristics of Plug-ins in general (including the Drum Synths), refer to Plug-in Overview.
Using Drum Synths
Drum Synths are Maschine Plug-ins and, as such, they support all usual Plug-in actions and procedures. To learn how to load, remove, replace, insert, and move, Drum Synths, as well as how to adjust the Drum Synth parameters and load/save presets, refer to section Plug-in Overview where these are described in detail.
Engines: Many Different Drums per Drum Synth
Each of the available Drum Synths (Kick, Snare, Hi-hat, Tom, and Percussion) provides many different drums: Indeed, each Drum Synth allows you to select a particular engine for generating the drum sound. In the same Drum Synth each engine will have its own algorithm, parameters, and sonic characteristics — it is in fact an entirely distinct drum. For example, the Kick provides eight different engines. Some engines will create acoustic drums while others will rather produce electronic sounds.
In each Drum Synth the first parameter (Engine) lets you select the engine you want to use. Most of the other parameters will depend on the selected engine.
Common Parameter Organization
All Drum Synths have a similar parameter organization, both in the Plug-in Strip view.
Common Parameter Pages
In Arrange view, the parameters of all Drum Synths are grouped in similar ways in the Control area:
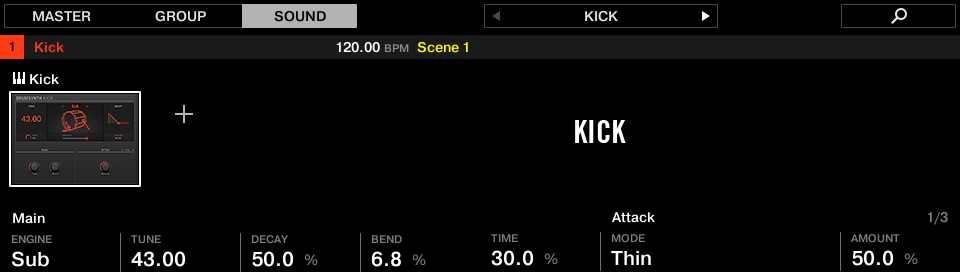
All Drum Synths share the same parameter organization in the Plug-in view
Their parameters are grouped into the same three Parameter pages:
The Main page groups the most important parameters for each drum type. Here you can select the engine to be used, the tuning, the decay, etc.
The Advanced page provides access to more complex and finer adjustments to the drum sounds.
The Modulation page allows you to adjust the playability of the drum by setting its velocity response.
The Main page always starts with a MAIN section. The other sections on the page differ with each Drum Synth and engine.
Tip
For a detailed description of each Drum Synth and its parameters, please refer to the Maschine Software Manual available from the Native Instruments website.
Various Velocity Responses
Each engine of each Drum Synth has a different response to the velocity of the notes you are playing. Globally, engines can be grouped into two general categories:
Acoustic sounding engines are heavily velocity-dependant: the velocity affects many characteristics of the generated sound, which allows you to play these drums very expressively.
Electronic sounding engines are generally less velocity-dependent. Most of them only use velocity to modulate the output volume of the sound.
The overall velocity sensitivity for both acoustic and electronic types of engines can be adjusted on the Modulation page via the Velocity control.
Pitch Range, Tuning, and MIDI Notes
All Drum Synths can be played chromatically: the pitch of the sound will be affected by the notes that you play on your MIDI keyboard (or on your pads in Keyboard mode).
For all engines, the Tune parameter lets you define which pitch will be played when hitting the pad of that Sound (with pads in Pad Mode) or playing the middle C (MIDI note 60) base note.
Notice
On Maschine+, MIDI note 60 is equivalent to C3.
The engines have different pitch ranges:
Most engines have limited pitch ranges: For example, in the Snare, the Chrome engine can play pitches from MIDI note 60 to 84, while the Iron engine can play pitches from MIDI note 46 to 70. If the pitch of an incoming MIDI note falls outside the pitch range of the engine, the pitch will be bounded to that engine’s allowable pitch range.
Some engines have an unlimited pitch range: For example, the Kick’s Sub engine, the Tom’s Fractal and Tronic engines, and the Percussion’s Fractal engine.
In some drum engines, it is impossible to set an exact tuning in MIDI notes. For them, the Tune parameter is set in percent (from 0 % to 100 %).
Bass Synth
Bass Synth is an internal fun and easy-to-use monophonic synthesizer module that allows you to create expressive basslines quickly. Like any other Instrument Plug-in, load it into the first Plug-in slot of a Sound to gain full control over its parameters. Create rich bass tones and program acid lines with ease.
You can further enhance the Bass Synth's sound by adding internal effects, tweaking parameters during a live performance, or automating them like any other plug-in.
Bass Synth key features:
One Oscillator (monophonic)
Seamlessly morph between sine to saw to square wave – and all spots in between
Octave switch
Filter, Mod envelope, Decay, Drive (bi-polar saturation/distortion), and Glide Time
Integrated with Maschine Jam: Program bass and acid lines via notes and glides on Maschine Jam direct from the 8x8 click-pad matrix. For more information on sequencing Bass Synth with Maschine Jam, please read the Maschine Jam Manual available from the Help menu of the Maschine software and Native Instruments website.
Tip
For more information on automation, refer to Recording Modulation.
In this section, you will find:
An overview of the Bass Synth: Using Bass Synth.
A description of the Bass Synth parameters: Bass Synth Parameters.
Notice
For a general description of the features and characteristics of Plug-ins (including the Bass Synth), refer to Plug-in Overview.
Using Bass Synth
Bass Synth is a Maschine Plug-in and, as such, supports all usual Plug-in actions and procedures. Hence, to know how to load, remove, replace, insert, move, copy/paste a Bass Synth, and adjust the Bass Synth parameters and load/save presets, please refer to section Plug-in Overview where these are described in detail.
Tip
Bass Synth presets can be loaded from the Browser by selecting: SOUNDS > Maschine > Bass Synth.
Bass Synth Parameters
The Bass Synth has two pages of parameters that can be navigated using the Page buttons.
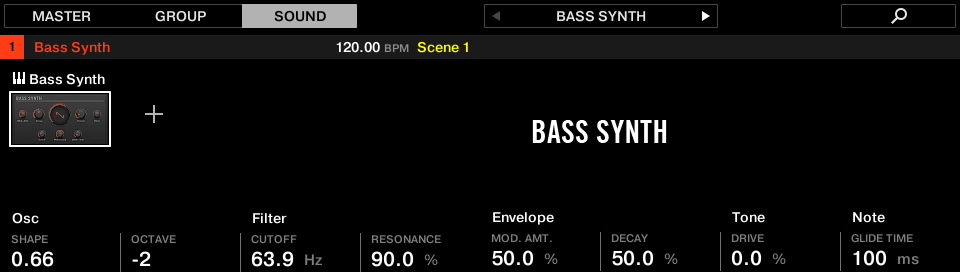
The Bass Synth in Plug-in view
Page 1 — Main Page
The Bass Synth Main page parameters are presented as follows:
Element | Description |
|---|---|
OSC Section | |
Shape | Adjusts the waveform shape continuously from sine to square. |
Octave | Transposes the base key of the Bass Synth (range: -3 – 3). |
Filter Section | |
Cutoff | Adjusts the frequency of the low-pass filter (range: 14.6 Hz – 23.7 kHz). |
Resonance | Adjusts the amount of boost around the cutoff frequency (range: 0.0% – 120%). Resonance can start to self-oscillate when increasing the amount over 100.%. |
Envelope Section | |
Mod. Amt. | Adjusts the amount of envelope applied to the filter cutoff (range: 0.0% – 100%). |
Decay | Adjusts the rate at which the sound fades to silence (range: 0.0% – 100%). |
Tone Section | |
Drive | Adjusts the amount of drive (range: -100% – 100%); -100% increases the input level for the filter, driving the signal internally into saturation, and 100% controls the drive level of the distortion at the end of the signal chain. |
Note Section | |
Glide Time | Adjusts the time it takes to glide from one pitch to the next (range: 10 ms – 1000 ms). |
Page 2 — Advanced Page
The Bass Synth Advanced page contains just one parameter.
Element | Description |
|---|---|
Note Section | |
Glide | Globally enables the glide parameter. Once set to on, the note will continuously play in a monophonic manner. |
Poly Synth
The Maschine Poly Synth is based on Native Instruments Pro-53 plug-in. This section describes its functionality and workflows.
Based on the Native Instruments Pro-53 plug-in, Poly Synth delivers the colorful character of a classic dual-oscillator synth built for full hands-on control with Maschine. It provides warm vintage tones, organic bass, and shimmering pads with all of the 80s golden-era style. Assign modulation, switch routings, blend sounds, patch, and play for polysynth magic.
Poly Synth includes the following features:
Up to 16 voices
Two oscillators
Multimode filter
Two envelope generators
One LFO
Modulation and Poly Mod
You can load Poly Synth into the first Plug-in slot of a Sound to gain full control over its parameters in the Control area or direct from your hardware controller. Enhance the sound of the Poly Synth further by adding internal effects, tweaking parameters during a live performance, or automate them like any other plug-in in Maschine.
Notice
The parameters described are presented as they appear in the Control area. In addition, the same parameters are available in the Plug-in panel within the Plug-in Strip (Mix view).
Using Poly Synth
Poly Synth is a Maschine Plug-in and, as such, supports all usual plug-in actions and procedures. Hence, to know how to load, remove, replace, insert, move, copy/paste a Poly Synth, as well as how to adjust the Poly Synth parameters, and load/save presets, please refer to section Plug-in Overview, where these are described in detail.
Tip
Poly Synth presets can be loaded from the Browser by selecting: SOUNDS, Maschine, Poly Synth.
Poly Synth Parameters
The Poly Synth has the same parameters in both the Control area and in the Plug-in Strip of the Mix view.
Poly Synth Parameter Pages in the Control Area
In the Ideas and Song view, the parameters of the Poly Synth are grouped in the Control area:

Poly Synth parameters in the Control area
The Poly Synth parameters are presented in nine pages:
Page 1: Filter adjusts the brightness of the sound and the filter mode.
Page 2: Envelopes adjusts the filter and amplitude envelope generators.
Page 3: Mix / Voices sets oscillator levels, voice mode, and the number of voices.
Page 4: Oscillator A sets the basic tone and waveforms for Oscillator A.
Page 5 Oscillator B sets the basic tone and waveforms for Oscillator B.
Page 6: LFO sets the rate and modulation destinations for the low-frequency oscillator.
Page 7: Modulation assigns the LFO or Noise signal (or a combination of both) to modify the frequency or pulse width of both oscillators as well as the filter cutoff.
Page 8: Poly Mod sets Oscillator B or the Filter envelope to modulate Oscillator A frequency, Oscillator A pulse-width, and the Filter cutoff.
Page 9: Global changes the overall sound and function of the Poly Synth.
Poly Synth in the Plug-in Strip
In Mix view, the panel of the Poly Synth provides easy access to parameters:
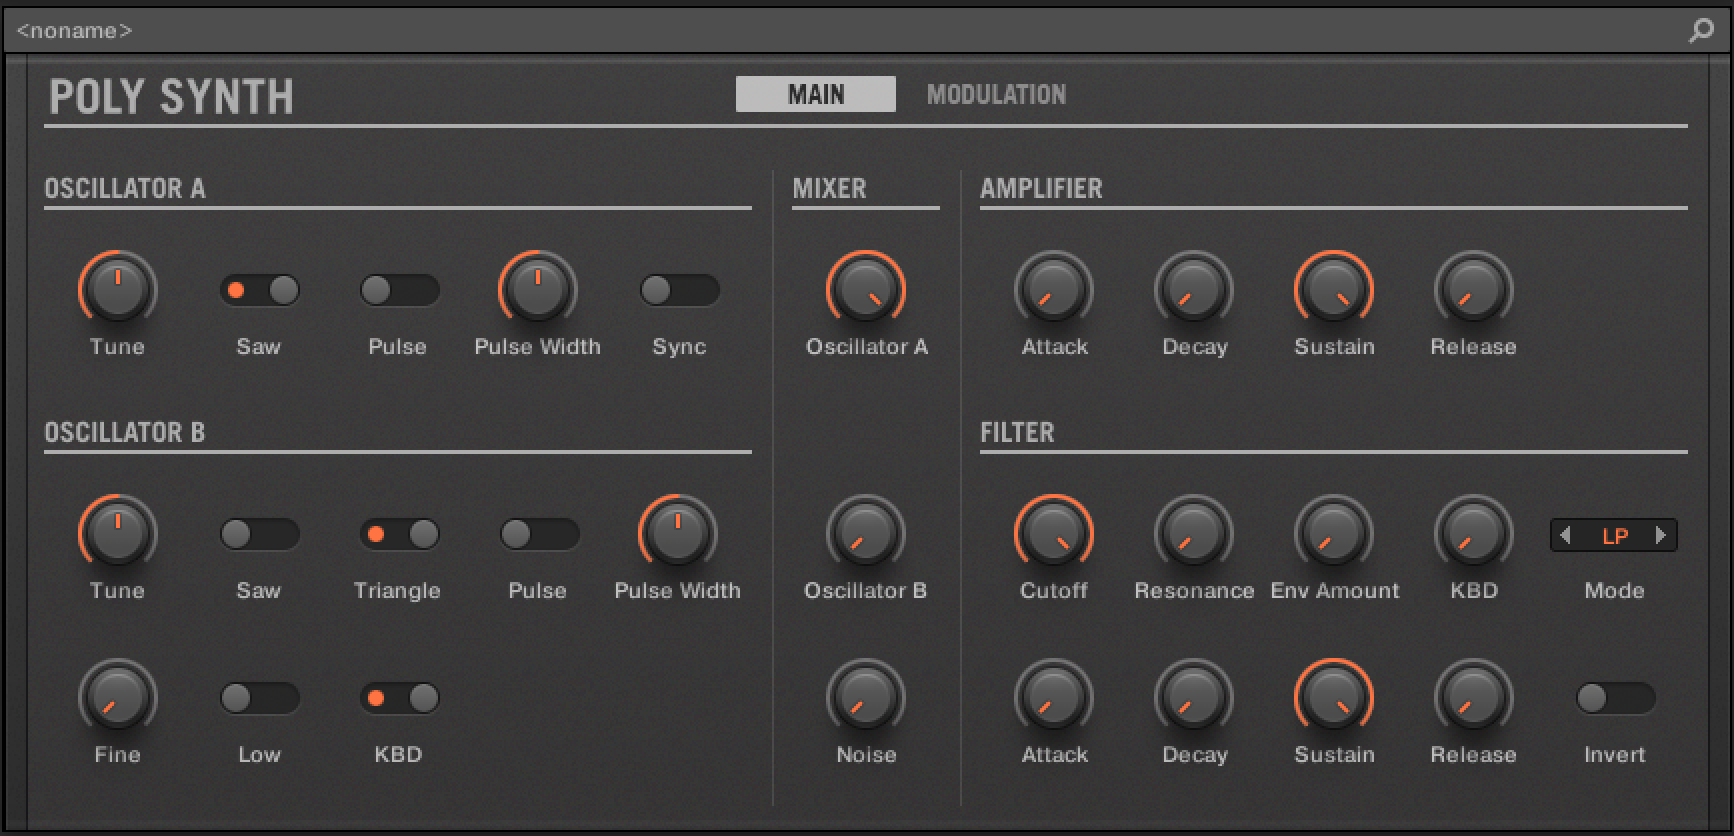
The Poly Synth parameters in the Plug-in Strip
In the Plug-in Strip the Poly Synth parameters are consolidated and grouped into two pages:
Page 1: MAIN contains all main synth parameters, including the Oscillators, Mixer, Amp, and Filter sections.
Page 2: MODULATION contains all global and modulation parameters, including Voicing, Global, LFO, Poly Mod, and Modulation sections.
Notice
For more information on the Plug-in Strip, refer to The Plug-in Strip.
Poly Synth Filter
The function of the filter is to subtract frequencies from the sound produced by the oscillators and noise generator, thereby changing the overall harmonic content of the sound. This change can be varied over time using the Filter Envelope to produce more dynamic timbres. Additionally, you can experiment with the Invert parameter to reverse the envelope's effect on the filter or the powerful Poly Mod feature to modulate the filter further.
The Filter page parameters are presented as follows:
Filter Parameters
Element | Description |
|---|---|
Cutoff | Sets the frequency of the filter. A low-pass (LP), band-pass (BP), or hi-pass (HP) characteristic may be selected using the Mode parameter. |
Resonance | Sets the amount of boost around the cutoff frequency for the filter. This emphasizes a narrow band of frequencies. High levels of resonance can cause the filter to self-oscillate. |
Env Amount | Sets the amount of modulation from the filter envelope to the filter’s cutoff frequency. Any setting above zero means that each time you strike a key, the filter envelope controls how the filter opens and closes. Higher amounts affect the cutoff frequency more dramatically. |
Invert | Inverts the effect of the filter envelope on the filter. When the Invert switch is activated, the action of the filter envelope on the filter is inverted. Normally when the Invert switch is off, and the Env Amount is turned up, the filter’s Cutoff rises in the Attack stage and drops back in the Decay and Release stages. However, with Invert on, the Cutoff drops during the Attack stage and comes back up in the Decay and Release stages. This can be useful for creating sound effects. |
KBD | Sets the amount of modulation from the keyboard to the filter’s cutoff frequency. Increasing the amount means that higher notes open the filter more. This is useful for adding brightness to a sound as higher notes are played, which is typically how acoustic instruments behave. The keyboard filter tracking is off at zero, meaning the filter frequency is unaffected by playing higher or lower notes. |
Mode | Selects the low-pass (LP), band-pass (BP), or hi-pass (HP) mode for the filter. |
Poly Synth Envelopes
The Poly Synth contains two 4-stage envelopes; one controls the filter and the other the amplitude.
The Filter envelope provides control over harmonics and brightness over time by modifying the cutoff frequency over four stages, including attack, decay, sustain, and release. Using these controls to filter sound over time can provide a lot of variation and expression.
The Filter Envelope is applied using the Env Amount parameter on the Filter page. Additionally, experiment with the Invert parameter to reverse the effect of the envelope on the filter, and the powerful Poly Mod to modulate the filter further.
The Amp Envelope shapes the volume of a sound over time. Using this envelope, it is possible to mimic the dynamic properties of instruments such as for example, a string with a slow attack and a long release or a drum with a sharp attack and quick release. Of course, there is lots of room for experimentation, especially when combined with the effect of the Filter Envelope.
The Filter and Amp Envelope parameters are presented as follows:
Filter Envelope
Element | Description |
|---|---|
Attack | Sets the attack time of the envelope. Turned fully left, the envelope will start immediately. As the level is increased, the attack becomes longer, allowing the filter to open smoothly. |
Decay | Sets the decay time of the envelope. After a sound reaches the filter frequency set at its attack stage, decay controls how quickly the filter then transitions to the cutoff frequency set with the sustain knob. The higher the setting, the longer the decay. |
Sustain | Determines the control level for the duration of time that the note is being held. Unlike the other settings, Sustain is not time-based. |
Release | Sets the release time of the envelope. This controls how quickly the filter closes after a note is released. If the Release switch on the Global page is set to off, then the Release control here will have no effect. |
Amp Envelope
Element | Description |
|---|---|
Attack | Adjusts the time it takes once a key is pressed for the volume to climb from zero to full volume. It can be used to create a sound with a fast attack or a slow fade-in. |
Decay | Adjusts the time it takes for the volume to fall from its initial full volume to the level set by the Sustain control while a key is held down. |
Sustain | Sets the volume level that the envelope remains at while the key is held down after the decay has expired. |
Release | Adjusts the time it takes for the volume to fall from the sustain level to zero once the key is released. It can be used to create sounds that have a short or long fadeout. |
Poly Synth Mix and Voices
The Mix / Voice page contains two sections that both affect the overall characteristics of the sound.
The Mix section enables you to adjust the levels of the various sound generators on the Poly Synth. These include Oscillator A, Oscillator B, and the noise generator. The level of at least one of these must be increased to make sound with the Poly Synth.
The Voice section contains parameters that can be used to set the polyphony (the number of voices used) and mode of the sound.
The Mix and Voice parameters are presented as follows:
Mix Parameters
Element | Description |
|---|---|
Level A | Adjusts the level of Oscillator A. At the far left position the oscillator is not heard. To the far right, the oscillator is at full volume. |
Level B | Sets the level of Oscillator B. At the far left position the oscillator is not heard. To the far right, the oscillator is at full volume. |
Noise | Sets the level of the noise generator. At the far left position the noise generator is not heard. To the far right, the oscillator is at full volume. |
Voice Parameters
Element | Description |
|---|---|
Glide | Sets the level of glide. When Unison mode is engaged, the Glide parameter determines the amount of time it takes the Poly Synth to slide from the previous note’s pitch to a new pitch. This is the portamento effect that is common among monophonic synthesizers. The range of this function is from 0 seconds (when turned fully to the left) to 5 seconds (when turned fully to the right). |
Mode | Sets the voice mode. In Poly mode, the Voices setting determines the number of voices that can play simultaneously. In Unison mode, all voices sound on one note. For example, if you use 16 voices of polyphony and are in Unison mode, playing a note will force 16 voices to play the same tone. That’s 32 oscillators! This yields a very full lead or bass sound and allows the Glide function for portamento (gliding) effects. To create a “fatter” Unison Mode sound, the Poly Synth subtly detunes each voice. The detuning gives a doubling effect that can be used to create a mighty sound. If Unison with Legato is activated, when detached notes are played, each Attack will still be re-triggered, but when overlapping notes are played, the pitches will change without new Attacks, for Legato response. |
Voices | Sets the number of voices of polyphony available to the Poly Synth synthesis engine. It also functions as the control for changing the amount of polyphony. The range is from 1 to 16 voices. |
Detune | Adds an amount of random deviation throughout the synth engine. This random detuning is particularly noticeable in Unison mode, where the tuning variances will cause a monophonic patch to thicken. When Detune is set at the minimum amount, the Poly Synth is in “digital” mode, where all signals in the synthesis engine are precisely calibrated. |
Poly Synth Oscillator A
The Poly Synth has two oscillators that are split across two pages named Oscillator A and Oscillator B. These oscillators produce waveforms that each have their own inherent sound character based on their harmonic content. The Poly Synth has two oscillators for each voice. If 16 voices are being used that's 32 oscillators! Level controls for each oscillator are located in the Mix / Voice section.
Oscillator A is capable of simultaneously generating sawtooth (ramp-like) and pulse (square-like) waveforms. You can select either waveform, both waveforms, or no waveform. If both waveforms are chosen, the output of this module will be an even mix of sawtooth and pulse waveforms. If neither waveform is selected, there will be no output from Oscillator A. Oscillator B can be hard-synced to Oscillator A to create more complex sounds.
Oscillator A parameters are presented as follows:
Oscillator A Parameters
Element | Description |
|---|---|
Tune | Sets the base pitch of Oscillator A. It can be adjusted in semitone increments over a 4-octave range. |
Sync | Activates Oscillator A hard sync. Synchronization forces this oscillator’s waveform to restart each time Oscillator B’s waveform begins. The result of synchronization is the creation of interesting waveforms by either reinforcing harmonics of the controlling oscillator or adding new, unusual harmonics to the output signal. It is important to note that when Sync is activated, the tune settings of Oscillator A only adjust the timbre of the oscillator. Oscillator B alone determines the pitch of the sound. Oscillator A will follow the pitch of incoming MIDI notes. Settings of Oscillator B are simply used to change the harmonic content of this oscillator. |
Shapes Parameters
Element | Description |
|---|---|
Saw | Activates the Sawtooth waveform. This is the richest audio signal of the waveforms (it contains all of the harmonics at decreasing volume levels in high frequencies). Its sound is ideal for brass sounds, percussive bass sounds, or rich accompaniments. |
Pulse | Activates the Pulse waveform. The harmonic spectrum of a pulse wave is determined by the duty cycle, which can be changed using the Pulse Width. Acoustically, the wave could be described as changing during the duty cycle from buzzy, nasal and biting for thin pulses to warm, round, and hollow for more evenly spread, squarish waveforms. |
Pulse Width | Changes the width of the pulse wave. It changes from a square wave when the pulse width knob is at its center position to a very narrow pulse wave when the pulse width knob is fully left or right. |
Notice
The parameters described are presented as they appear in the Control area (Arrange view). The same parameters are available in the Plug-in panel within the Plug-in Strip (Mix view). See The Plug-in Strip for more information on this.
Poly Synth Oscillator B
The Poly Synth has two oscillators split across two pages named Oscillator A and Oscillator B. These oscillators produce waveforms with their own inherent sound character based on their harmonic content. The Poly Synth has two oscillators per voice. Level controls for each of these are located in the Mix / Voice section.
Oscillator A is capable of simultaneously generating sawtooth (ramp-like) and pulse (square-like) waveforms. Oscillator B can simultaneously generate sawtooth, triangle, and variable-width pulse waves and can be hard-synced to Oscillator A to create more complex sounds.
Oscillator B is also used as both a sound and modulation source. In addition to having more waveforms and finer frequency control, Oscillator B can be used as an LFO (Low Frequency Oscillator). This can also be disconnected from the incoming MIDI notes, allowing it to operate independently of the pitch being played.
Oscillator B parameters are presented as follows:
Oscillator B Parameters
Element | Description |
|---|---|
Tune | Sets the tuning of Oscillator B. The Tune control on Oscillator B works identically to that found on Oscillator A. It increments the frequency by semitones and provides a range of +/- 2-octaves. When the Low Mode is on, this control allows the frequency to be varied from roughly 0.3 Hz (one cycle every three seconds) to 30 Hz. |
Fine | Sets the fine-tuning of Oscillator B. The fine control knob allows the tuning of Oscillator B to be adjusted continuously over a range of one semitone. When this control is turned fully counter-clockwise, there is no effect on the oscillator frequency. |
Low | Turns Oscillator B into a low-frequency oscillator. The frequency range varies from 0.3 Hz to 30 Hz, with the rate selected using the Tune and Fine parameters. |
KBD | Activates MIDI note control of Oscillator B. When turned off, its tuning can only be controlled by the Tune and Fine knobs, MIDI continuous controllers, andmodulation functions. |
Shapes Parameters
Element | Description |
|---|---|
Saw | Activates the Sawtooth waveform. This is the richest audio signal of the waveforms (it contains all of the harmonics at decreasing volume levels in high frequencies). Its sound is ideal for brass sounds, percussive bass sounds, or rich accompaniments. |
Triangle | Activates the Triangle waveform. It sounds somewhere in between a square wave and a sine wave. It’s not as buzzy as a square but not as smooth as a sine wave. It sounds clearer, maybe even brighter than a sine wave. |
Pulse | Activates the Pulse waveform. The harmonic spectrum of a pulse wave is determined by the duty cycle, which can be changed using the Pulse Width. Acoustically, the wave could be described as changing during the duty cycle from buzzy, nasal and biting for thin pulses to warm, round, and hollow for more evenly spread, squarish waveforms. |
Pulse Width | Changes the width of the pulse wave. It changes from a square wave when the pulse width knob is at its center position to a very narrow pulse wave when the pulse width knob is fully left or right. |
Poly Synth LFO
The LFO provides a modulation signal with Modwheel control. The LFO is a special-purpose oscillator that produces a frequency typically below the range of human hearing. In addition to standard LFO functionality, the Poly Synth’s LFO can also sync to the Maschine tempo.
An LFO, short for low-frequency oscillator, is an oscillator that runs below audio rate (below 20 cycles per second). The LFO is used for periodic modulation such as vibrato (periodic pitch modulation), filter modulation, and pulse-width modulation. The LFO can be routed to any or all of these destinations using the controls in the Modulation section.
The LFO produces three waveshapes: sawtooth, triangle, and square. Any of these waveshapes can be activated simultaneously. Noise is also available as a modulation source on the Modulation page. When all wave three shapes are switched off, the output of the LFO is a constant. With this, the Mod-Wheel can, for example, be used to directly make a filter sweep. Additionally, when all three waveform selector switches are turned on, the LFO enters the Sample and Hold mode. This is especially effective when combined with the Voice Trig mode, to produce a different Filter Cutoff every time the notes retrigger.
The LFO parameters are presented as follows:
LFO Parameters
Element | Description |
|---|---|
Rate | Determines the rate of the low-frequency oscillator. |
Mode | Determines the mode of the LFO. The LFO can be set to run free or synchronized to the tempo of your host sequencer. In Free mode at the minimum Rate setting, the LFO cycles at about 0.04 Hz (1 cycle every 25 seconds). At its maximum Rate setting, the LFO will achieve a 20 Hz (20 cycles per second) rate. When set to Synced, the Frequency control will lock the LFO to the nearest appropriate tempo. As the Rate parameter is increased, the locking function will select a larger quantization value. It is sensitive to 1/16 and 1/8 note values, as well as triplet figures. |
Voice Trig | Resets the Envelope when a MIDI note is received. This will automatically retrigger any held notes. |
Shapes Parameters
Element | Description |
|---|---|
Saw | Activates the sawtooth wave of the LFO. Activating/deactivating all of the shapes together will unlock other LFO behaviors. For more information, refer to above. |
Triangle | Activates the triangle wave of the LFO. |
Pulse | Activates the pulse wave of the LFO. |
Poly Synth Modulation
The Modulation page is used to assign the LFO or Noise signal (or a combination of both) to modify the frequency or pulse-width of both oscillators as well as the filter cutoff. The Amount parameter sets the initial modulation level, and the modulation wheel on your MIDI controller can be used to apply the modulation effect further.
The Oscillator A Oscillator B destination switches determine the signals that will be affected by the modulation. Selecting the Freq A or Freq B destinations will allow you to apply LFO or noise modulation to Oscillator A and Oscillator B frequencies, respectively. This can provide interesting pitch and timbre alterations.
The PW A and PW B switches provide modulation of the pulse with the two oscillators. This can add great depth to your patch when using the pulse waveshapes on the oscillators. Finally, the Filter switch will allow you to add LFO and noise modulation of the cutoff frequency. This can create long sweeping or warbling filter effects that can also be controlled by simply moving the modulation wheel.
The Modulation parameters are presented as follows:
Modulation Parameters
Element | Description |
|---|---|
Amount | Sets the amount of LFO modulation routed to a destination set in the Destination section. Modulation can also be applied using the modulation wheel. |
LFO<>Noise | Determines the mix of the modulation sources to be applied. When turned to the left, the modulation source is the output of the LFO section. When completely turned to the right, the source is the output of the Noise generator. When placed between these extremes, the source is a mixture of the two signals. |
Destination Parameters
Element | Description |
|---|---|
Freq A | Adds LFO or Noise modulation to the frequencies of Oscillator A. This can provide interesting pitch and timbre alterations to Oscillator A. |
Freq B | Adds LFO or Noise modulation to the frequencies of Oscillator B. This can provide interesting pitch and timbre alterations to Oscillator B. |
PW A | Adds LFO or Noise modulation of the pulse on Oscillators A. This can add great depth to your patch when using the pulse waveshapes on Oscillator A. |
PW B | Adds LFO or Noise modulation of the pulse on Oscillators B. This can add great depth to your patch when using the pulse waveshapes on Oscillator B. |
Filter | Adds LFO and Noise modulation of the filter cutoff. This can create long sweeping or warbling filter effects by simply moving the modulation wheel. |
Poly Synth Poly Mod
The Poly Mod (polyphonic modulation) page provides a modulation system unique among polysynths. The Poly Mod system can be set to use Oscillator B or the Filter envelope to modulate Oscillator A frequency, Oscillator A pulse width, or the Filter cutoff frequency. with up to 16 voices this means that voice apply individual modulation to any of these selected destinations, creating interesting and varied results especially if the LFO is not set to retrigger for each new note played.
The Poly Mod parameters are presented as follows:
Poly Mod Parameters
Element | Description |
|---|---|
Filter Env | Selects the amount of modulation from the Filter envelope that is applied to a selected destination. For more information on the Filter envelope, refer to Poly Synth Envelopes. |
Oscillator B | Creates FM and vibrato effects using an oscillator as a modulation source. The setting of Oscillator B will determine how much effect the output of Oscillator B will have on the selected modulation destinations. |
Destination Parameters
Element | Description |
|---|---|
Freq A | Activates frequency (tuning) of Oscillator A as a modulation destination. When activated, the tuning of Oscillator A will be affected. Depending on the Filter Env and Oscillator B controls settings, you will be able to create pitch slides, FM clanging, or wild pitch LFO effects. |
PW A | Activates pulse width of Oscillator A as a modulation destination. Selecting the PW A switch will cause the Poly Mod system to affect the pulse width of Oscillator A. This is most often used to add thickness to a sound. |
Filter | Activates the cutoff frequency of the filter as a modulation destination. The Filter destination switch will allow the Poly Mod section to modulate the Filter Cutoff setting. Modulating the Filter Cutoff will allow you to create LFO or FM-based filter effects. |
Poly Synth Global
The Global page contains a number of parameters that enable you to change the overall sound and function of the Poly Synth.
The Global parameters are presented as follows:
Global Parameters
Element | Description |
|---|---|
Tune | Sets the basic tuning of the entire Poly Synth. The range of this control is +/-1 semitone. |
Pitchbend | Sets the pitchbend range of the Poly Synth. The range of this control is 1 to 24 semitones. |
Velocity | Determines if the incoming MIDI note velocities will control the envelope functions. When engaged, velocity will vary the amplifier envelope by 90%, and the filter envelope by 70%. The use of velocity control can help add dynamics to a sound. |
Release | Determines if the Release settings of the filter and amplifier envelopes are used. When this button is activated, the envelope release times work as expected. When the button is deactivated, release times are set to their minimal positions. |
Hold | Continues to hold played notes until it is deactivated. |
Using Native Instruments Plug-ins
Maschine+ enables you to load VST/AU plug-ins from Native Instruments and to use them like the internal plug-ins from Maschine+.
As with internal plug-ins, the following rules apply for loading Native Instruments plug-ins:
An Instrument plug-in can be loaded only in the first Plug-in slot of a Sound.
An Effect plug-in can be loaded in any Plug-in slot of any Sound, Group, or Master.
The following sections describe additional features and tasks specific to Native Instruments plug-ins compared to Internal plug-ins. For all other tasks (for example, loading, adjusting Plug-in parameters, etc.), refer to Plug-in Overview.
Using the VST/AU Plug-in Parameters
The parameters of Native Instruments plug-ins offer various ways to shape each instrument/effect individually. Maschine+ provides quick and convenient access to the parameters of any Native Instruments plug-in: upon loading these parameters are auto-mapped and organized into Parameter pages that will appear on the displays — exactly like Internal Plug-ins.
Having the Plug-in parameters on Parameter pages in Maschine+ has the following benefits:
You can step through the Parameter pages and tweak each parameter (refer to Navigating Channel Properties, Plug-ins, and Parameter Pages).
The Plug-in parameters can be automated the same way as any other parameters (refer to Recording Modulation.
An auto-mapped Parameter page of the Massive Plug-in in the software
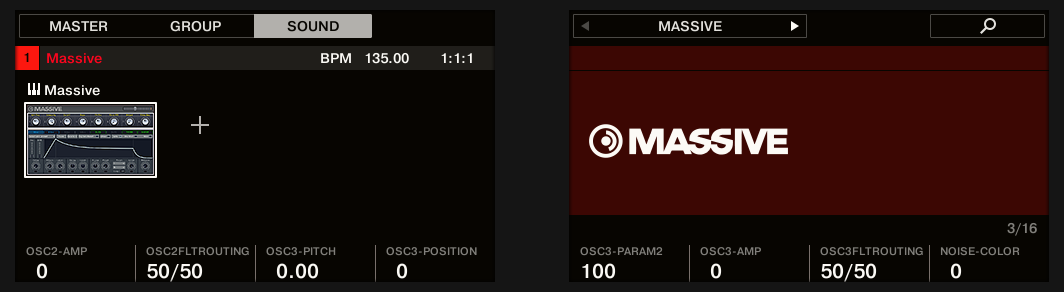
An auto-mapped Parameter page of the Massive Plug-in
Furthermore, for Native Instruments Plug-ins these Parameter pages group the Plug-in parameters in an intelligent way that fits the particular workflows of each Plug-in. For example, in the Massive Plug-in, the eight Macro Controls of Massive will be grouped into a single Parameter page, the main parameters for Oscillator 1 will be grouped into another Parameter page, etc.
Using Native Instruments Plug-in Presets
For some of your Native Instruments plug-ins, you might already have a set of factory or user presets (or patches, programs, etc.) that you like to use. Maschine+ lets you directly load these presets and save them as Plug-in presets within Maschine. Saving your VST/AU presets as Plug-in presets within Maschine will notably allow you to access them from the Browser.
Notice
You can only save presets in the Maschine software.
Accessing Factory Presets of Native Instruments’ Instruments/Effects
Accessing factory presets of your Native Instruments instruments and effects is straightforward: factory presets of all Native Instruments instruments/effects installed on Maschine+ are already integrated into the Maschine library. You will find them directly in the Browser by selecting the corresponding file type (Instruments or Effects) For more information on loading files from the Browser, refer to Loading Files from the Browser.
Multiple-Output Plug-ins and Multitimbral Plug-ins
Maschine+ allows extended use of multiple-output Plug-ins as well as multitimbral Plug-ins.
Multiple-Output Plug-ins
Multiple-output Plug-ins are Plug-ins with more than one audio stereo output.
When a multiple-output Plug-in is loaded into a Sound, Maschine+ uses its available outputs as follows:
The Plug-in’s first output pair is inserted in the usual Plug-in signal chain: This output pair is fed into the input of the next Plug-in slot (or sent to the channel output if the Plug-in is in the last Plug-in slot).
The Plug-in’s additional outputs are made available as audio sources for other Sounds of the same Group (they appear in the Source menu in the Audio page of the Input properties for these Sounds). This can be used to build advanced routings in Maschine. For more information on configuring audio inputs for Sounds, please refer to section Sending External Audio to Sounds.
Multitimbral Plug-ins
Multitimbral Plug-ins are Plug-ins that can receive MIDI on top of the host control.
When a multitimbral Plug-in is loaded into a Sound, the other Sounds of the same Group can send MIDI data to this Plug-in: The Plug-in will appear as an additional port in the Dest. menu on the MIDI page of the Output properties for these Sounds. For more information on configuring MIDI output for Sounds, please refer to section Sending MIDI from Sounds.