Advanced Operation of Traktor
This section describes advanced features of Traktor such as using MIDI and master clocks, recording and broadcasting mixes, and using Cruise mode.
This section describes advanced features of Traktor such as using MIDI and master clocks, recording and broadcasting mixes, and using Cruise mode.
Synchronization using Ableton Link
Ableton Link is a protocol that synchronizes beat, phase and tempo of Link-activated applications on the same computer or over a shared network. This means you can conveniently keep applications synchronized across different devices or join a group jam with others with minimal setup. Connecting applications via Link provides you with the ability to synchronize them to a shared timeline and change the tempo globally from each of the connected applications.
Connecting to a Network
Applications that support Ableton Link can join a Link session when connected to the same network. To enable Link within Traktor, simply make sure the computer running Traktor is connected to the same local network as the other applications you want to link to. This can either be a local network or an ad-hoc (computer-to-computer) connection.
To ensure maximum security and reliability while using Link, there are several things you may want to consider:
For reliability, connect to the local network using a router via an Ethernet cable.
If you do use a Wi-Fi network, be sure to use a password to prevent excluded users from joining your session.
For the most secure and reliable connection, create a Link session via a direct connection from one computer to another using a Thunderbolt or Ethernet cable. For more general information on setting up and using Link, please refer to the Link FAQs article located on the Ableton website: https://help.ableton.com/hc/en-us/articles/209776125-Link-FAQs.
Joining and Leaving a Link Session
Link MIDI Clock Note GENERAL
When Link is active, it is not possible to synchronize Traktor to incoming MIDI Clock as receive. Link will take priority. Sending MIDI Clock from Traktor as a master is still possible.
Synchronizing Traktor Decks to the Link Timeline
Most applications supporting Ableton Link have a unique timeline that is automatically synced as long as Link is activated. In Traktor, enabling Link synchronizes the Master Clock to the common Link timeline. The Master Clock is automatically set as the tempo master in Traktor and can serve as a SYNC reference for the Decks.
Notice
When using External Sync, the automatic Tempo Master assignment mode AUTO is deactivated and the Master Clock is forced to always be the Tempo Master. The tempo of such session cannot be changed from the Decks but only from the Master Clock controls.
The Deck’s behavior when synchronized to the Master Clock, and thus the Link timeline, is defined by the Sync Mode, which can be set in Traktor’s Preferences under Sync Mode on the Transport page.
BeatSync Mode
BeatSync mode is recommended when using Link. It synchronizes both tempo and phase of a Deck to the tempo master, in this case the Link timeline. The phase of the Deck is aligned when the SYNC button is turned on. SYNC turns dim when the phase of the Deck is shifted manually (i.e. when scratching or holding a Deck in the stopped position), but Traktor will re-align the phase when the Deck plays normally again (i.e. when you release the record or jog wheel).
Notice
The Beatgrids of your tracks need to be properly set for BeatSync to function correctly.
TempoSync Mode
TempoSync maintains tempo-only synchronization to the Tempo Master, in this case the Link timeline. The phase of the Deck is aligned when the SYNC button is turned on. SYNC turns dim if the phase of a Deck is shifted. The tempo always remains synchronized in this mode. When using TempoSync with Link, drifts in tempo and phase may occur.
Tip
You can quickly re-align the tempo and phase by pressing the Deck’s SYNC button twice.
In order to keep drifts in tempo and phase to a minimum:
Avoid large and sudden tempo changes.
Use an Ethernet cable instead of a wireless connection.
Increase the buffer size (latency) for your audio driver in the Audio Setup page of the Preferences to avoid buffer underruns. For example, if you normally set your buffer size to 256 samples, set it to 512 samples.
Tip
On macOS, you can use the Latency slider in the Audio Setup page to adjust the buffer size. On Windows, click on Settings in the Audio Setup page to change the buffer size in the control panel of your audio driver.
Matching the Downbeat
Since Traktor’s playback is not automatically synchronized to the first downbeat of a bar (beat 1 of 4), you may have to correct this manually. You can use the blue bar below the LINK button as an indicator. It shows the phase of the Link timeline relative to the current bar.
Release the downbeat of your track when the bar is empty.
Resetting the Downbeat
Occasionally, for example due to tempo offsets or when resuming playback after having stopped, Traktor’s Master Clock may be out of phase in relation to the Link timeline. To quickly reset the phase, you can use Traktor's Reset Downbeat function. It is available as a mapping command in the Controller Managerpage in the Preferences under Add In… > Master Clock > Ableton Link > Reset Downbeat.
Notice
Resetting the downbeat may cause skip by one or two beats backwards in the Link timeline.
Syncing Traktor via MIDI Clock
Traktor allows you to sync external hardware and software using MIDI Clock signals to be controlled in the Master Controls panel in the Global section.
You can enable the MIDI Clock on the External Sync page in the Preferences.
Syncing Traktor to External MIDI Clock Signal
Traktor is able to receive MIDI Clock Signals (Clock Receive) from another computer running Traktor, from other applications, or from MIDI hardware sending MIDI Clock:
Open the Controller Manager page in the Preferences.
Click Add....
Select Generic MIDI from the drop-down menu to create a new generic MIDI device.
In the In-Port drop-down menu, select the port from which you want the device to receive the incoming MIDI Clock signal.
Select the External Sync page in the Preferences.
Click EXT to select the External Clock Source.
Close the Preferences.
In the Master Control Panel click EXT.
The Traktor Master Clock now follows the external MIDI Clock signal once it is started.
Press the start button on the sending device, to sync the clock to the phase of the application or hardware sending the MIDI Clock signal,
In case of an offset between the sending hard- or software and Traktor, the offset has to be adjusted in the sending (Master) device.
Using Traktor as Master Clock
To use Traktor as the tempo source using its Master Clock, Traktor has to send the MIDI Clock Signal to the external hard- or software:
Open the Controller Manager page in the Preferences.
Create a new generic MIDI device.
Assign the Out-Port to the device you want to send the MIDI Clock signal to.
Open the External Sync page in the Preferences.
Tick Enable MIDI Clock.
The additional MIDI Clock functions are now displayed in the Master Control panel.
To start sending a MIDI Clock signal, click the Start/Stop button. Clicking it again stops sending.
When MIDI Clock is activated, the Start/Stop button is lit blue. The Tempo Display shows the tempo of the MIDI Clock signal in BPM.
By clicking the SYNC button, Traktor triggers a MIDI Clock Stop Message immediately followed by a MIDI Clock Start Message to re-sync the external hard- or software.
It may be required to adjust the offset between Traktor and the receiving hard- or software.
Tip
For syncing external hardware with the MIDI Clock, the Master Clock has to be set as Master Tempo Source.
Syncing two Instances of Traktor
These are the steps to sync two versions of Traktor running on different computers:
Connect the two computers via MIDI in order to transmit the MIDI Clock signals.
Decide which of the two computers should be the Clock Master and click the MASTER button in the Master Control panel.
On the other computer click the AUTO button in the Master Control panel.
To sync both computers, press the TICK button in the Master Control panel.
Once the two ticks are audible, press the SYNC button in the Master Control panel on the sending computer in order to reset the receiving computer.
Now start tweaking the MIDI Clock Sending Offset until the two Ticks are in perfect sync by clicking the Offset button.
You can then turn off the Ticks.
Recording Your Mix with the AUDIO RECORDER
In order to record your mix with the AUDIO RECORDER you at first need to make some adjustments in the Preferences and also to the AUDIO RECORDER to record audio from Traktor's Master Output.
Adjusting AUDIO RECORDER Preferences
Before you start recording you have to adjust the settings on the Mix Recorder page in the Preferences to define the audio source and the file settings:
Open the Mix Recorder page in the Preferences.
Select the Source option Internal.
Set the directory you want to save the recording file(s).
Select the file size at which Traktor will automatically split the recordings file.
Close the Preferences.
For more information about the Mix Recorder Preferences, refer to Preferences – Mix Recorder Page.
Adjusting Recording level
Click the AUDIO RECORDER button in the Global section to display the AUDIO RECORDER.
Playback a track on any Deck to monitor the incoming audio signal in the AUDIO RECORDER.
The Recordings Level Meter in the AUDIO RECORDER reflects the incoming audio signal. If not, make sure the channel fader is raised and the crossfader is positioned accordingly.
Adjust the recording level with the GAIN knob of the AUDIO RECORDER.
For more information about adjusting levels, refer to Optimizing Gain and Output Levels.
Recording Your Mix
Click the Record button to start the recording.
The display shows the actual file size and recorded time. When the maximum file size is reached, Traktor splits the actual file and seamlessly starts a new file for recording.
Click the CUT button to manually split the actual file and to seamlessly start a new file for recording.
To stop the recording, click the Record button again.
This saves the recorded file.
Broadcasting Your Mix
With Traktor you are able to broadcast your mix over the Internet. Basically everything that is audible from the Master Out can be streamed to the Internet, and listeners all over the world are able to listen to your broadcast in real time.
In order to broadcast your mix with the AUDIO RECORDER you at first need to make some adjustments in the Preferences and also to the AUDIO RECORDER .
Adjusting AUDIO RECORDER Preferences
To let the AUDIO RECORDER receive audio from Traktor's Master Output you need to adjust it on the Mix Recorder page in the Preferences:
Open the Mix Recorder page in the Preferences.
Select Internal in the Source option.
For more information about the Mix Recorder Preferences, refer to Preferences – Mix Recorder Page.
Configuring Traktor for Broadcasting
To broadcast your mix you need to adjust Traktor to send your
Before getting started, it is necessary to configure Traktor so that the local client can connect to the server and the metadata of the radio stream contains the correct information:
Open Broadcasting Page in the Preferences.
Adjust the Proxy Settings according to your current Internet configuration. If you are not using a proxy, simply check None.
Under Server Settings, input the Address of the Icecast server you want to connect to. This can be either a hostname or an IP-address.
Specify the port where the Icecast server can be reached. Most servers use the default setting of 8000.
Type in the Mount path and Password. This information can be obtained from the host of the Icecast server and permits only authorized clients to stream data from there.
Select the Format for the streaming. Note that with a higher bit rate, more bandwidth is used for every single stream. Therefore, given the same bandwidth, fewer listeners can tune in at the same time.
In the Metadata Settings, enter the information about your broadcast. This information is sent to the server and your listeners.
Traktor is ready for broadcasting.
For more information about the Broadcasting page in the Preferences, refer to Preferences – Broadcasting Page.
Adjusting Recording level
Click the Audio Recorder button in the Global Section to display the AUDIO RECORDER.
Playback a track on any Deck to monitor the incoming audio signal in the AUDIO RECORDER.
The Recordings Level Meter in the AUDIO RECORDER reflects the incoming audio signal. If not, make sure the channel fader is raised and the crossfader is positioned accordingly.
Adjust the recording level with the Record GAIN knob.
For more information about adjusting levels, refer to Optimizing Gain and Output Levels.
Starting Broadcast
Click the Broadcast button to start broadcasting.
If the button is highlighted, you are connected to the icecast server. If the Broadcast button is flashing, the connection with the Icecast server could not be established. In this case, check if the settings on the Broadcasting Page in the Preferences are entered correctly.
To stop broadcasting, click the Broadcast button again.
Streaming Protocol
Traktor uses a streaming protocol called Icecast. The Traktor software contains an Icecast client, which can send data to an Icecast server.
To use this feature, you need access to a computer running as an Icecast server. It is recommended that this computer has an Internet connection with at least 128 kb/s upstream transfer rate. The available bandwidth is being shared among the listeners, so it should be as high as possible.
Tip
For more information about setting up an Icecast server, refer to the Icecast website http://www.icecast.org/docs.php.
Tip
Icecast works only on Windows and Linux. For Broadcasting with on macOS take a look at the easy-to-use application Nicecast from rogue amoeba rogueamoeba.com/nicecast/.
Using Cruise Mode for Automatic Mixing
Cruise mode lets Traktor automatically mix the tracks contained in the selected Playlist or the Track Collection folder one after the other.
Tip
Cruise Mode will also work when using an external mixer.
Enabling Cruise Mode
Select any Playlist or the Track Collection folder in the Browser Tree.
Load a Track from the Track List into a Deck.
Click the Play button on that Deck to start playback.
Click the Cruise mode button in the Header to enable Cruise mode.
Cruise mode is activated. Traktor now mixes the tracks contained in the Track List one by one.
Cruise Mode Behavior
When Cruise mode is activated you can observe the following behavior of Traktor:
The playing track continues to play.
The channel fader for the playing track will be completely raised, whereas the channel fader for the next track will be set to minimum position.
The crossfader is set to center position and remains.
The next track in the Playlist is automatically loaded into the opposite Deck.
The next track will automatically start playback a few seconds before the current track reaches its end.
Tips for Using Cruise Mode
At least one track has to be playing when engaging Cruise mode.
Use a Playlist to create an order for the tracks to be played automatically.
You can optimize Cruise mode transitions by setting Fade In and Fade Out points in the tracks.
For more information on setting Fade In and Fade Out points, refer to Setting Fade Out and Fade In Cue Points in Tracks for Automated Mixing.
You can manually trigger the transition to the next track at any moment by pulling down the channel fader of the playing track.
Enabling FX Unit 3 and FX Unit 4
In order to use FX Unit 3 and FX Unit 4 you need to enable the option 4 FX Units in the Preferences.
Open the Effects page in the Preferences.
Enable 4 FX Units in the FX Unit Routing section.
When FX Units 3 and 4 are activated:
The FX Units 1 and 3, and FX Units 2 and 4 share the panels in the Global section.
In any Mixer channel there are now four FX Unit On buttons available.
FX Unit 1 and 3 in Single FX Mode
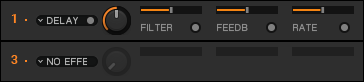
FX Unit 1 and 3 in Single FX Mode.
FX Unit 1 and 3 in Group FX Mode
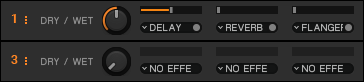
FX Unit 1 and 3 in Group FX Mode.
Configuring the FX Units to be used in Send FX Mode
The FX Units can also be used in Send FX mode in conjunction with an external mixer with integrated multi-channel audio interface connected to your computer. This section guides you through the various steps for configuring the FX Unit to be used in Send FX mode.
Notice
Send FX mode is only available in External Mixer mode and has to be configured in the Preferences.
Step 1 – Enabling External Mixer Mode
Open the Preferences.
Select Output Routing page.
Set the Mixing Mode to External.
Step 2 – Configuring the Output Send Channel
On the Output Routing page, set an output of your audio device as Output Send.
This output will typically be connected to the FX return input of the external mixer.
Step 3 – Configuring the Input Send Channel
Open the Input Routing page in the Preferences.
Under Input FX Send (Ext) set an input of your audio device to Input Send.
This input typically is connected to the FX send output of the mixer.
Step 4 – Routing the FX Unit for Send FX
Open the Effects page in the Preferences.
Under FX Unit Routing set the FX Unit you like to Send.
The audio signal that is sent to the FX Units is now entirely controlled by the FX Send knobs or buttons of the external mixer.
Additional Mouse Controls for Faders and Knobs
Using Additional Plus and Minus Buttons
When hovering the mouse over the Tempo fader or a knob, small + and - buttons appear next to it. These buttons allow for more precise changes and are better suited to set a knob to a specific value:
Hover the mouse over a control element to display its + and - buttons.
Click the + and - buttons to move the Tempo fader or turn the knob stepwise into the respective direction.
Adjusting Sensitivity of Plus and Minus buttons for Knobs
Traktor offers five sensitivity options for step-wise controlling the parameters with the + and - buttons: Min, Fine, Default, Coarse, and Switch. The sensitivity can be adjusted for any control element individually.
In order to adjust the sensitivity for a control element:
Hover the mouse over a control element to display its + and - buttons.
Perform a right-click on either the + or - button to open the sensitivity options menu.
Select one of the options.
Click the + and - buttons or use the mouse wheel to see how the behavior of the knob or fader has changed.
Adjusting Sensitivity of Plus and Minus buttons for Knobs
With the mouse you can also jump from the current parameter value to any other value immediately.
Right-click and hold any knob to display another knob pointer in gray.
While holding the right mouse button, drag the mouse to turn the gray knob pointer to the position to your liking.
While still holding the right mouse button, click and also hold the left mouse button.
This turns the blue knob pointer to the gray knob pointer position.
Release the left mouse button before and then release the left mouse button.
The parameter value changed immediately.
Managing Traktor Layouts
In this section you will learn how to create new Traktor layouts using the Layout Manager page in the Preferences. There are various ways to create user Traktor layouts. You can add a standard Traktor layout as a basis for your custom layout or you can duplicate and customize an existing Traktor layout.
Adding a Traktor Layout
To add a new Traktor layout:
Open the Preferences.
Select the Layout Manager page.
Click on Add... to open the drop-down menu.
Select the Traktor layout you want to add from the drop-down menu.
The new Traktor layout is added to the Personal Layouts table on the Layout Manager page.
Renaming a Traktor Layout
You can rename any Traktor layout in the Personal Layouts table:
Select the Traktor layout you want to rename.
Click in the Change Name text field and delete the current text.
Enter the new title for the Traktor layout.
Click on Rename.
The Traktor layout is renamed.
Customizing Traktor Layouts
You can customize any Traktor layout in the Personal Layouts table to your needs.
Select the Traktor layout you want to customize in the Personal Layouts table.
Open the Preferences page with the option you want to select, for example, Decks Layout.
Select the option, for example, 4 Decks from the decks drop-down menu.
The user interface now shows four decks.
Continue to customize the Traktor layout by selecting further options in the Preferences.
The user interface will change according to your customs. All changes are automatically saved for the selected Traktor layout.
Duplicating a Traktor Layout
Besides adding standard Traktor layouts you can also duplicate a customized Traktor layout and further refine this to your needs:
Select the Traktor layout you want to duplicate in the Personal Layouts table.
Click on Duplicate.
A duplicate of the selected Traktor layout is added to the Personal Layouts table. You can now rename and customize the duplicate to your needs.
Sorting Layouts
You can sort Traktor layouts by priority in the layouts drop-down menu in the header.
Select a Traktor layout in the Personal Layouts table in the Layout Manager page in the Preferences.
Use the Move Up and Move Down buttons to move the selected Traktor layout up or down in the Personal Layouts table.
The order of the Traktor layouts also changes in the Traktor layout drop-down menu in the header.