ASHLIGHT Overview
ASHLIGHT contains the following key elements: Snapshots, Perform Page, Grain Page, Sample Page, Effects Page, Global Page, XY Pad and Macros.
ASHLIGHT contains the following key elements and controls:
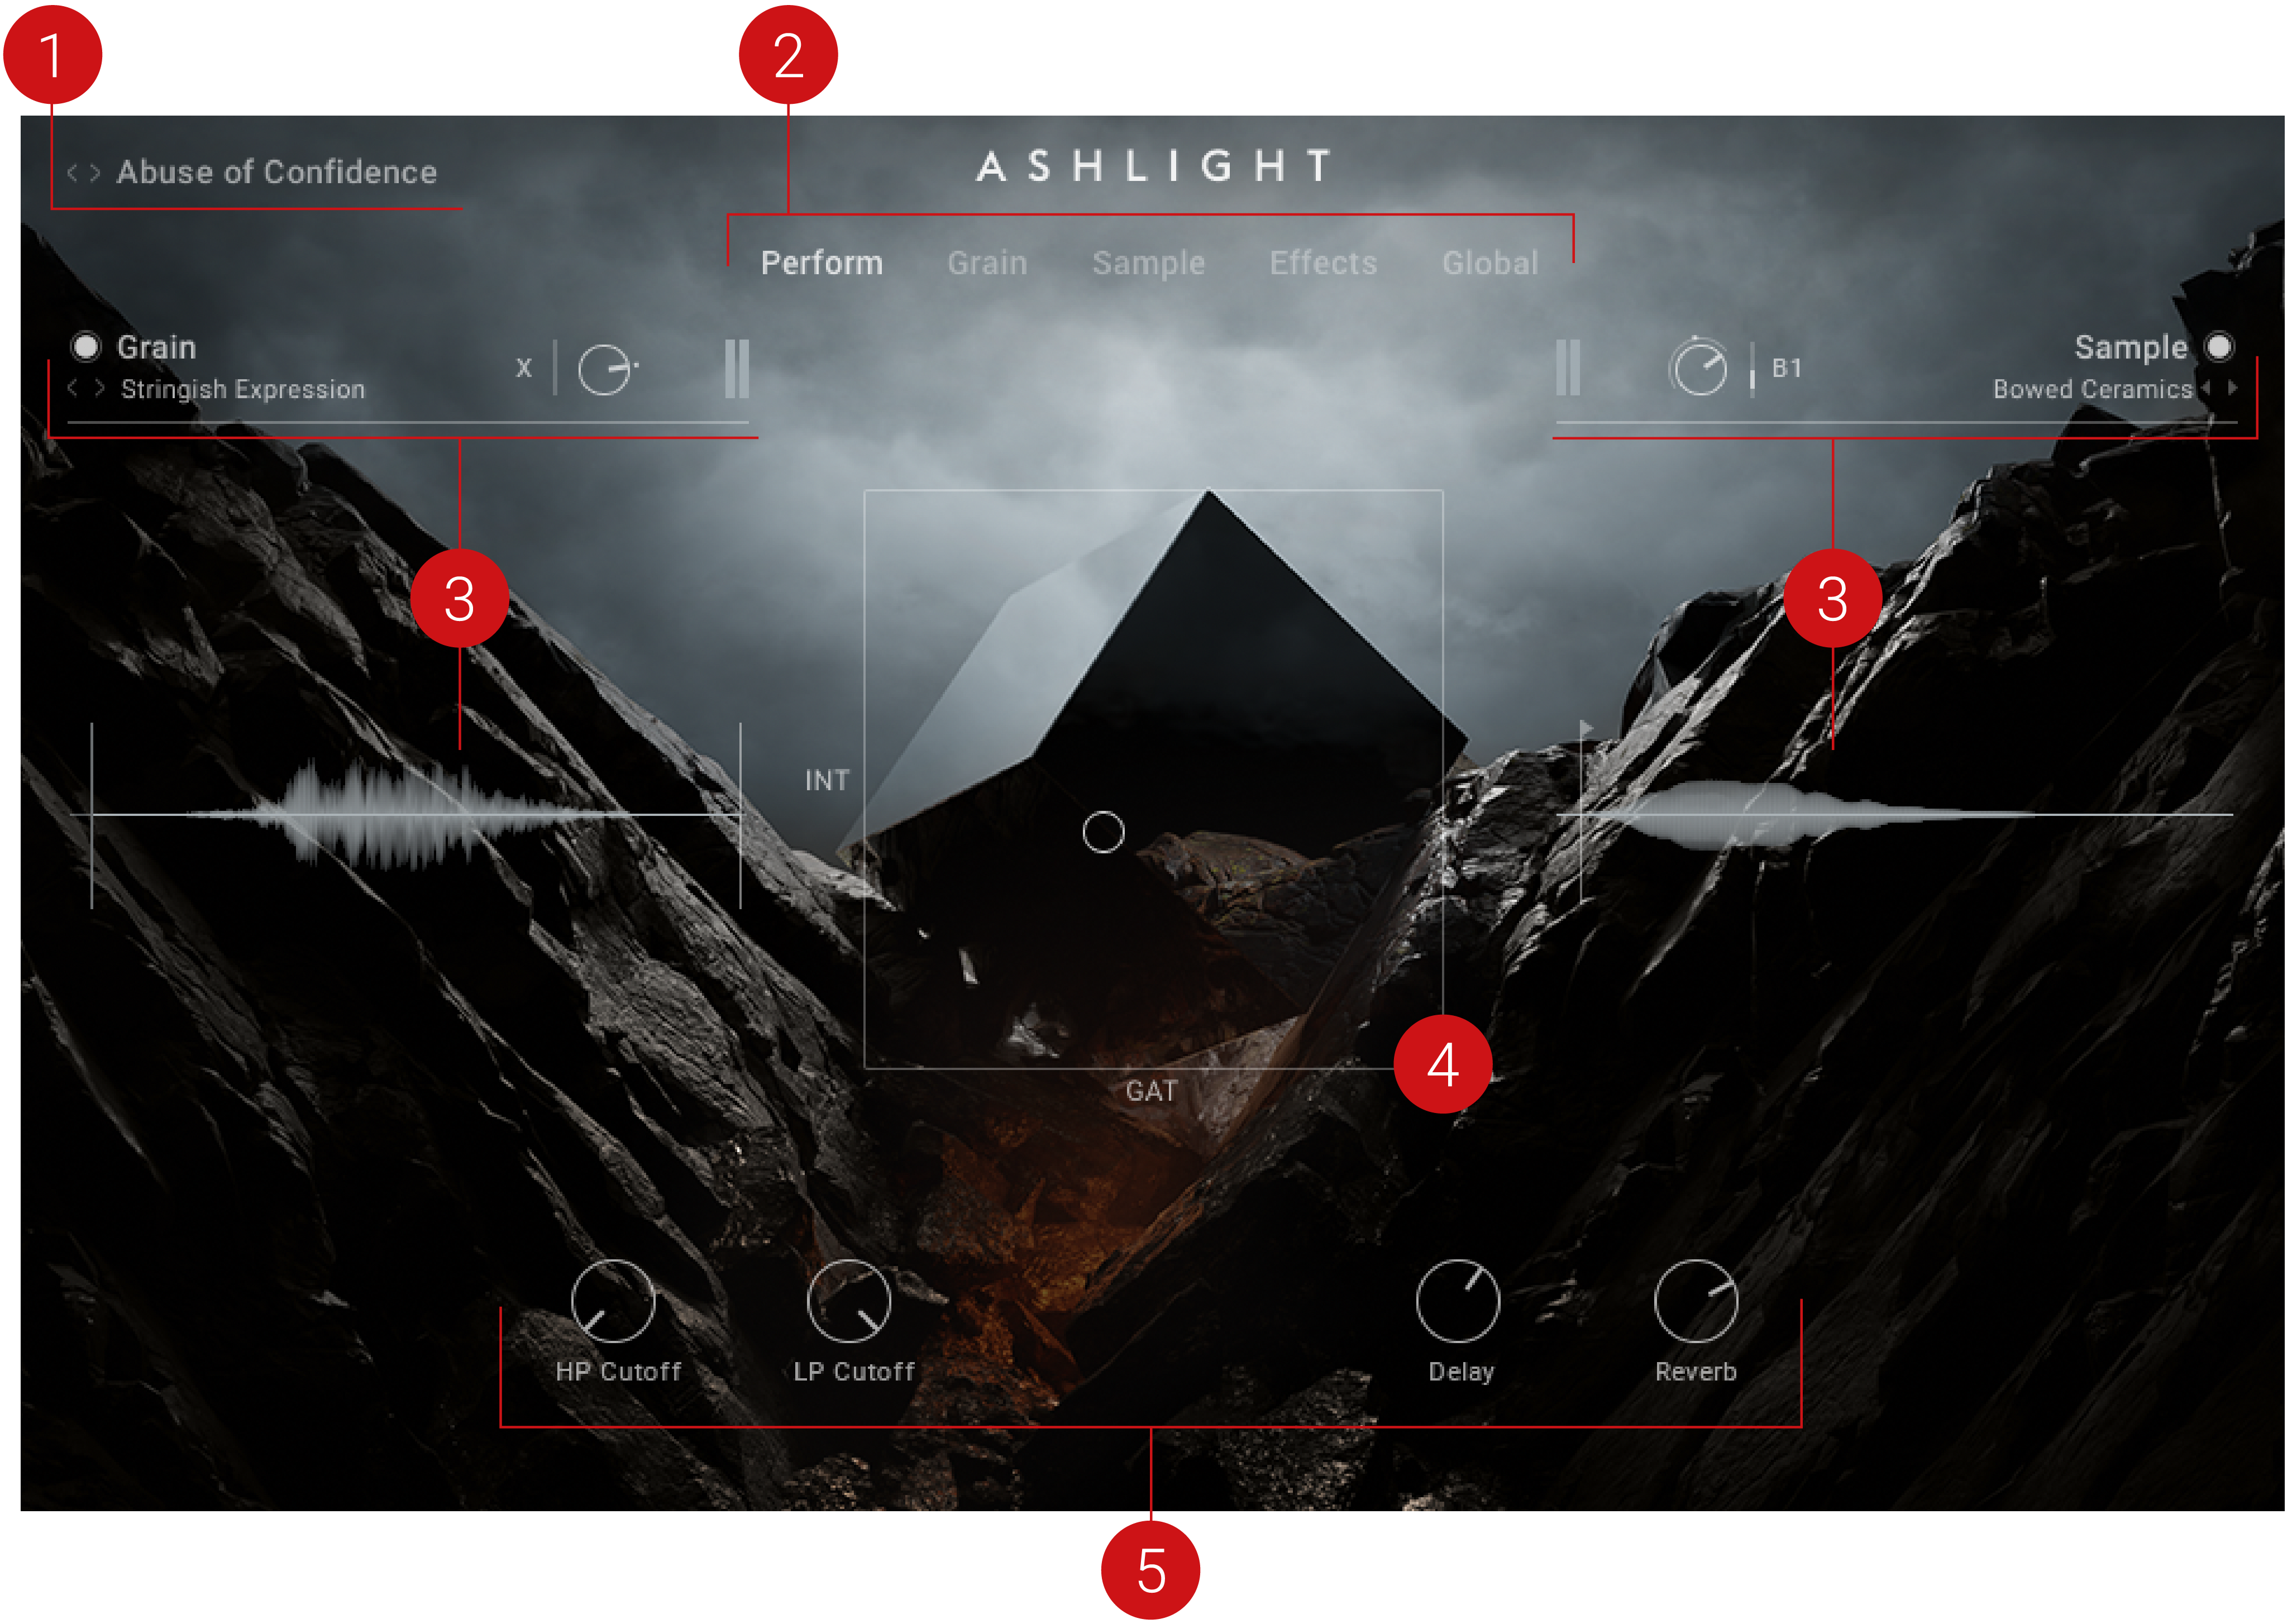
Snapshots: Snapshots are your own personalized user presets, which you can save and recall at a later time. For more information, refer to Snapshots.
Main Navigation: Selects between the five main pages; Perform, Grain, Sample, Effects, and Global.
Perform Page: The XY pad at the center of the Performer page works as the key interaction for shaping the sound. The main change in the character of the sound will take place using the XY pad. This page also hosts four Macros that provide quick access to control and change the assigned parameters. For more information, refer to Perform Page.
Grain Page: The Grain page covers all parameters related to playback within the Grain engine. The lower area has separate navigation, displaying either Send FX, Macros or Modulation. For more information, refer to Grain Page.
Sample Page: The Sample page covers all parameters related to playback within the Sample engine. For more information, refer to Sample Page.
Effects Page: The Effects page contains a flexible FX chain for both the Grain engine and Sample engine, with a large XY Pad in the middle for mapping effects parameters. For more information, refer to Effects Page.
Global Page: The Global page allows for mapping of MIDI CCs to the XY Pad and includes a third effects chain which affects the combined Grain and Sample layers. For more information, refer to Global Page.
Sound Sources: Displays the waveform and contains controls relating to the currently selected Grain and Sample sources. For more information, refer to Grain Header and Sample Header.
XY Pad: The XY pad at the center of the Performer page works as the key interaction for shaping the sound. The main change in the character of the sound will take place using the XY pad. For more information, refer to XY Pad.
Macros: The lower pane has separate navigation, displaying either Send FX, Macros or Modulation. For more information, refer to Macros.
Signal Flow
The Grain and Sample layers each travel through their own independent FX Bus. Their combined layer volumes are then sent into the Global Insert chain. Separately from this, the Sample and Grain layers' FX sends are combined at the global Delay and Reverb FX. These send FX are then routed into the Global FX chain, which allows for true global effects.
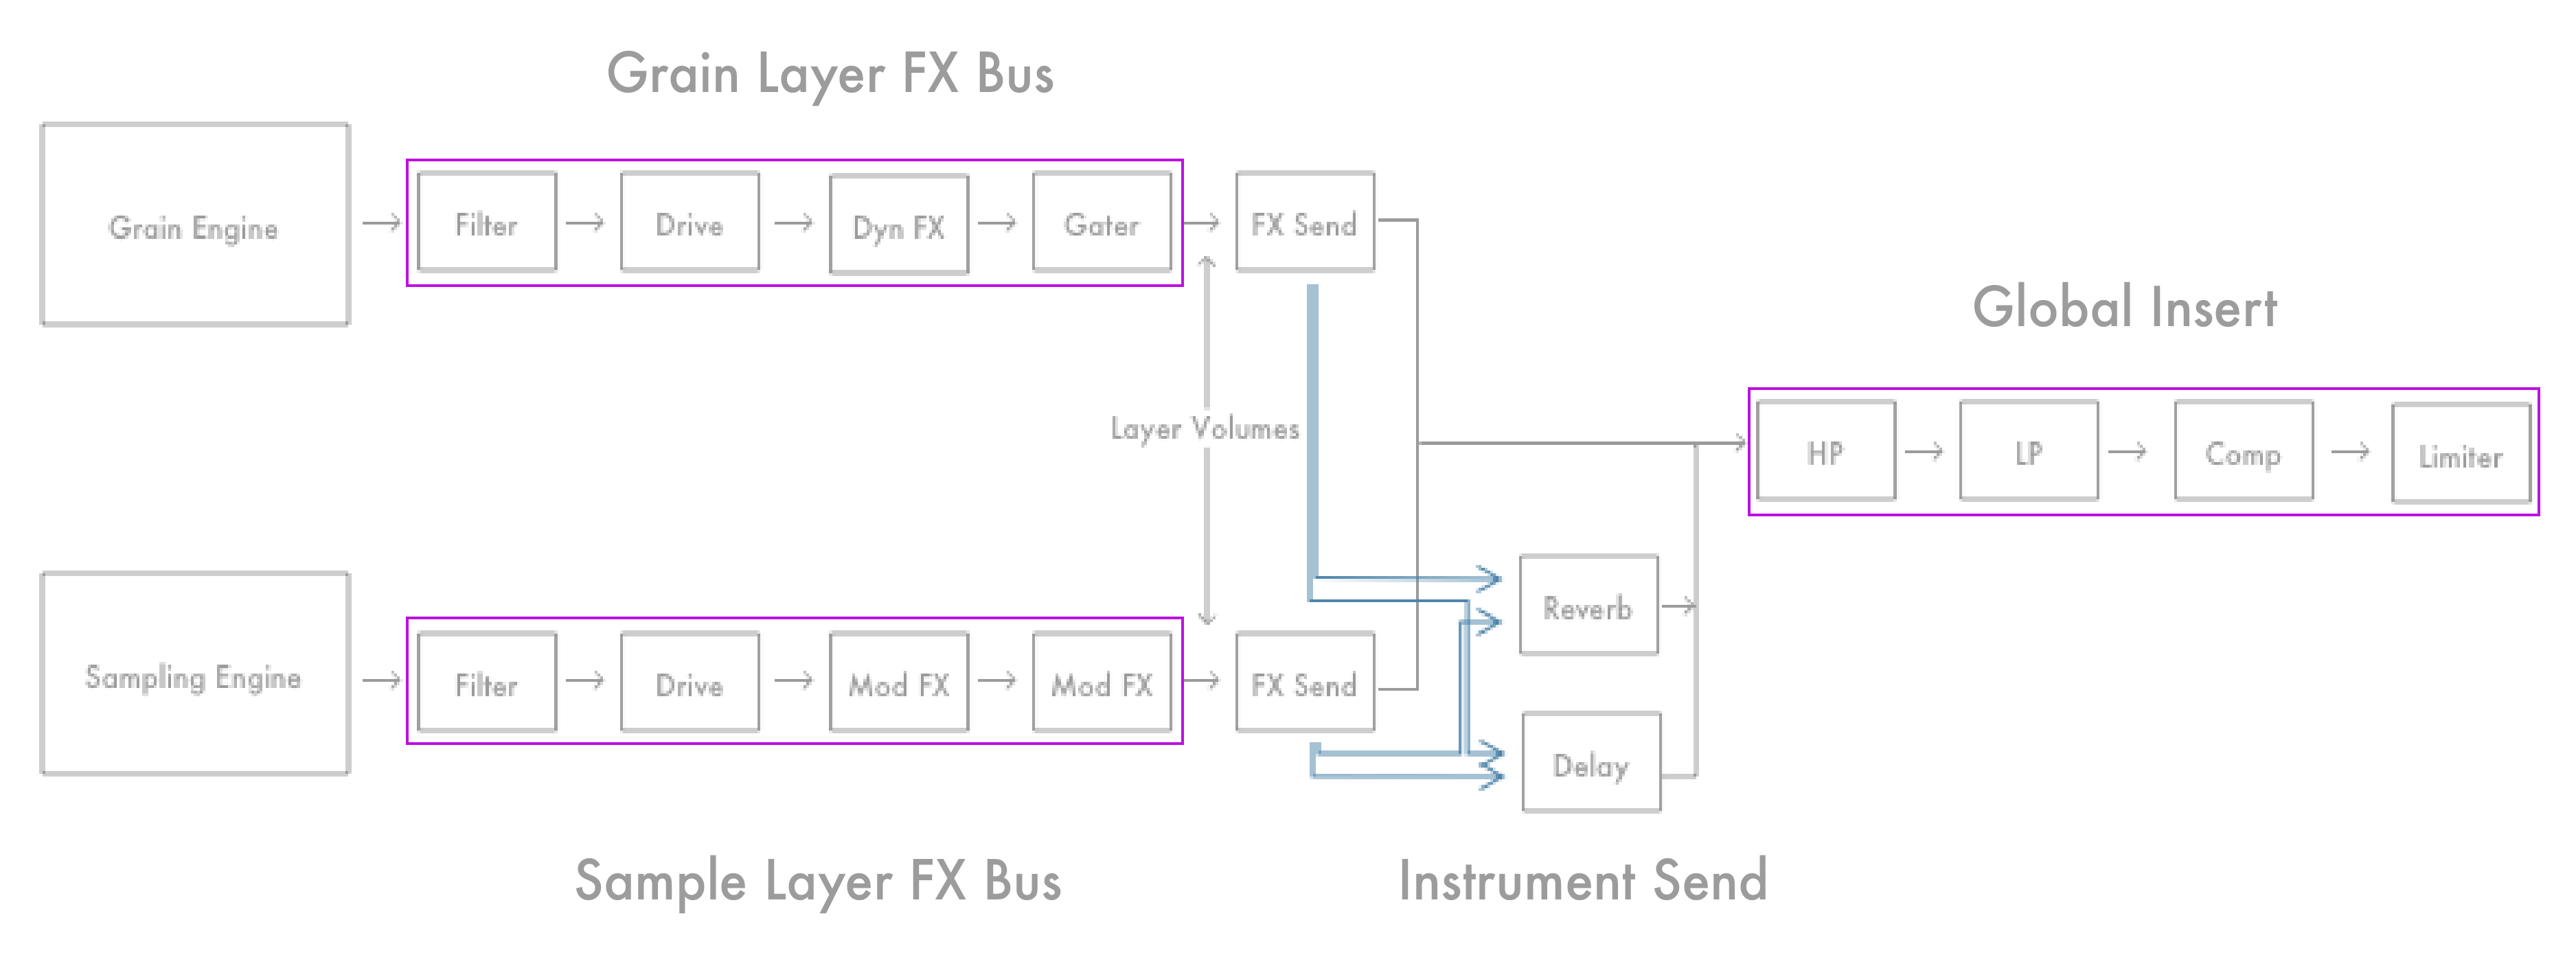
The Signal Flow of ASHLIGHT.
Creating a Sound
ASHLIGHT is built from a custom granular engine with hand-tailored audio sources routed through matching effects and modulators. In addition to the primary granular engine, there is also a sample layer that can be used for complementary sonic tasks like background noise, envelope attacks, tonal centering, or pads.
To build your own sound and get a feel for the ASHLIGHT workflows, follow these steps:
Grain Layer
The Grain layer uses granular synthesis to manipulate and alter audio sources. Change the playback order and speed of the grains, and apply processing to each grain (duration, fades, level and pitch) for dramatic effects.
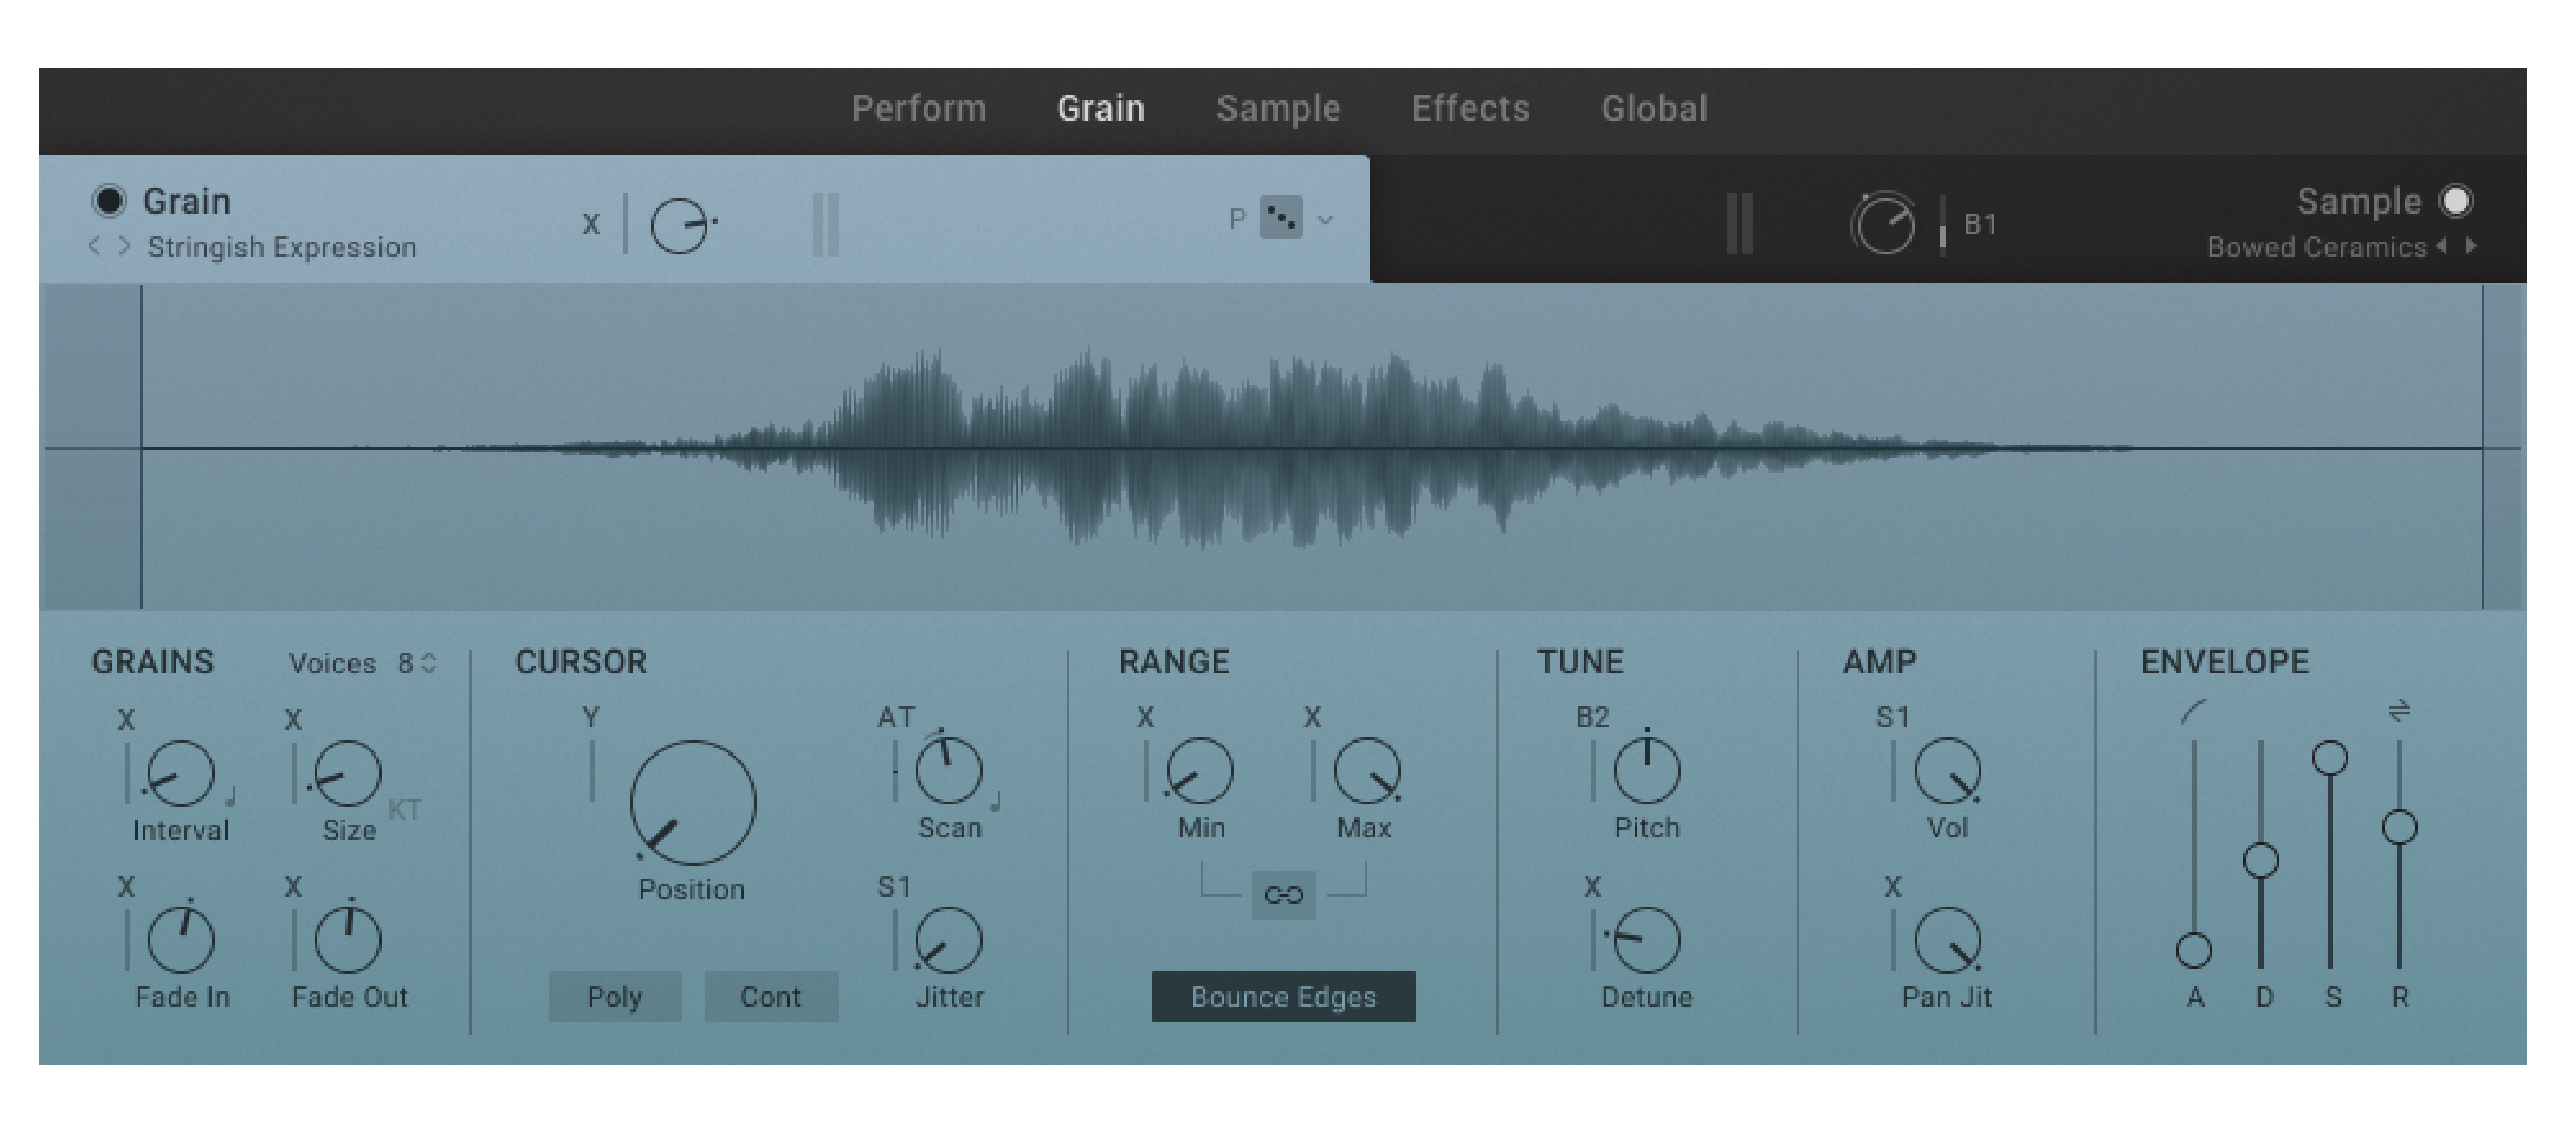
Select your Grain source and determine the behavior of the Granular layer. Presets for the Granular engine are selected by the arrows or Grain Source label. Click the arrows to browse presets quickly, or click on the label to open the Grain browser, where you can search for presets that are categorized by Type, Pitch, Category, and Character.
Adjust the Start position and set the Range and Length of the Grain sample playback.
Introduce some movement into your sound by adjusting the Scan and Jitter parameters in the Cursor section. The Scan control will determine the speed and direction in which the cursor moves, and the Jitter control will determine the random position of each grain.
Adjust the envelope section to determine the Attack and Decay of the Grain source.
Assign the Detune control to the X-axis and apply a subtle amount of modulation. As you move the cursor of the XY pad, you will hear the fine deviations in pitch.
Modulation and Effects
The Modulation pane is where ASHLIGHT comes to life. It provides modulation sources that bring movement and dynamics to your sound. The Modulation pane contains two LFO, two Shapers, and a Matrix for altering and combining modulation sources.

In the Modulation pane, route an LFO to the Shaper and assign the Shaper to any modulatable parameter by choosing S1 from the corresponding menu. Adjust the modulation amount with the slider underneath the drop-down menu.
Open the Send FX pane and turn up the Delay level for the Grain layer. Now select a preset from Effect type dropdown until you find a delay character that works with your Grain sound. Assign the Time and Feedback parameters to the X and Y-axis respectively.
In the Effect page, select a Filter and assign the Cutoff to the Y-axis. Assign the Resonance control to the X-axis, and move the cursor up and down to hear the filter open as the Delay send effect becomes more intense.
Sample Layer
The Sample layer contains controls for the playback of the sample source. The Sample layer accesses a custom sound library of multi-samples and one-shots, designed to compliment those in the Grain layer.
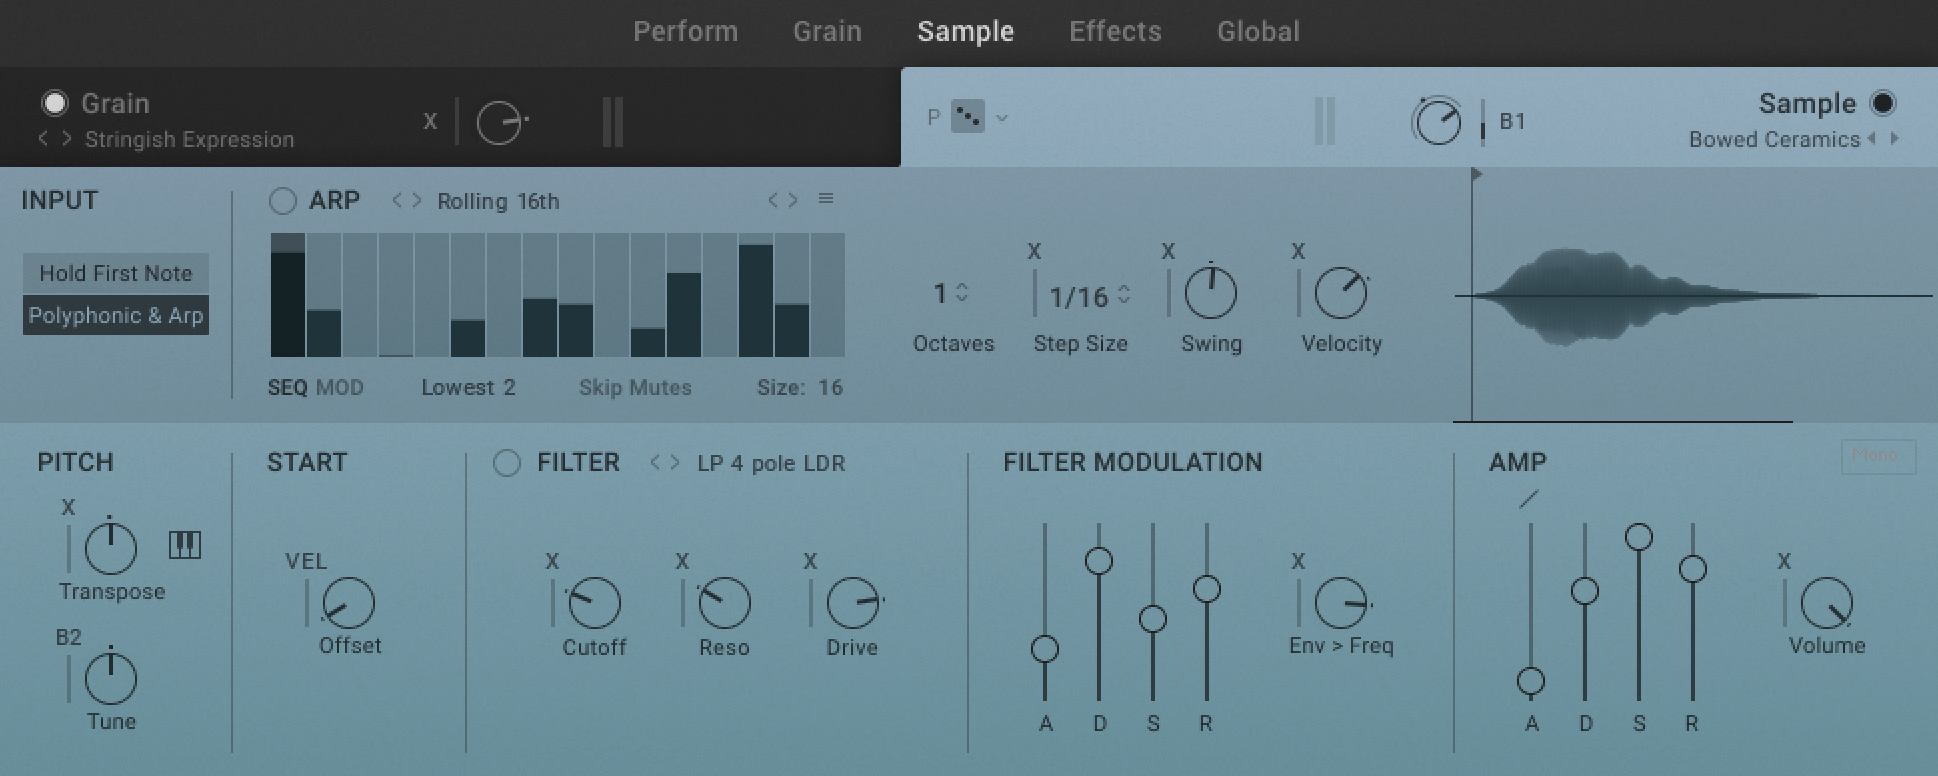
Sources for the Sampler layer can be chosen via the Sample browser. Use the browser to search for sample presets that are categorized by Type, Pitch, Origin, and Mood.
Transpose the Sample layer to -1 octave or use the Tune control to finely tune the sample to compliment the Grain sample source.
Extend the Filter Modulation and Amp envelopes to create a more expansive sound, then assign LFO 2 to the Volume parameter to create a tremolo effect.
In the Modulation pane, set LFO 2 to a fast setting to create the rapid deviations in volume that define tremolo.
Global FX
The Send FX Pane is where the global Delay and Reverb send effects are contained. Each effect has controls that determine their behavior and sonic character. Explore how effects can shape and inspire your sound.

A final Global FX chain applies effects to the combined Grain and Sample layers.
Explore adding other Effects and assigning their parameters to the XY pad. Using your ears, following your intuition, and experimenting is the best way to find your own signature sound.
Importing Your Own Samples
ASHLIGHT allows you to import your own samples. This feature can be used when designing your own Snapshots allowing you to utilize the processing power of the specialized grain and sample modules, effects, and the powerful performance-based XY modulation matrix.
Samples can be added to ASHLIGHT by dragging and dropping them from your operating system or the Files folder in KONTAKT, directly onto the waveform displays in the Perform page, the Grain page, or the Sample page. Compatible audio file formats are: .wav, .aif, and .ncw. Compressed files such as .mp3 do not work but can be converted to one of the compatible formats using third-party file conversion software.
To add your own sample:
Using the mouse, click-and-hold the audio file you want to add.
Drag the file to a waveform display on the Performance page, Grain page or Sample page.
Release the mouse button.
The sample is imported and the waveform is displayed accordingly.
Once a file has been imported KONTAKT will automatically try to detect the root key. You can also set the root key of the imported sample manually using the up/down arrows of the Sample Layer Root Key in the top right corner of the Grain or Sample Waveform display. This allows you to increase or decrease the root key of the imported user sample by one octave. Hold [Option] (Mac) / [Alt] (Windows) to change the key in semi-tones. For more information, refer to Grain Page Overview or Sample Page Overview.
Tip
For information on importing files from the KONTAKT File menu, refer to the KONTAKT Manual available here.