Perform Page
The Perform page is the main view of ASHLIGHT. It features the XY pad for real-time modulation and four Macro controls that are freely configurable.
The Perform page is the main view of ASHLIGHT and gives you direct access to the key controls of the other pages. The XY pad at the center of the page can be used to perform real-time modulation of both the Grain and Sample layers. From the Perform page you can also browse Grain and Sample presets, adjust their output levels and applied modulation. The four Macro controls below the XY pad are freely configurable and provide quick access to control and change their assigned parameters.
Perform Page Overview
The Perform page contains the following elements and controls:
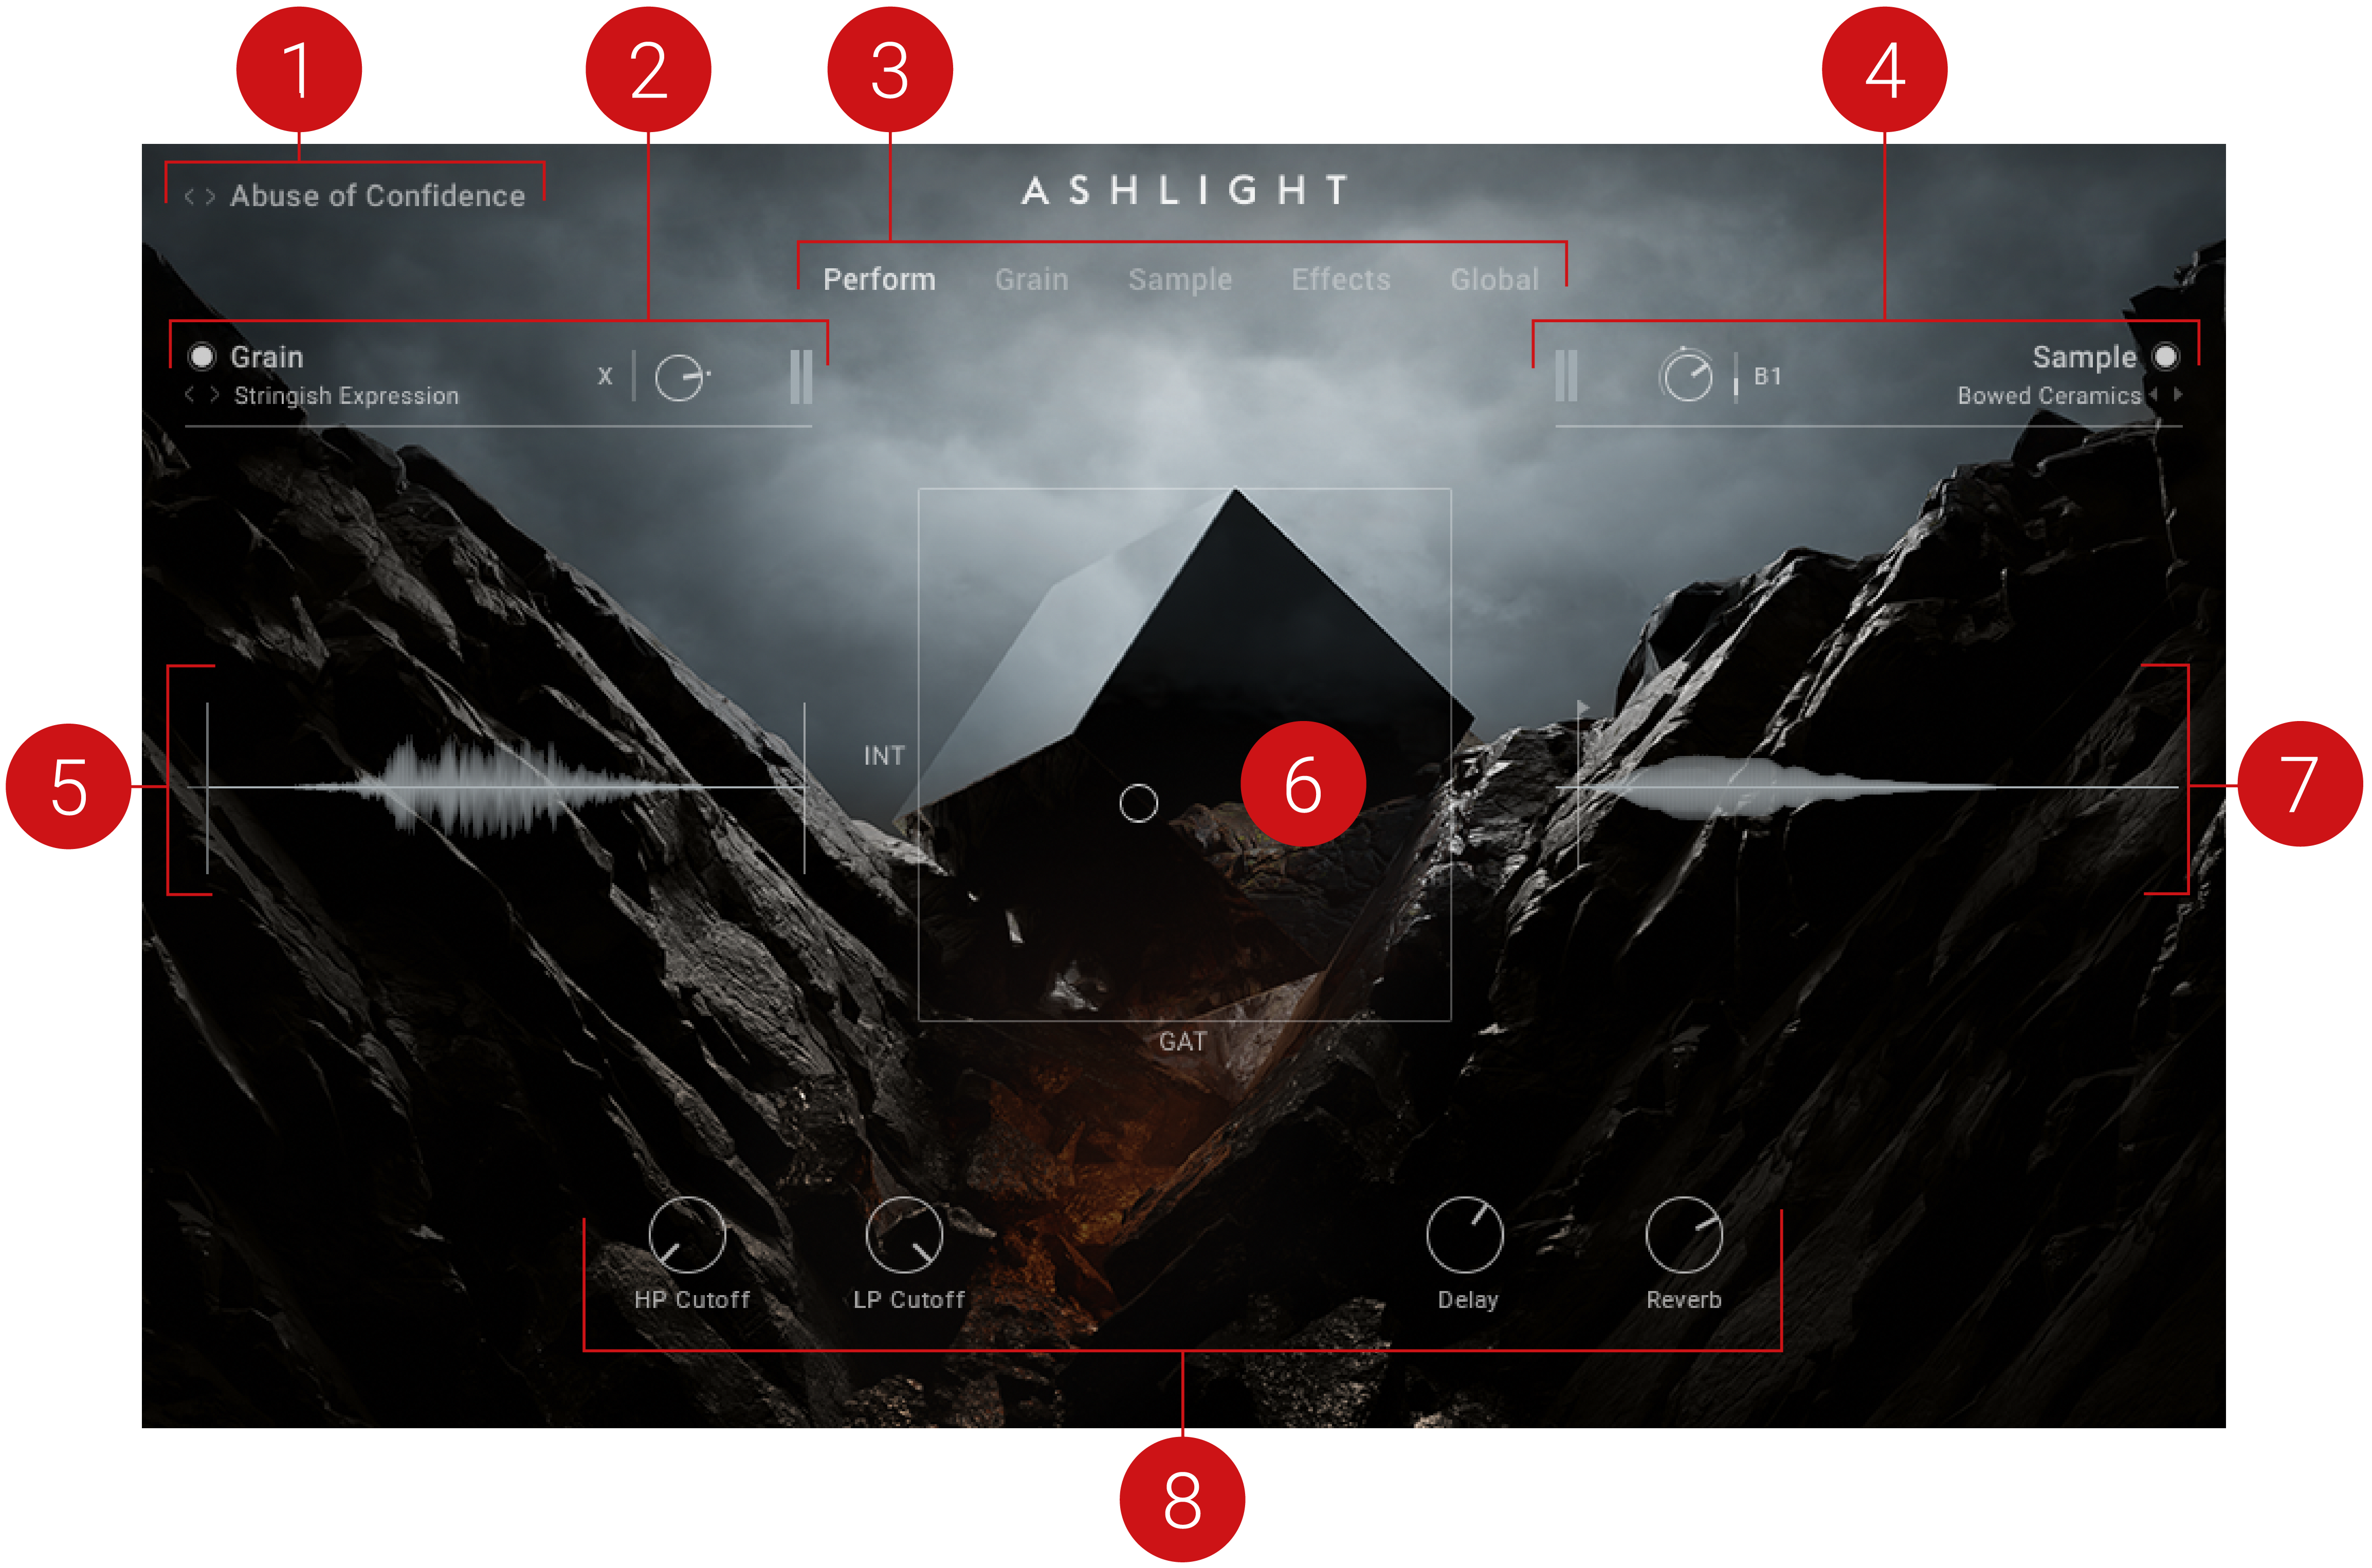
Snapshot Browse controls: Contains previous/next buttons to browse through Snapshots and provides quick access to the Snapshot browser. For more information, refer to Snapshot Browse Controls.
Grain Header: Contains global functions including the selection of the source sample, access to the Grain Source browser, and overall volume level control for the Grain layer. For more information, refer to Grain Header.
Top Navigation: Contains buttons to display the other pages of ASHLIGHT .
Sample Header: Contains global functions including the selection of the source sample, access to the Sample Source browser, and overall volume level control for the Sample layer. For more information, refer to Sample Header.
Grain Waveform display: Displays the Grain Source waveform and visualizes the Grain Cursor position of up to ten notes. You can also directly jump to the Grain page by clicking within the waveform.
XY Pad: Controls the sound of the current Snapshot in realtime according to the modulation assignments for the X and Y parameters. For more information, refer to XY Pad.
Sample Waveform display: Displays the Sample Source waveform and visualizes the playhead position.
Macros: These top-level parameter controls can be assigned to multiple targets at the same time. You can select the labels corresponding to the parameters. For more information, refer to Macros Pane Overview.
Grain Header
The Grain Header contains global functions including selection of the source sample, access to the Grain Source browser, and overall volume level control for the Grain layer. The Grain Header is available on the Perform page, on the Grain page, and on the Effects page. It contains the following controls:
The Grain Header contains the following controls and features:
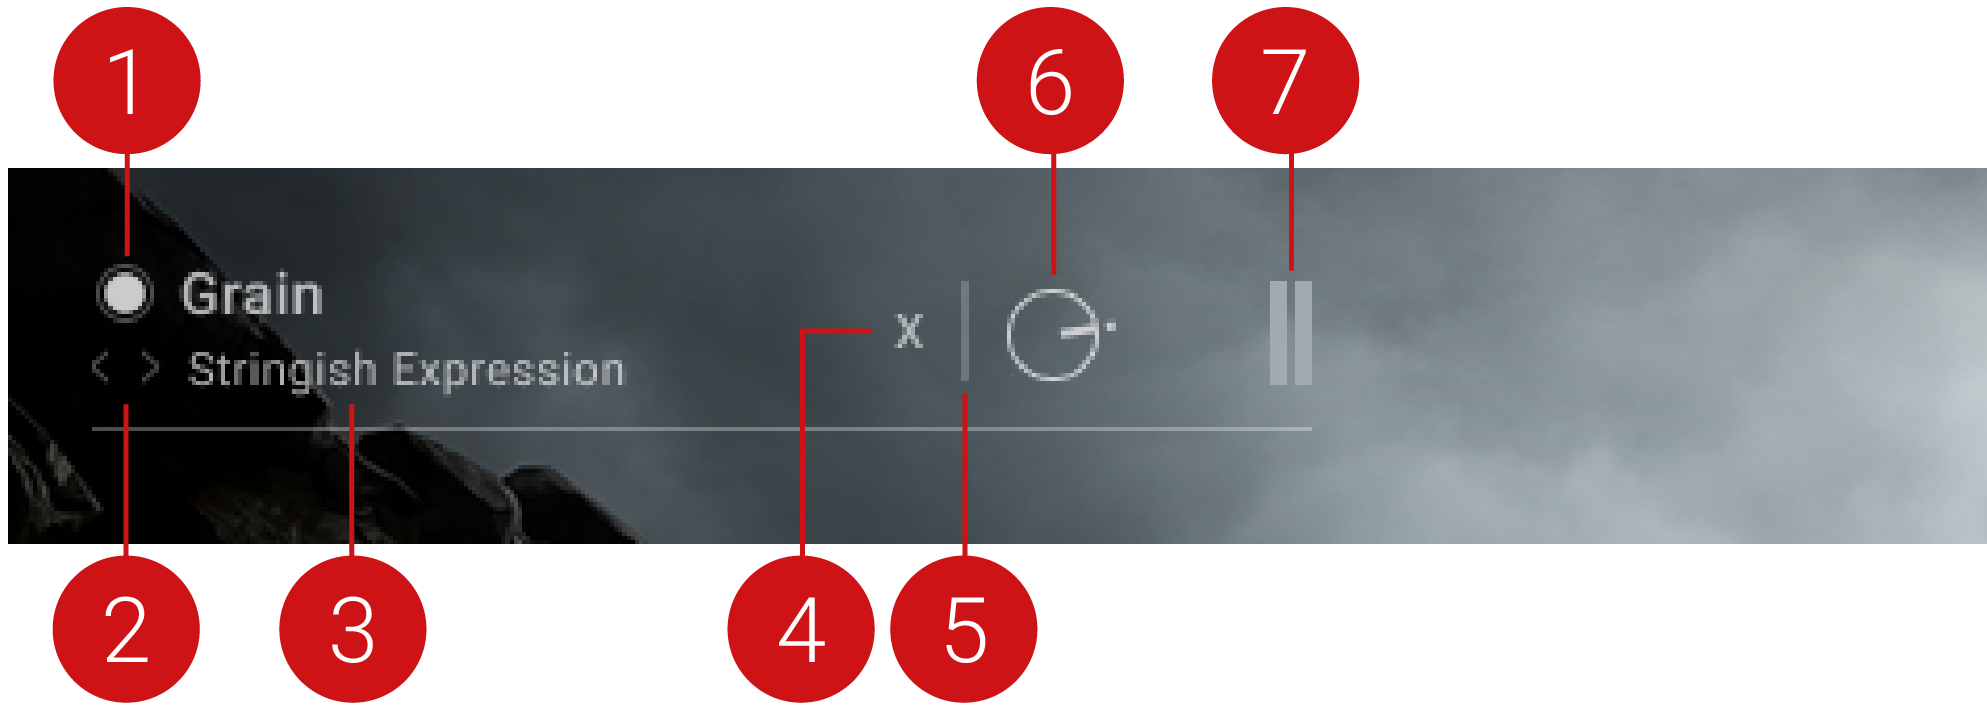 |
Grain Layer on/off: Determines if the Grain layer is active or bypassed. When the button is filled out, it indicates the Grain Layer is active.
Grain Source previous/next: Loads the previous/next Grain Source from the Results list in the Grain Source browser. If tags are selected to limit the results in the Grain Source browser, the arrows appear filled out. For more information, refer to Filtering a Browser Search.
Grain Source: Displays the name of the loaded Grain Source. Click the name to open the Grain Source browser. For more information, refer to Using Browsers.
Modulation Source: Selects the Modulation Source to be applied to the Grain Volume control.
Modulation Amount: Controls the amount of modulation applied to the Grain Volume control by the selected Modulation Source.
Grain Volume: Sets the volume for the Grain Layer which is applied after the Grain Layer effects, and before the Global FX chain and the Send FX chain.
Grain Level meter: Displays the current output volume level for the Grain Layer.
Sample Header
The Sample Header contains global functions including selection of the source sample, access to the Sample Source browser, and overall volume level control for the Sample layer. The Sample header is available on the Perform page, the Sample page, and the Effects page.
The Sample Header contains the following controls and features:
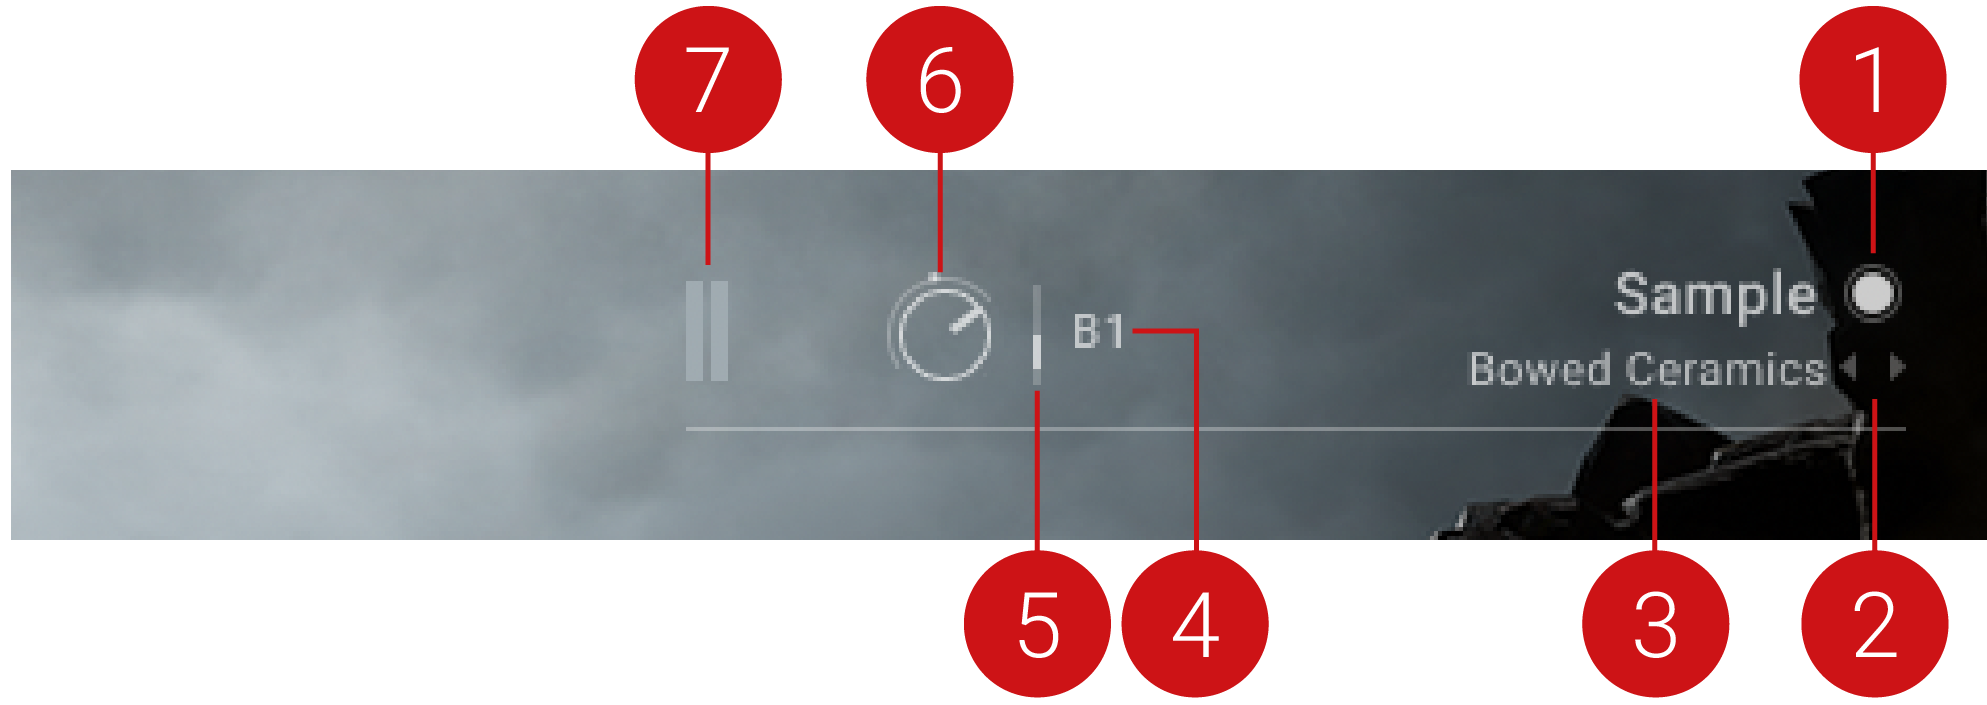 |
Sample Layer on/off: Determines if the Sample Layer is active or bypassed. When the button is highlighted, the Sample Layer is active.
Sample Source previous/next: Loads the previous/next Sample Source from the Results List in the Sample Source browser. If tags are selected to limit the results in the Grain Source browser, the arrows appear filled out. For more information, refer to Filtering a Browser Search.
Sample Source: Displays the name of the loaded Sample Source. Click the name to open the Sample Source browser. For more information, refer to Using Browsers.
Modulation Source: Selects the Modulation Source to be applied to the Sample Volume control.
Modulation Amount: Sets the amount of modulation applied to the Sample Volume control by the selected Modulation Source.
Sample Volume: Sets the volume for the Sample Layer which is applied after the Sample Layer effects, and before the Global FX chain and the Send FX chain. Note that this parameter can not be modulated polyphonically. Sample Volume should be used if volume control per voice is required.
Sample Level meter: Displays the current output volume level for the Sample layer.
Snapshot Browse Controls
The Snapshot Browse controls are available on any page in ASHLIGHT, and provide a quick and easy-access option for browsing Snapshots. The Snapshot browser is also opened here, where you can search for a specific Snapshot using tags.
The Snapshot Browse controls contain the following features:
 |
Snapshot Previous/Next (<> icons): Loads the previous/next Snapshot from the Results List in the Snapshot browser. If tags are selected to limit the results in the browser, the arrows appear filled out. For more information, refer to Filtering a Browser Search.
Snapshot Name: Displays the name of the loaded Snapshot. A Snapshot contains a complete ASHLIGHT preset. Click the name to open the Snapshot browser. For more information, refer to Using Browsers.
Tip
Snapshots can be saved with KONTAKT's Snapshot functionality in the Instrument header. For more information, refer to Snapshots Overview.
XY Pad
The XY pad lies at the center of the Perform page, controlling the sound of the Snapshot in real-time according to the modulation assignment of the X and Y parameters. The XY pad also appears on the Effects page and Global page, as well as in the three browsers. The XY pad contains the following elements:
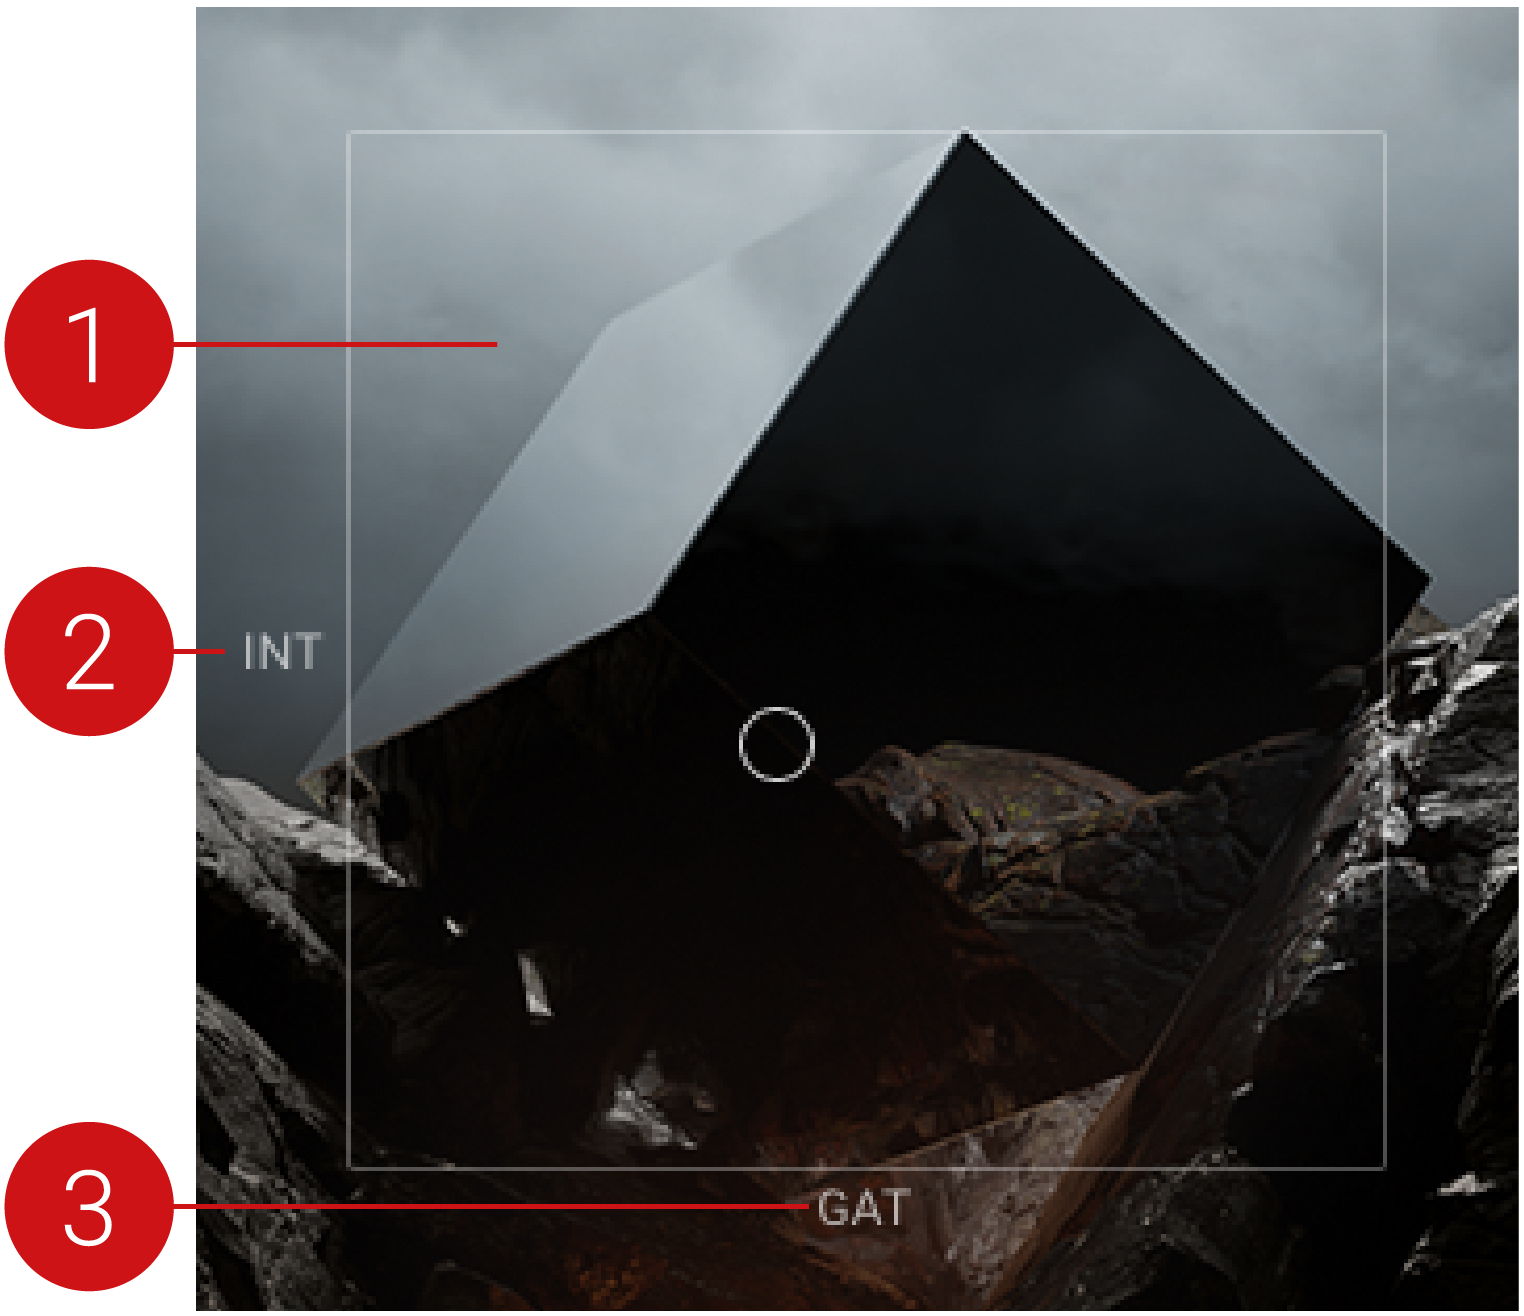 |
XY Cursor: Controls the sound of the Snapshot in real-time according to the modulation assignment of the X and Y parameters. For more information, refer to XY Pad Assignment. You can also assign MIDI controllers to control the X and Y axis on the Global page, refer to Assigning XY Pad to a MIDI Controller.
Y axis label: Selects a label for the Y axis functionality. Moving the XY Cursor vertically will affect all controls assigned to Y XY Pad. For more information, refer to XY Pad Assignment.
X axis label: Selects a label for the X axis functionality. Moving the XY Cursor horizontally will affect all controls assigned to X XY Pad. For more information, refer to XY Pad Assignment.
XY Pad Assignment
The XY pad should operate the most important real time parameters. The main purpose of the Y axis should be to control the Intensity. Assigning multiple parameters to the XY control enables you to create subtle and complex sonic articulations using only the XY pad.
To assign a control to the X or Y axes:
Click on the Modulation Connector of the parameter you wish to assign.
From the drop down, select the X XY Pad to assign the parameter to the X axis, or the Y XY Pad to assign to the Y axis.
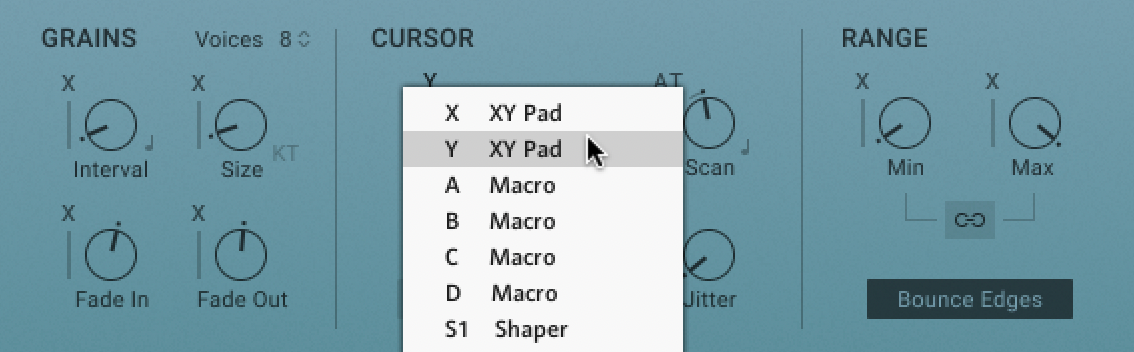
The parameter is now assigned to the XY Pad.
Below are some examples of suitable parameters for the XY pad:
Grain Settings:
Grain Detune
Cursor position / Range
Scan speed
Grain Rate and Volume compensation
Grain Fade In/Fade Out
FX:
Filter Cutoffs
Dry Wet or FX send levels
Delay Feedback
Sources:
Level / Balance control layers
MPE Support
MIDI Polyphonic Expression (MPE) is a method of using MIDI that allows for more nuanced and expressive control over electronic instruments, replicating the varying articulations that one can apply to an acoustic instrument. Rather than global MIDI messages, MPE sends each message on a per-note basis, allowing for more dynamic and expressive performances.
In ASHLIGHT, polyphonic pitch bend is hardwired to control the tuning of the played notes. Slide and pressure (aftertouch) messages are handled in the modulation system in the same way as every other polyphonic modulation source is processed. The effects section does not process every voice separately, hence the modulation applied to effect parameters is monophonic.
Pitch bend messages are processed with a pitch bend range from -12 to 12 for pitch wheel messages on channel 1. This channel is used for global messages and affects all voices. Pitch bend messages on member channels 2 to 16 affect individual notes and are processed with a range from -48 to 48. Therefore, MIDI Channel 1 is mandatory when using ASHLIGHT with a standard keyboard without MPE. Make sure that your host and hardware use the corresponding pitch bend range setting and MIDI channels.
Polyphonic pitch bend and aftertouch work with all Snapshots from ASHLIGHT's library. To find dedicated MPE sounds that use the polyphonic slide modulation assignments, filter for Snapshots tagged with MPE in the Browser. You can also set up your own slide controller assignment by assigning the SLD MPE Slide modulation source to any polyphonic parameter. The grain position knob is a good starting point.
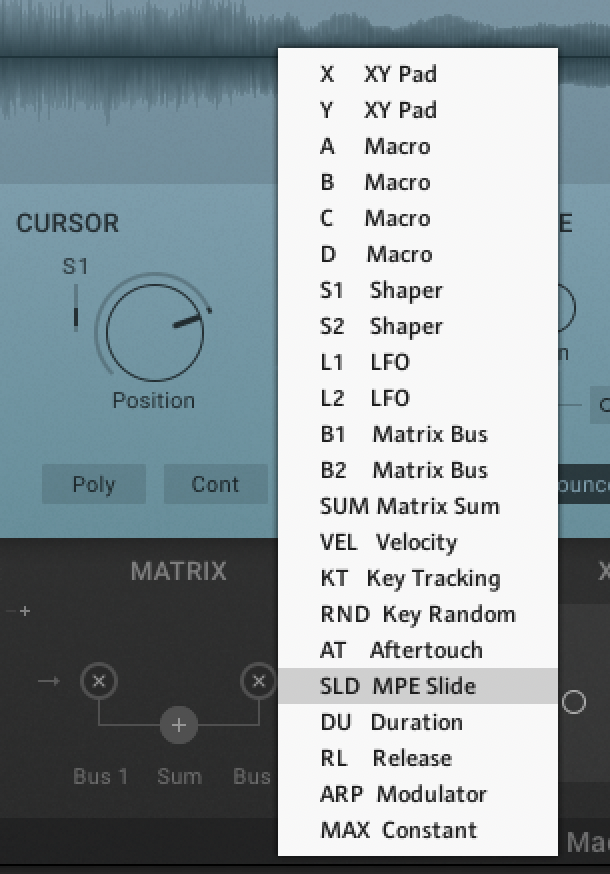 |
MPE Slide option in the Mod Assignment menu.
Notice
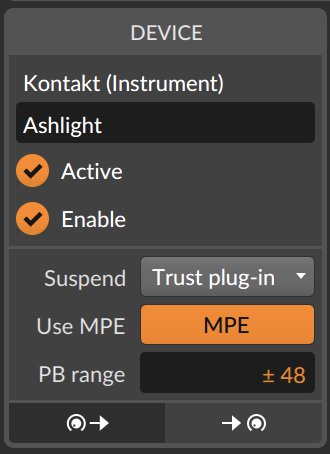
Note that some DAWs require you to explicitly enable MPE for a specific plug-in instance. For instructions on setting up MPE, refer to Ableton Live 11, Bitwig Studio, and Cubase 11.
Notice
MASCHINE is not yet MPE compatible. Please run ASHLIGHT in KOMPLETE KONTROL, which supports MPE.
Ableton Live 11
In Ableton Live 11, the MPE option is located in the context menu of the VST plug-in device. To activate MPE for an instance of KONTAKT:
Right click on the device header.
Select Enable MPE Mode.
 |
Enabling MPE Mode in Ableton Live 11.
Bitwig Studio
To activate MPE for an instance of KONTAKT in Bitwig Studio:
Ensure that your MPE input device is set up in the Controllers tab of Bitwig Studio’s preferences.
Select the KONTAKT device.
Activate the MPE button on the left side of the device’s settings section.
 |
Activating MPE in Bitwig Studio.
Cubase 11
To activate MPE for an instance of KONTAKT in Cubase 11:
Ensure that your MPE input device is set up on Cubase's Studio Setup page.
Set the MIDI channel on the track used for ASHLIGHT to All.
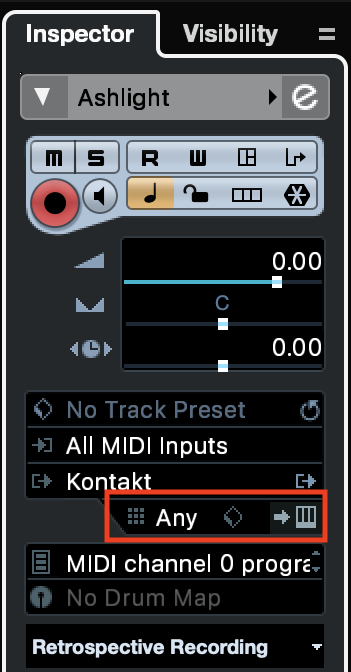 |
Activating MPE in Cubase 11.