Effects Page
The Effects page contains effects or each source layer, including Delay, Reverb, Dynamics, Utility, Mod, Filter, Utility, Gater and Drive options.
On the Effects page, you can apply effects to the audio signals coming from the Grain layer and the Sample Layer. For each layer, there is a dedicated Effects section containing an effects chain. Each effect chain consists of four effect slots for loading individual effects. You can choose from nine effects which can be operated in several modes. Depending on the effect mode, there will be different parameters and controls for the select effect.
This section contains an overview of the Effects page. Here you will learn how to load effects into effect slots and how to select an effect mode. You will also learn how to reorder and to disable effect slots within the effect chain.
Notice
The procedures for the Effect sections explained here are the same for the Grain Layer, the Sample Layer, and the FX section on the Global page.
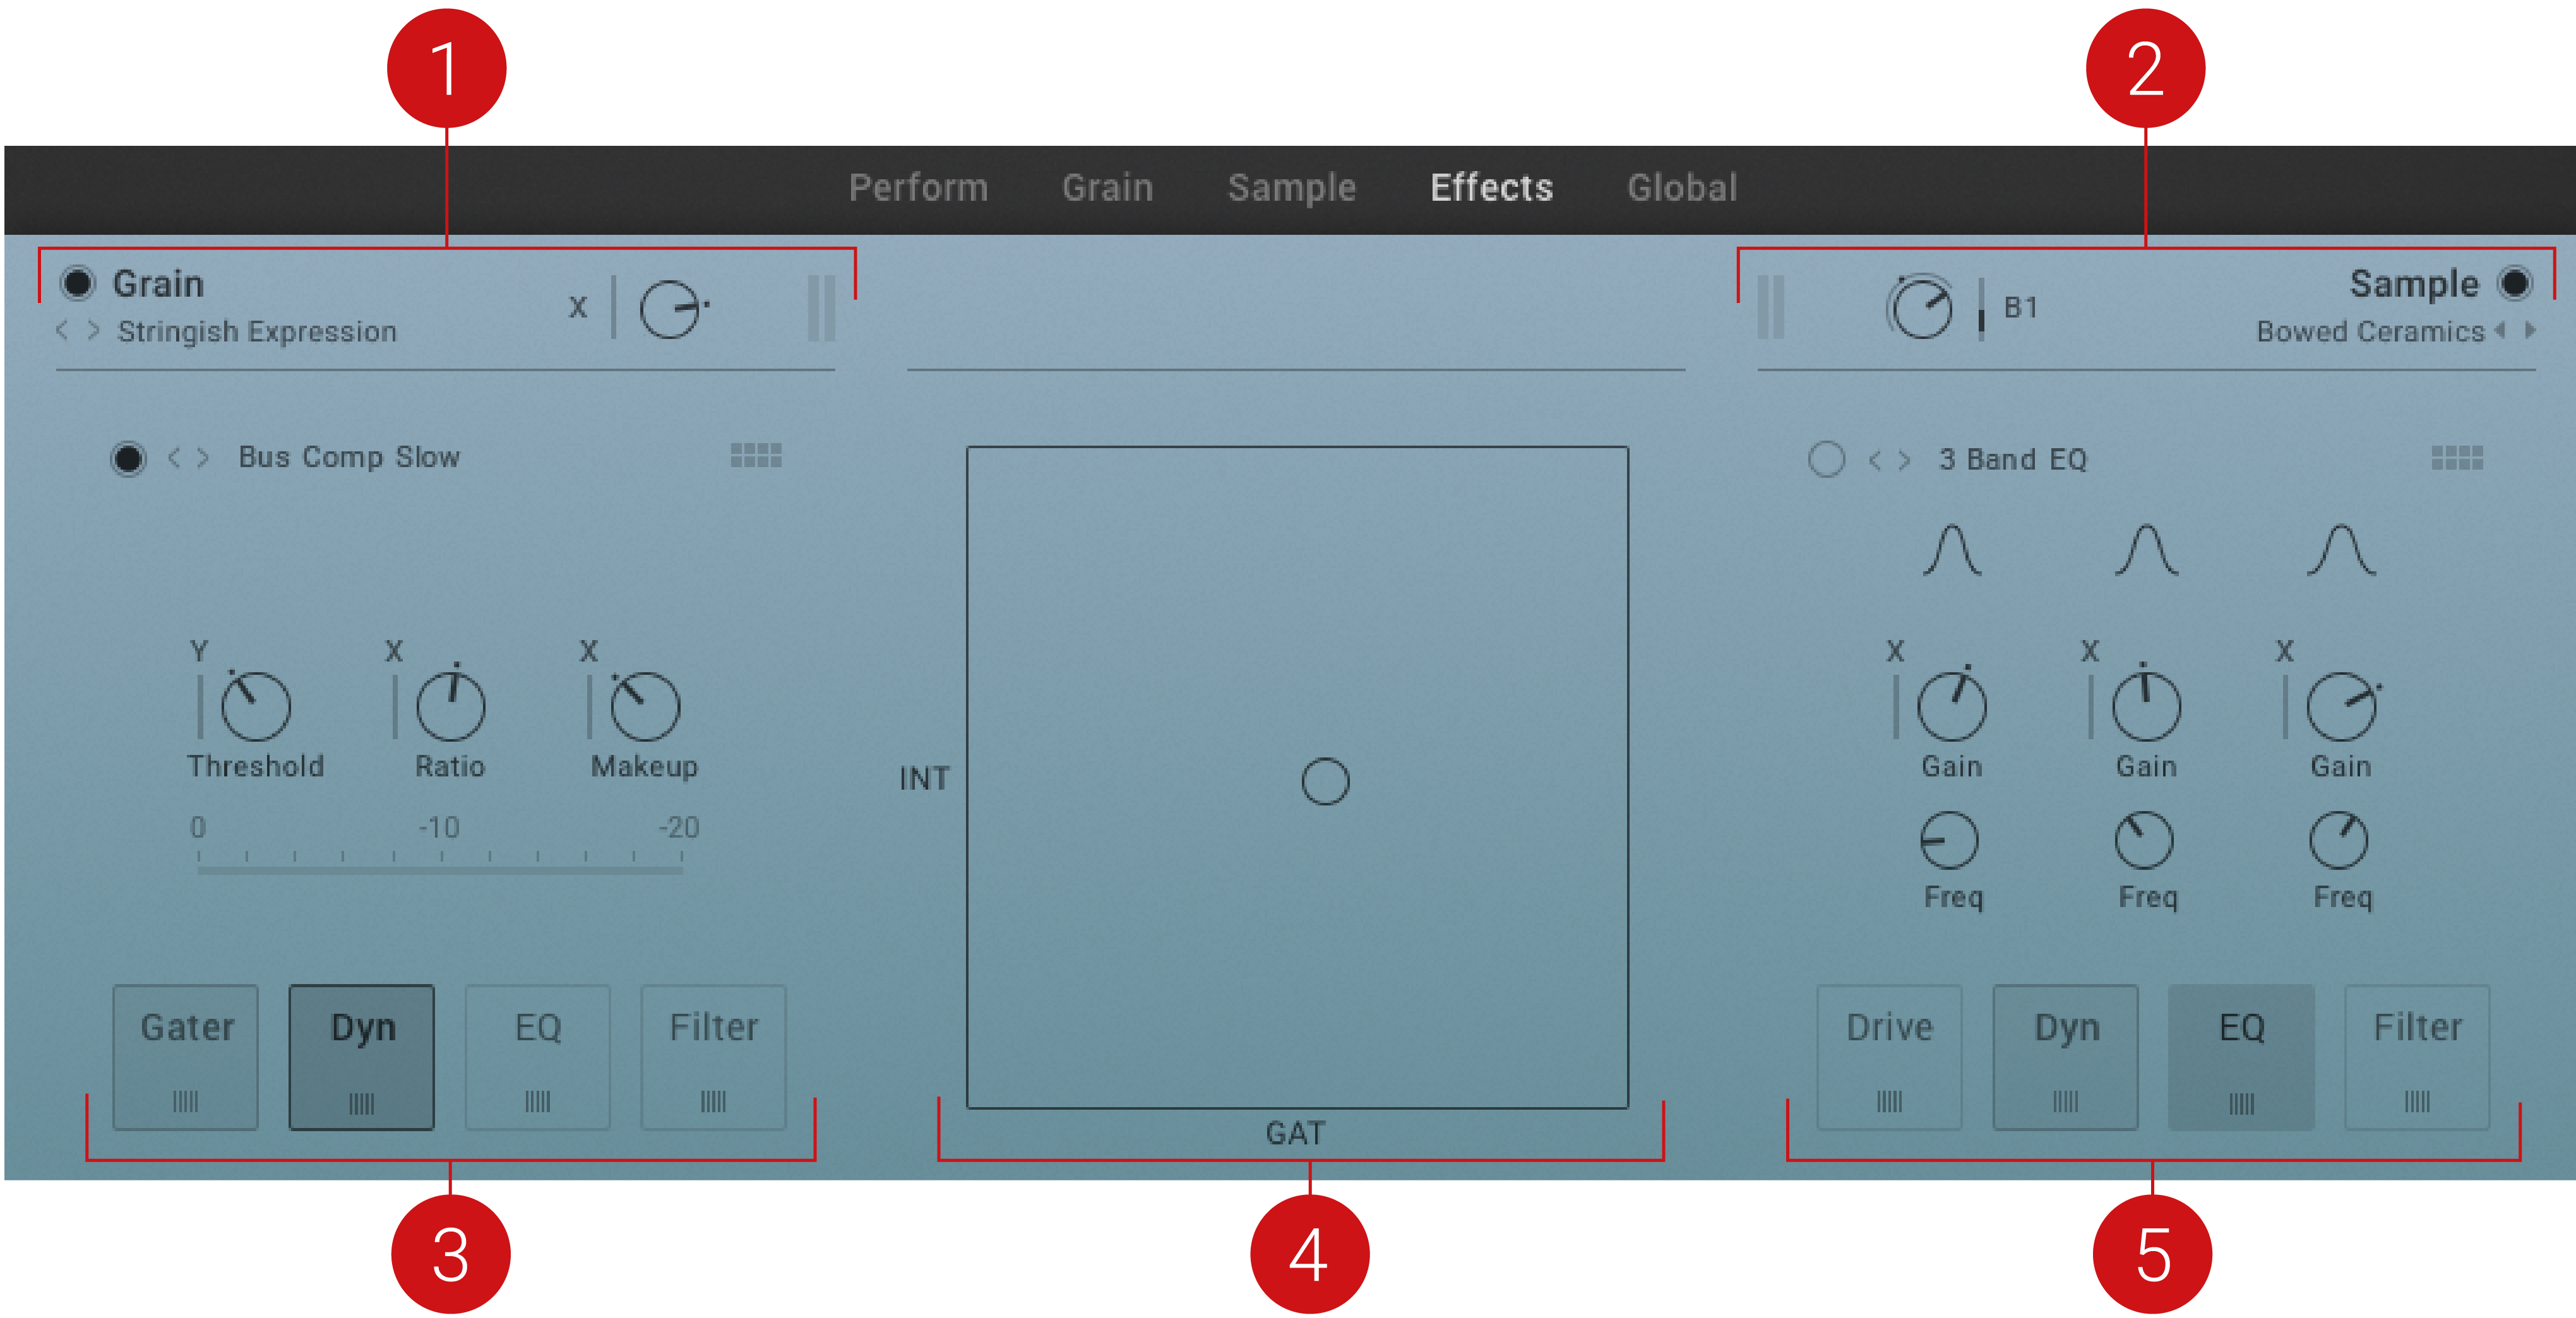
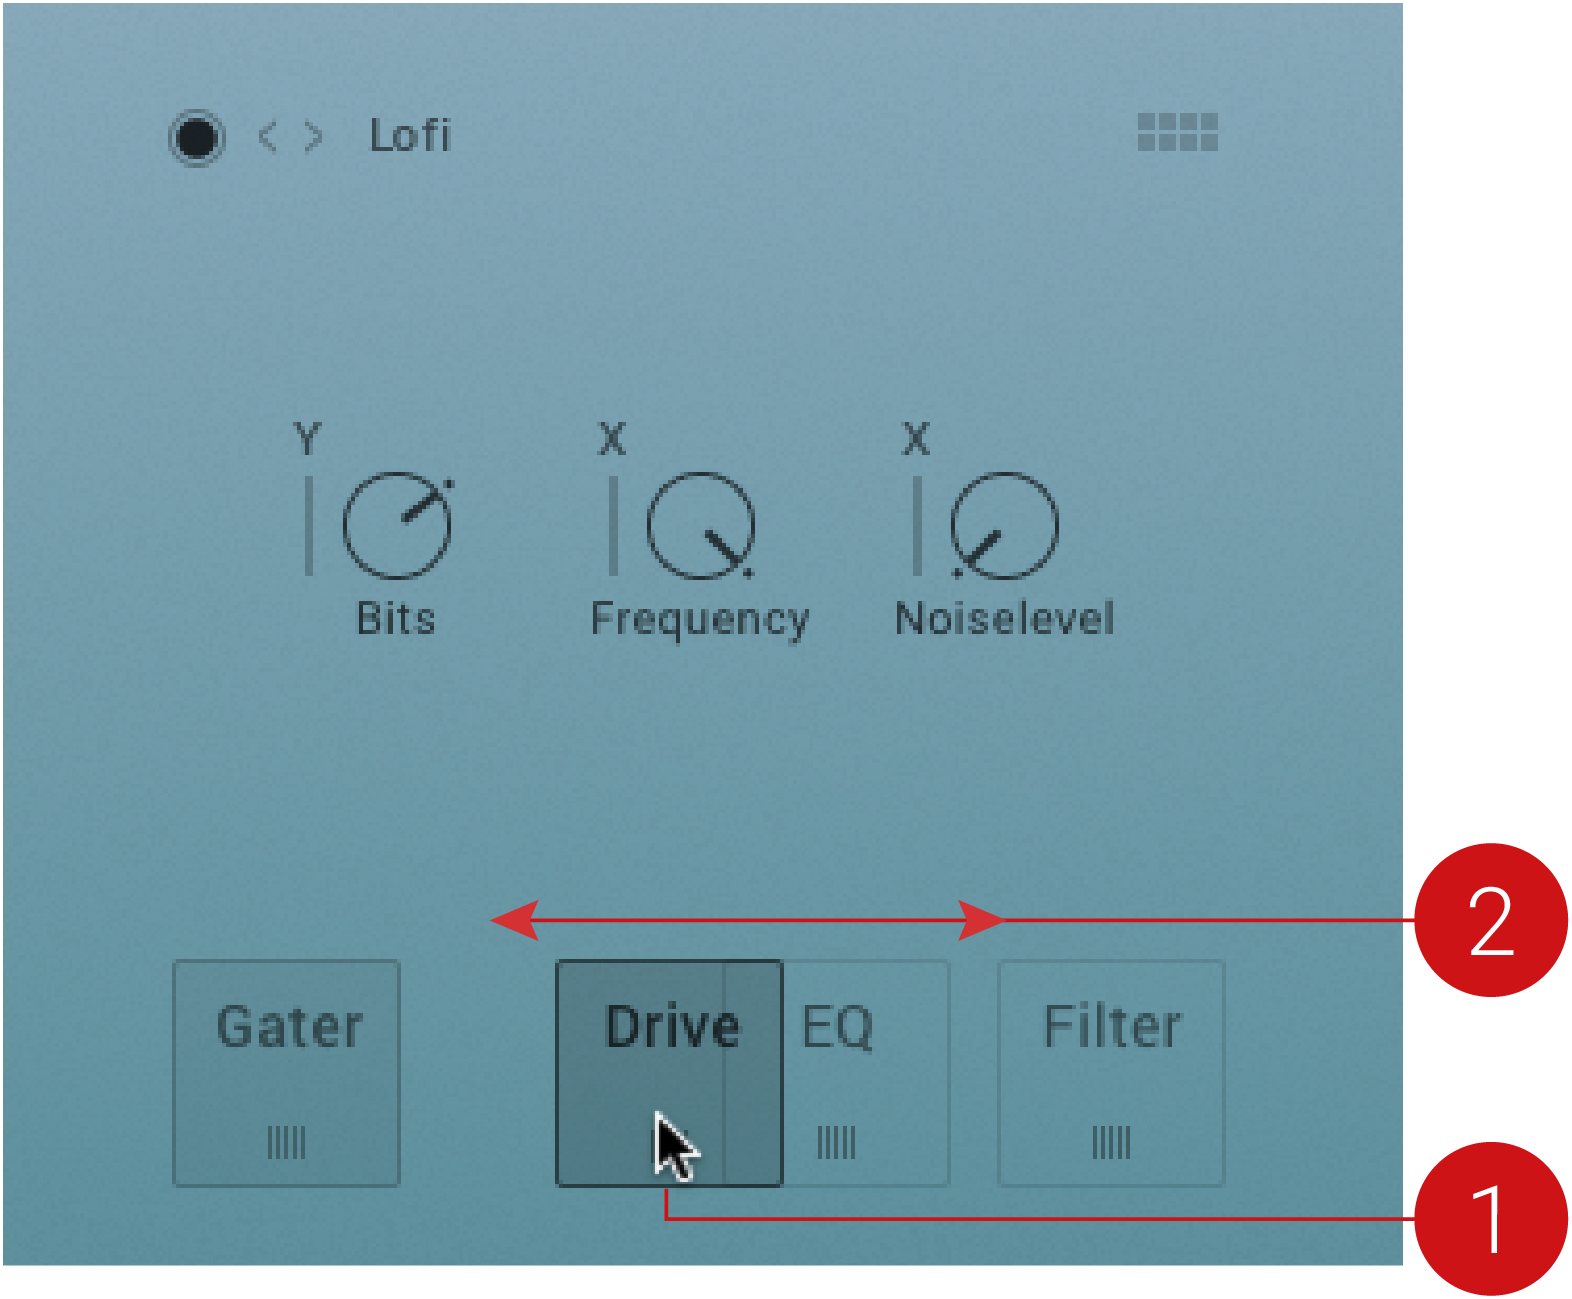
Effects Page Overview
The Effects page contains the following elements and controls:
Effects page.
Grain Header: Contains global functions including selection of the source sample, access to the Grain Source browser, and overall volume level control for the Grain layer. For more information, refer to Grain Header.
Sample Header: Contains global functions including selection of the source sample, access to the Sample Source browser, and overall volume level control for the Sample layer. For more information, refer to Sample Header.
Grain Effects section: Contains settings and controls relating to the Grain layer's Effects Chain. For more information, refer to Effects Section Overview.
XY Pad: With the XY Pad you can shape the sound of the Snapshot in realtime according to modulation assignment for the X and Y parameters. The axis labels provide a hint of what to expect when moving the Cursor. You can assign MIDI CCs for the XY pad on the Global page. For more information, refer to Assigning XY Pad to a MIDI Controller.
Sample Effects section: Contains settings and controls relating to the Sample layer's Effects Chain. For more information, refer to Effects Section Overview.
Effects Section Overview
The Effects page contains two Effects sections: one for the Grain layer and one for the Sample layer. The Global page contains another Effects section to further process the audio signal mixed from the Grain layer and the Sample layer. The Grain, Sample and Global Effects all share the same controls and workflows.
Each Effects section contains the following elements and controls:
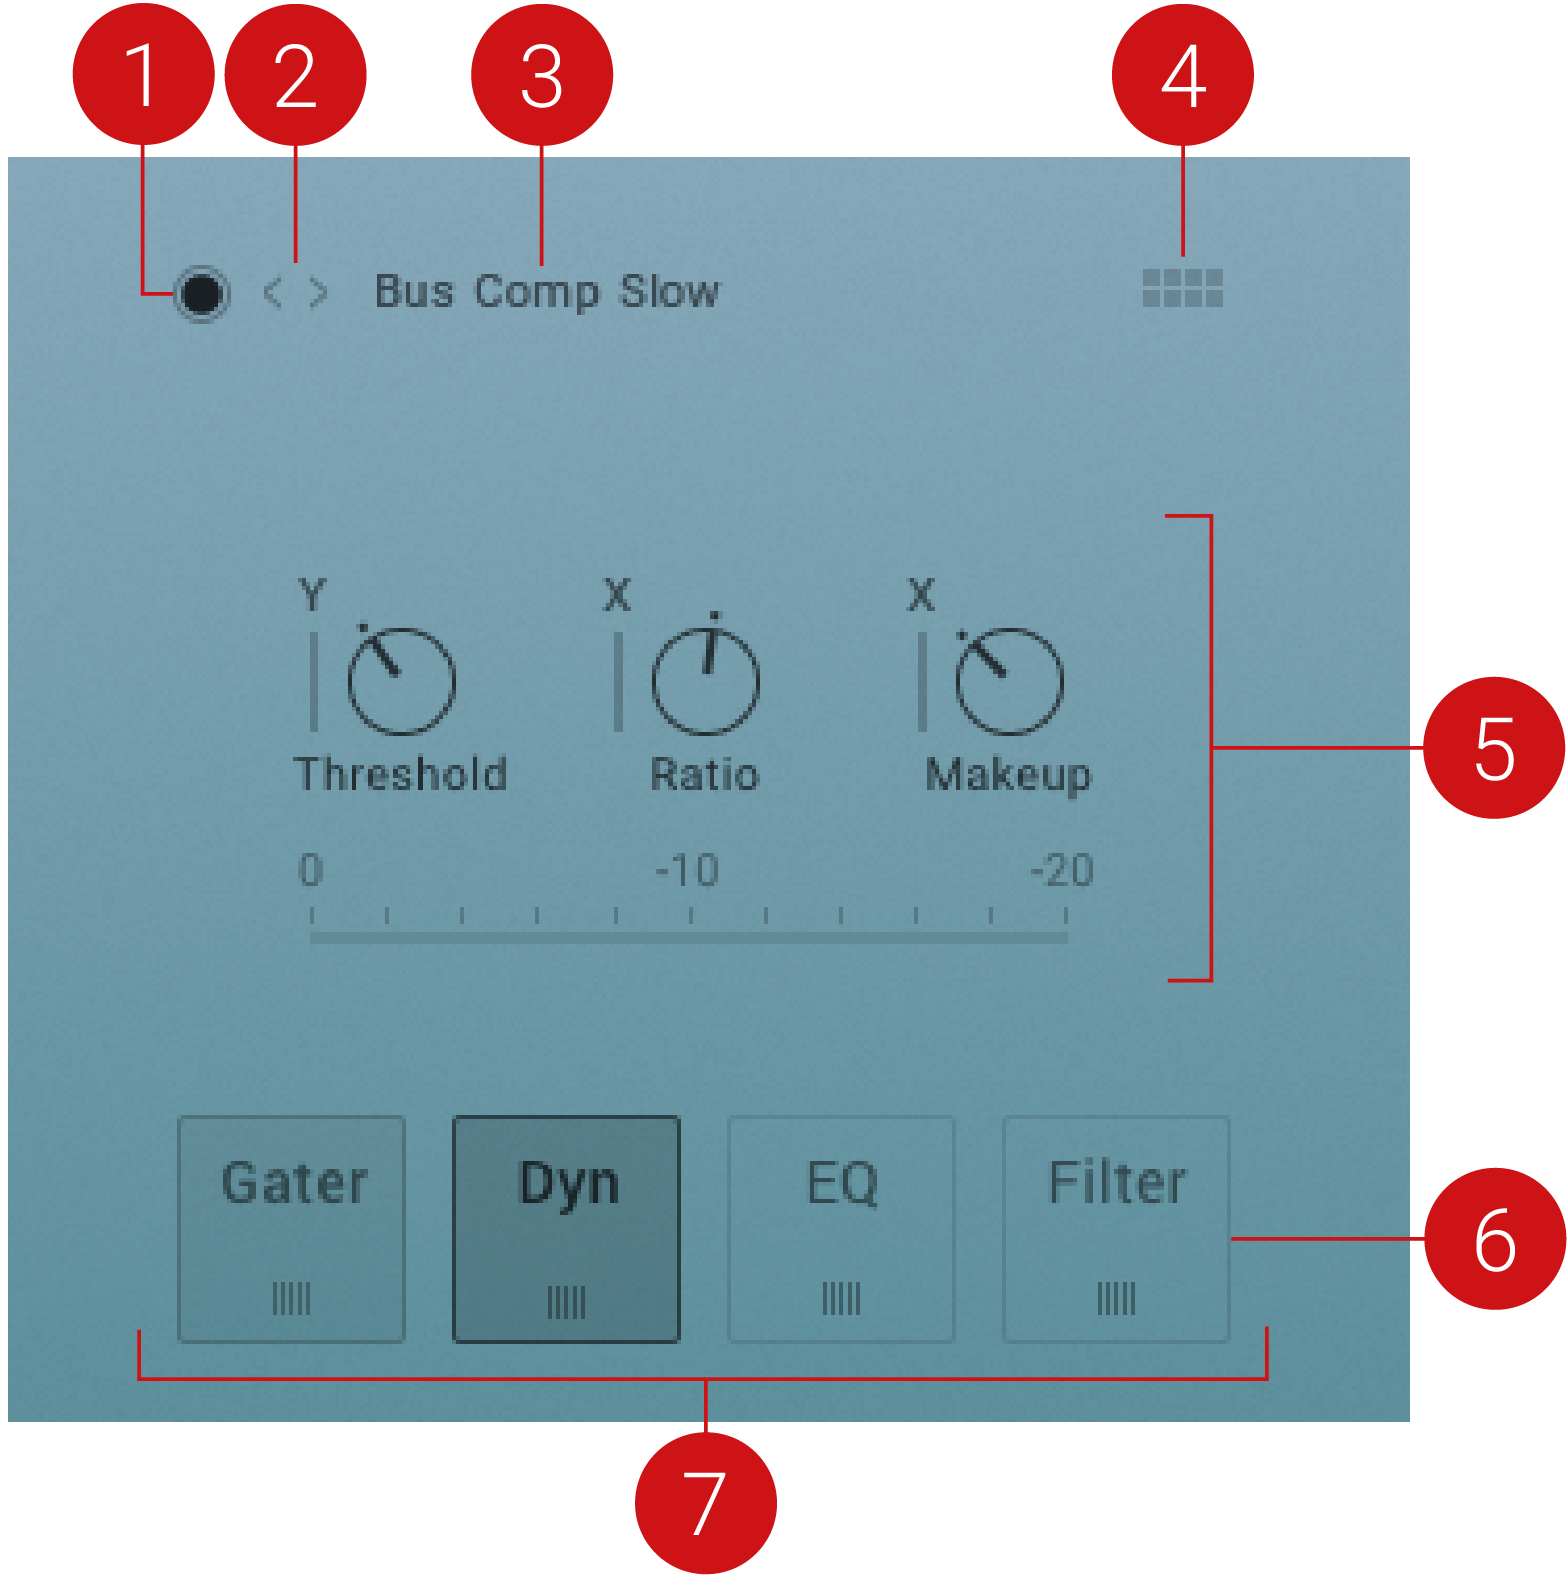 |
Effect on/off : Switches the effect in the selected Effect Slot on or off. When the button is highlighted, the Effect is active. For more information, refer to Bypass Effect Slots.
Effect Mode previous/next: Selects the previous or next Effect Mode for the selected effect. For more information, refer to Selecting Effect Modes.
Effect Mode: Displays the selected Effect Mode. Clicking the display opens a drop-down menu to directly select an Effect Mode for the selected effect. For more information, refer to Selecting Effect Modes and Effect Reference.
Effect Selector button: Opens the Effect Selector to load one of nine effects into the selected Effect Slot. For more information, refer to Effect Selector.
Effect parameters: Each effect contains up to three individual parameters, and some additional control, for adjusting the effect's sound. For more information, refer to Effect Reference.
Effect Slot: Each slot can load one effect. Selecting an effect slot displays the parameters of the loaded effect. For more information, refer to Loading Effects into Effect Slots .
Effects Chain: The Effect Chain contains four Effect Slots, each with an individual effect. The Effect Slots can be moved and rearranged within the Effects Chain. For more information, refer to Moving Effect Slots in the Effects Chain.
Notice
The procedure explained here for editing controls is the same for the Grain Layer, the Sample Layer, and the FX section on the Global page.
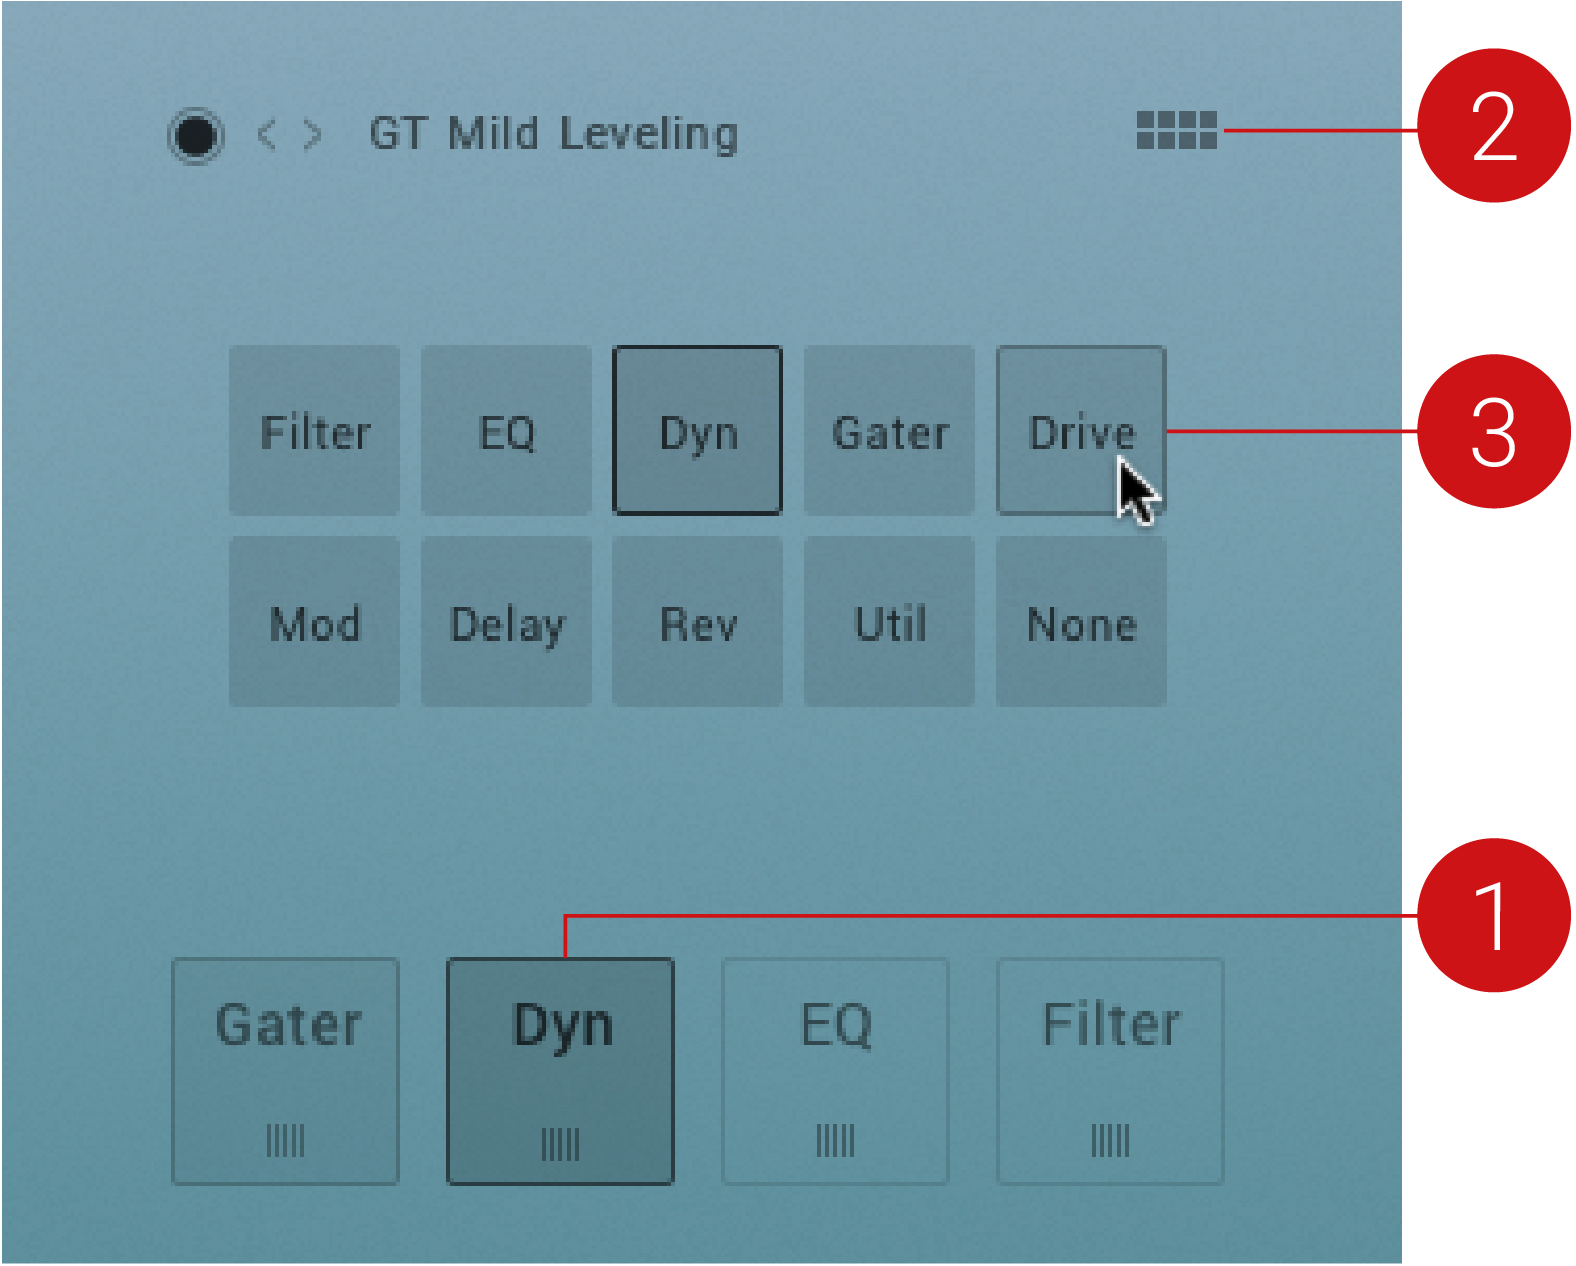
Effect Selector
When clicking the Effect selector button in the Effects section, the Effect selector opens. The Effect selector allows you to choose one of nine different Effect types for loading into the selected Effect slot. You can also select None to leave the selected Effect slot empty. The Effect selector closes as soon as an effect is selected.
For more information on the effect types, refer to Effect Reference.
 |
Effect selector.
Loading Effects into Effect Slots
To load an effect into an Effect Slot:
 |
Select an Effect Slot in the Effect Chain.
Click the Effect Selector button to open the Effect Selector.
Select an effect to load it.
The effect is loaded into the Effect Slot. The Effect Selector closes. You can now adjust the effect's parameters.
Selecting Effect Modes
Any effect can be operated in various modes to change the general behavior of the effect. Each Mode has its own set of unique parameters that best shape and articulate the sound of that effect. For more information on Effect Modes, refer to Effect Reference.
To select an Effect Mode:
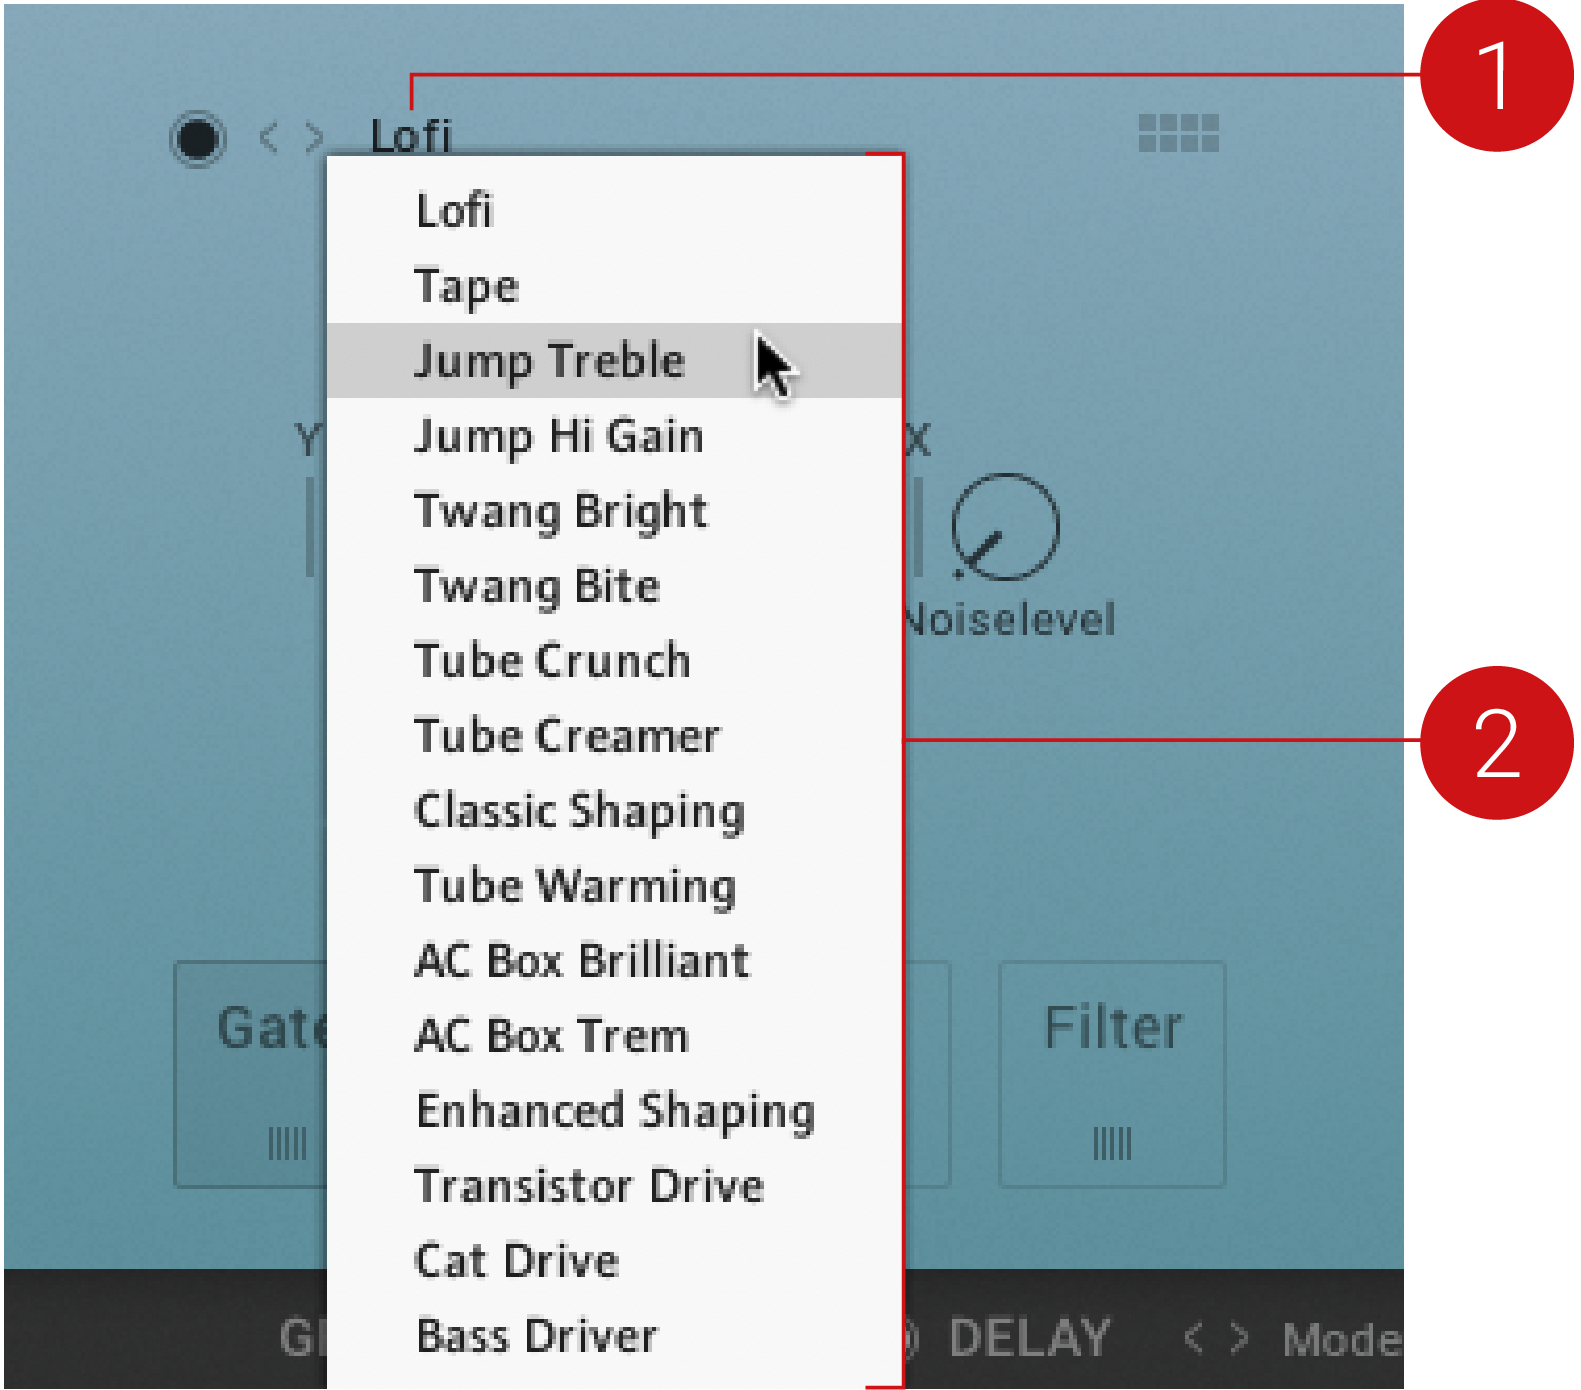 |
Click the Effect Mode Display to open the Modes menu.
Select a Mode from the drop-down menu.
The Effect Mode is changed. The new Mode is shown in the Mode Display, and the parameter controls are changed accordingly.
Tip
Alternatively, you can skip to the next or previous Mode using the Effect Mode arrows, located next to the Mode Display.
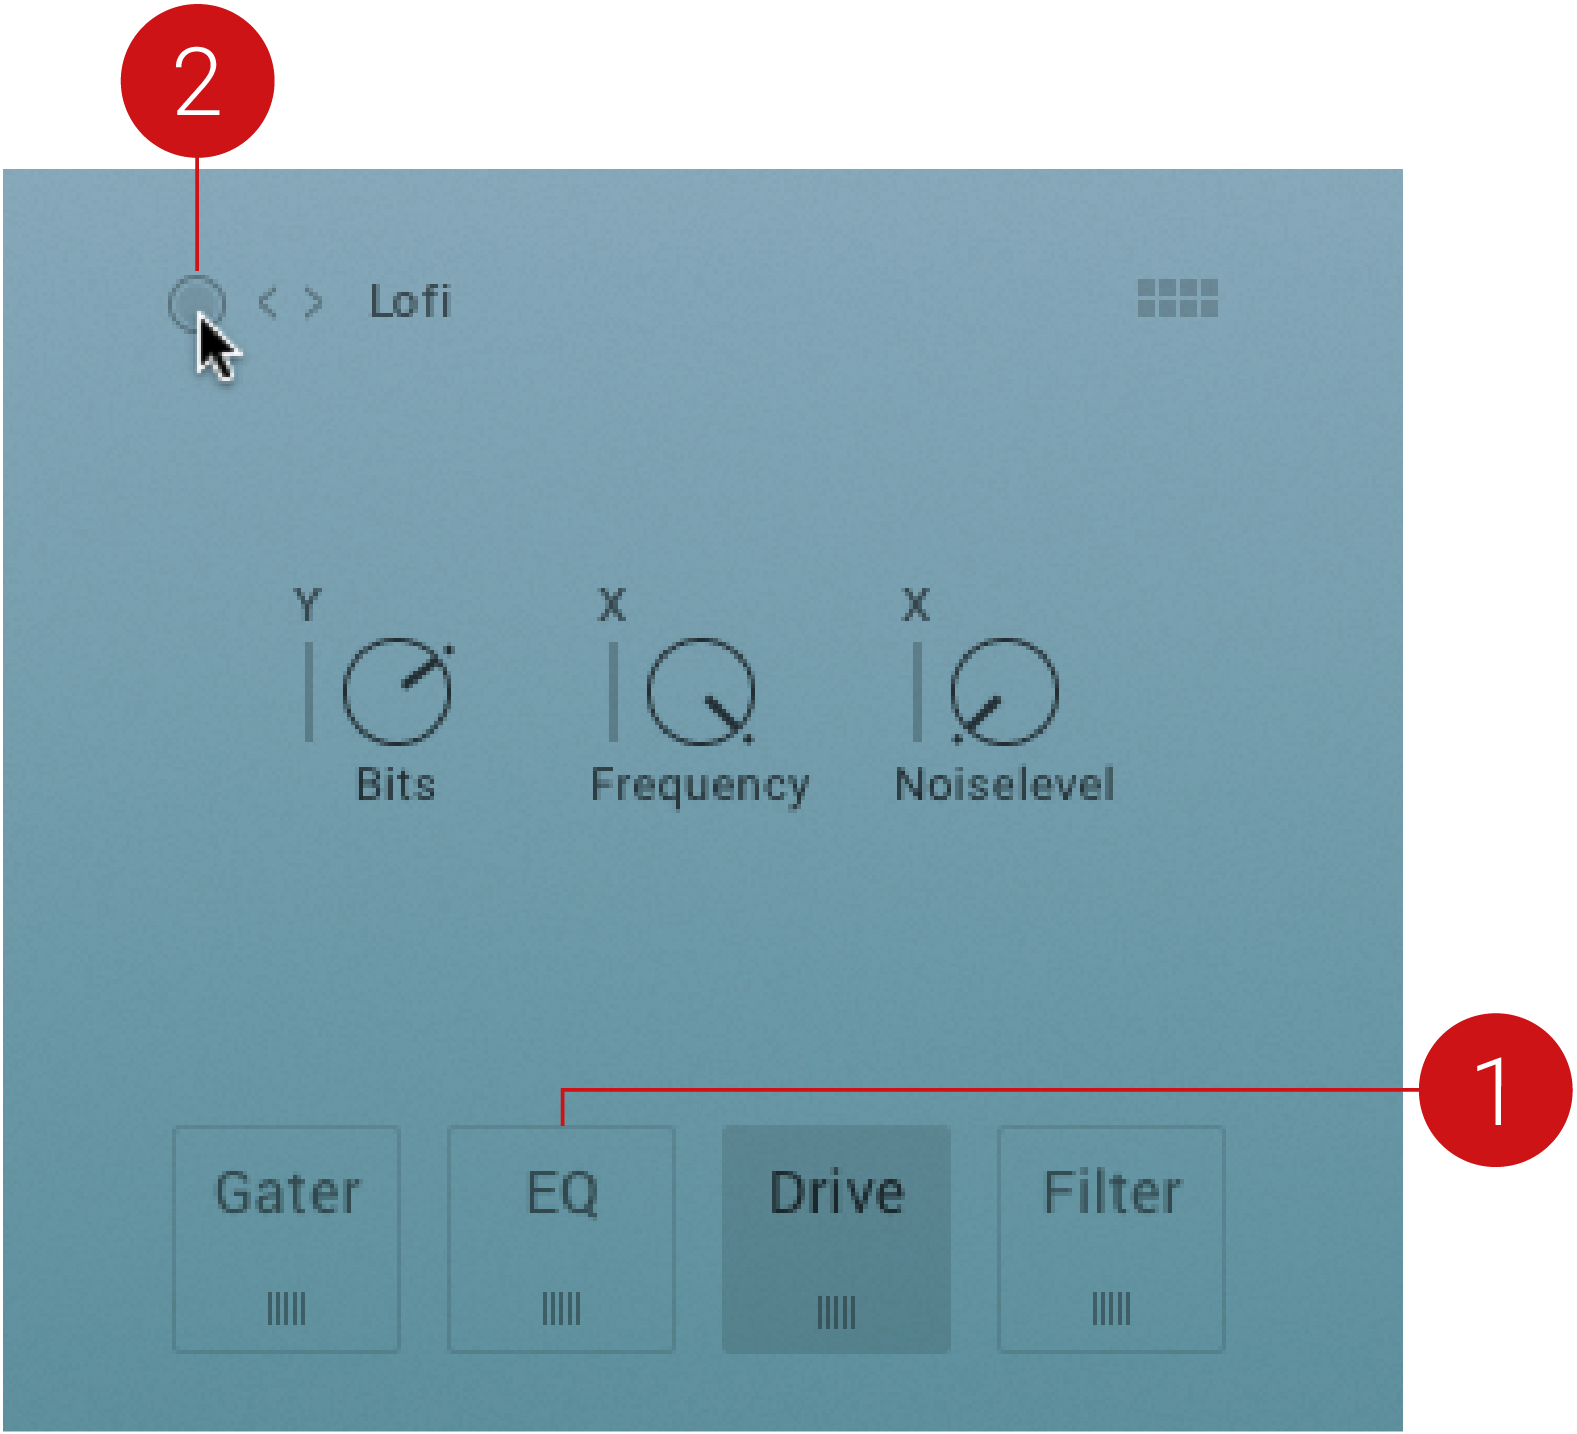
Moving Effect Slots in the Effects Chain
You can move effects slots within the effect chain to change the resulting sound of the effect chain.
To move effect slots within the effect chain:
 |
Click and hold the icon at the bottom center of the effect slot.
Drag the effect left or right within the effects chain, and release.
The effect is moved to a new position within the effects chain.
Bypass Effect Slots
You can bypass individual effect slots in the effects chain to compare the sound with or without particular effects.
To bypass an effect slot:
 |
Select the effect slot you want to bypass.
Click the Bypass button.
The Active button is deselected and the effect slot is bypassed. This is also indicated by the missing frame around the effect slot.
Effect Reference
ASHLIGHT provides nine different types of Effects, which can be loaded into any of the four slots in the Effects Chain. When selecting effects, you must consider the function of the effect itself, and its impact in the signal flow of the Effects Chain. Certain combinations of effects are particularly effective when used together, while other combinations are less successful. For further flexibility and functionality for a wide range of sound design, each effect has multiple Effect Modes, which will shape the character and behavior of the effect. In this section you are introduced to all available Effects in ASHLIGHT, and the range of Effect Modes in which they can be operated in.
Delay
This delay module is based on Native Instruments’ dedicated Replika XT delay plug-in. It features different modes: Modern, BBD, Tape, Vintage and Diffusion, that add distinct color to your sound. All modes offer controls for time, feedback level, a low cut filter, a high cut filter, and ping pong effect. Each mode also provides a unique range of parameter controls to tailor the effect to your specific needs.
The following parameters are available for all effect modes:
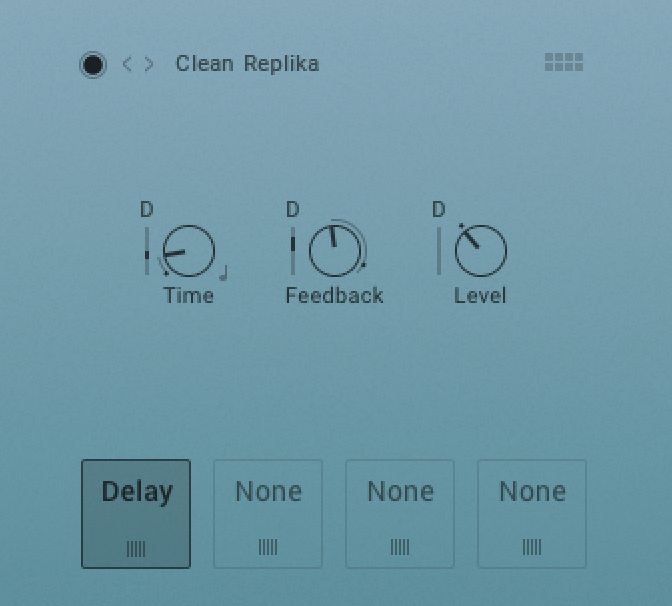 |
Clean Replika Delay
Time: Adjusts the delay time in milliseconds. To synchronize the time to your host or Master Editor tempo, click the Time control’s unit display (ms) and choose a note length value from the drop-down menu.
FX Sync: Sets the effect's time-based parameter in sync with the master clock.
Feedback: Adjusts the level of the signal that is fed back to the delay's input. Increasing Feedback adds delay repeats. Levels above 100% create swelling echo repeats up to self-oscillation.
Level: The range is from 100/0% to 0/100%.
Delay Modes
The following Delay modes are available:
Modern (Saturation, Dark, Ping Pong): Modern mode is a clean delay, with saturation and filter controls that allow you to add warmth and color to your sound. It is a pristine and transparent delay, well-suited to acoustic instruments like guitar and piano. When changing the delay time, pitch stays constant.
BBD (Clean, Warm, Dark, Grunge, Ping Pong, Vibrato LR): Analog mode offers four Bucket Brigade delay models that replicate the character sound of BBD chips. From subtle distortion and warmth, to clean, smooth sounds, each model emulates desired characteristics of classic analog delay units.
Tape (Fresh, Vintage, Dark, Dark LR): Tape mode reproduces the sound of tape delay, modeled on the physical mechanisms that make up early tape machines. Controls for Tape Age, Flutter, and Saturation allow you to manipulate the noise, hiss, and color of the effect.
Vintage (Ping Pong, Mod, BP): Vintage mode emulates the sound of early digital delay units. Select between four quality levels that model the behavior of vintage delays with a limited sample memory size. Increasing the delay time causes the sampling rate to decrease, introducing audio artifacts. The sample quality and interpolation vary for each of the four quality levels.
Diffusion (Dense, Small LR, Gentle, Cloud Pan, 4 Times): Diffusion mode can produce a standard delay effect, but it is best used for its huge, diffusion-based reverb sound. Thicken the density of delay repeats with the Dense, Modulation, and Size controls to create a full sounding reverb effect. This mode is ideal for ambient music and sound design.
Drive
The Drive effect can be used to apply specific saturation to the sound. Several effect modes for different saturation sounds are available which are explained in more detail below.
Lofi
This module adds various digital artifacts, like quantization noise or aliasing, to a clean signal. It’s great for roughing up sounds that would otherwise be too plain and featureless.
Lofi contains the following parameters:
 |
Lofi effect
Bits: Re-quantizes the signal to an adjustable bit depth. Fractional bit levels (such as 12.4 bits) are possible and can add considerable “grit”. Audio CDs have a quantization depth of 16 bits, old samplers frequently used 8 or 12 bits, and 4 bits evoke memories of countless irritating children’s toys.
Frequency: Adjusts the frequency characteristic of the noise and acts as a low-pass filter.
Noiselevel: Adds hiss to the audio signal.
Tape
The Tape Saturator emulates the soft compression and distortion of recording to tape. It can be used lightly to add warmth and coloring to the sound, or heavily to add aggressive distortion.
Tape contains the following parameters:
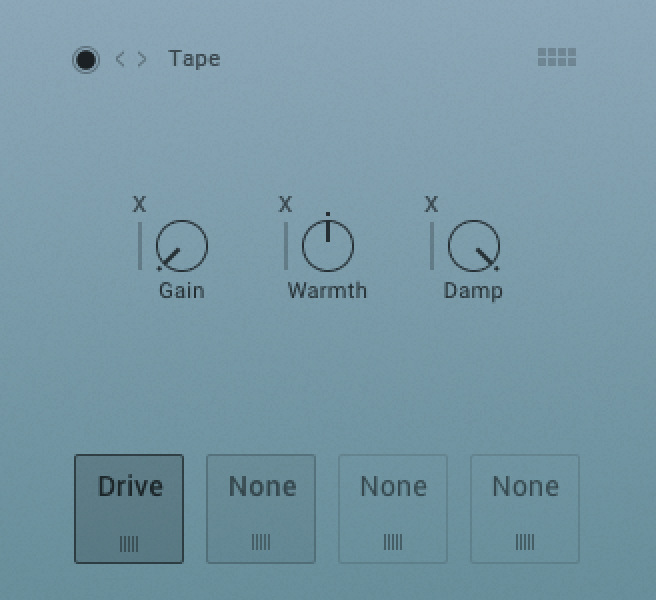 |
Tape effect
Gain: Controls the input gain of the effect. This will increase the amount of tape distortion and compression.
Warmth: Controls the low frequency boost/cut of the effect.
Damp: Attenuates high frequencies in the output signal, thereby counteracting the brightness caused by the artificial harmonics.
Jump Treble, Jump Hi Gain
The Jump effect simulates the classic tone of British guitar amplifiers. It is ideal for creating smooth, singing lead sounds. The Jump effect is available on both the Group and Instrument level.
The following parameters are available:
 |
Jump treble effect
Preamp: Sets the amount of gain added by the preamp. Turning it clockwise adds drive, distortion and edge to the sound.
Treble: Adjusts the high-frequency response.
Master: Adjusts the amp’s master volume.
Twang Bright, Twang Bite
The Twang effect simulates the rich tube sound of classic guitar amps from decades ago. It’s ideal for screaming leads and crunchy rhythm guitar sounds, as well as clean sounds with personality.
The following parameters are available:
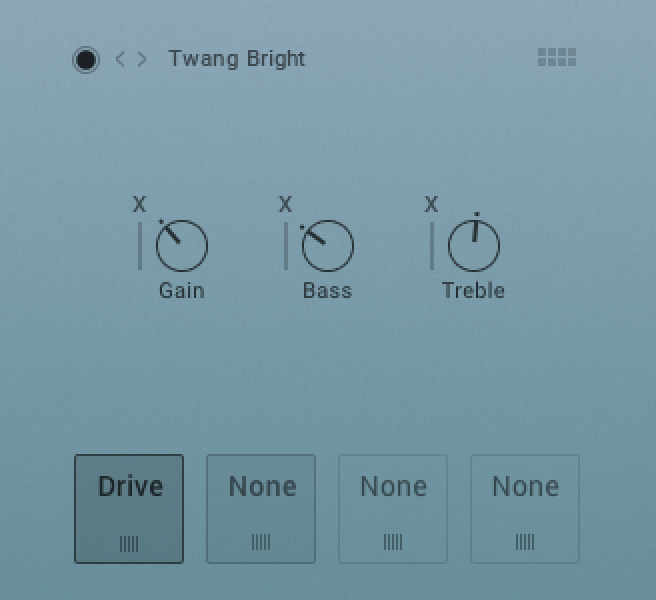 |
Twang Bright effect
Gain: Controls the input level. In contrast to the Output knob, which merely adjusts the overall level of the module, this knob works like the gain control of a guitar amp and affects the amount of distortion.
Bass: Adjusts the level of the signal’s low-frequency components.
Treble: Adjusts the level of the signal’s high frequency components.
Tube Crunch
The following parameters are available:
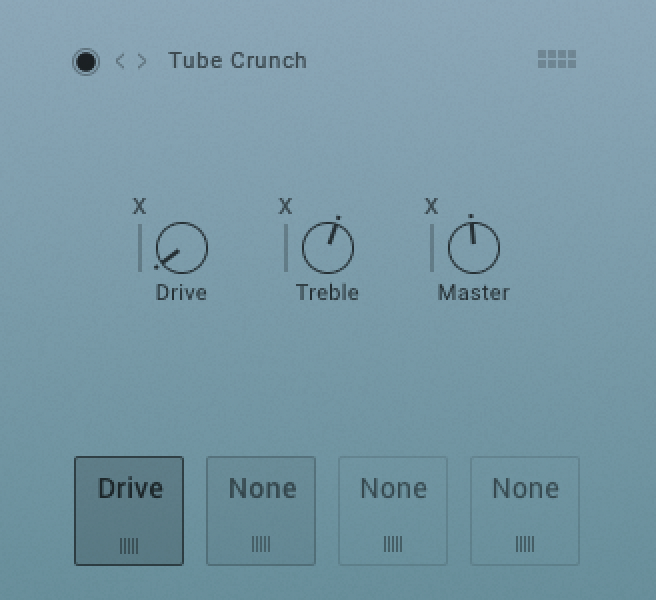 |
Tube Crunch effect
Drive: Adjusts the amount of distortion.
Treble: Adjusts the level of the signal’s high frequency components.
Master: Adjusts the amp’s master volume.
Tube Creamer
The following parameters are available:
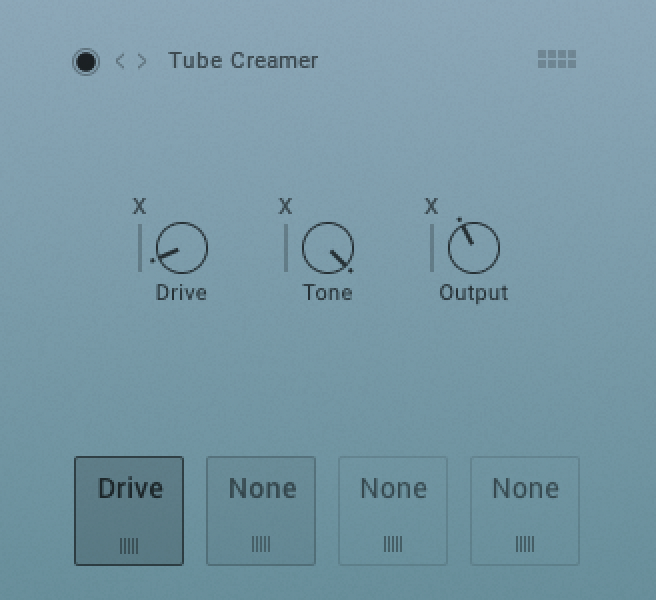 |
Tube Creamer
Tone: Controls the brightness of the sound. Turning this knob clockwise will result in a more pronounced top-end, which works great on bright, screaming leads and biting rhythms. Turning it counter-clockwise results in a mellower, darker sound.
Output: Adjusts the module’s output level.
Enhanced Shaping
The following parameters are available:
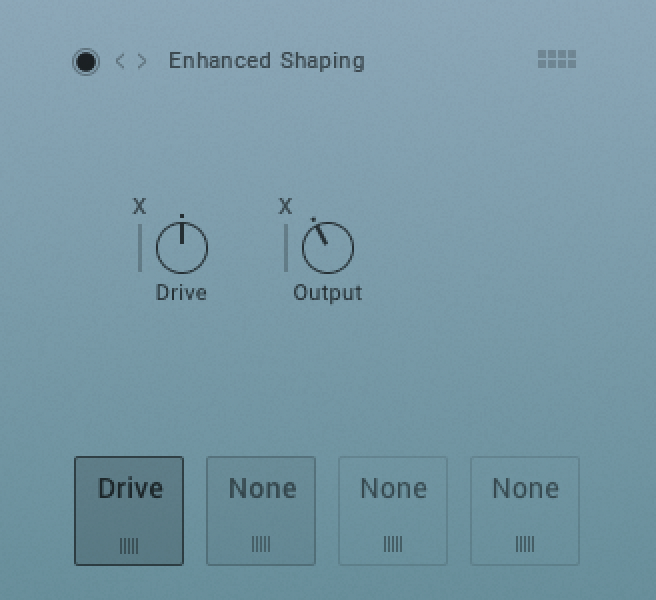 |
Enhanced Shaping effect
Drive: Adjusts the amount of distortion.
Output: Adjusts the module’s output level.
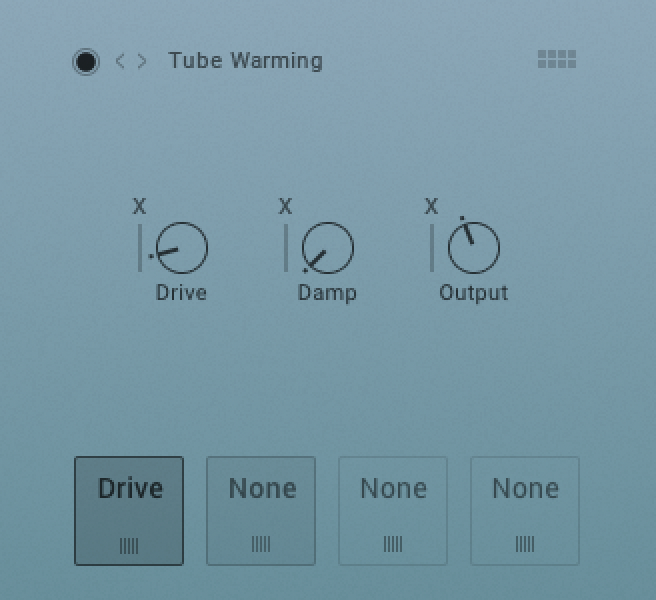
Tube Warming
The following parameters are available:
 |
Tube Warming
Drive: Adjusts the amount of distortion.
Damp: Attenuates high frequencies in the output signal, thereby counteracting the brightness caused by the artificial harmonics.
Output: Adjusts the module’s output level.
AC Box Brilliant, AC Box Trem
The ACBox models the guitar amplifier sound that powered the British Invasion of pop music. There were many versions of this highly original amp made, each having a different character. We chose a model that stands out with a unique flavor and includes the famous Top Boost channel!
The following parameters are available:
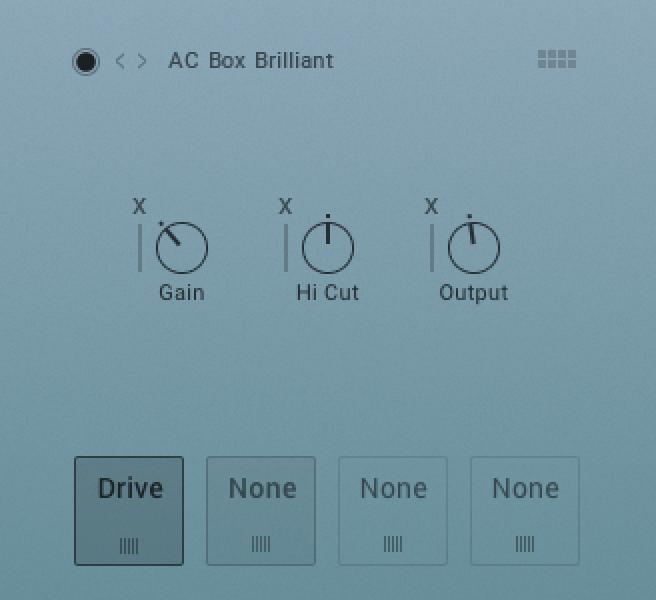 |
AC Box Brilliant
Gain: Sets the level for the Brilliant channel.
Hi-Cut: Controls a low-pass filter. By turning the knob clockwise treble in the output of the Normal channel is reduced.
Output: Adjusts the module's output level.
Dynamics
The Dyn (Dynamics) effect can be used, for example, to reduce the level of loud passages in the audio signal. The available parameters and effect modes are explained in more detail below. The following parameters are available in the respective modes:
Bus Comp Effect Modes
Compressors are dynamic tools which automatically reduce the level of loud passages in a signal, thereby affecting the signal’s dynamic range. The Solid Bus Comp is modeled after a classic analog bus compressor. It offers a more characteristic dynamic control than KONTAKT’s standard compressor.
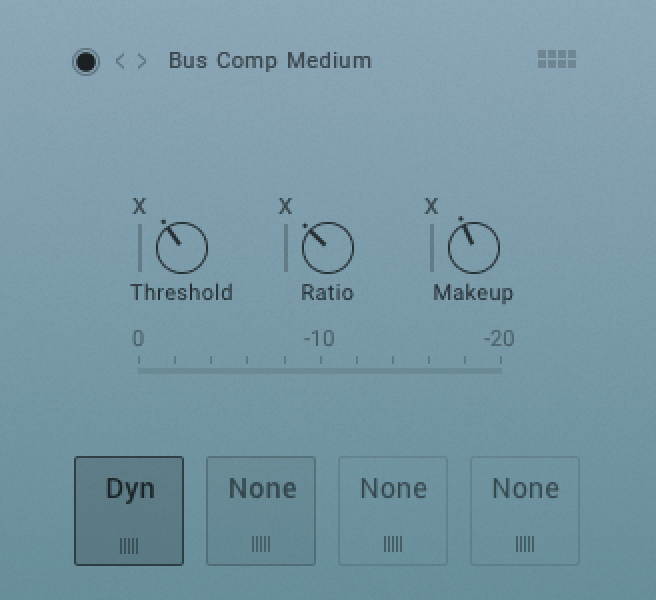 |
Bus Comp Medium
Threshold: Sets a level threshold above which the Compressor starts working. Only levels that rise above this threshold will be reduced by the compression; signals that stay below it will be left unprocessed.
Ratio: Controls the amount of compression, expressed as a ratio of “input level change” against “output level change”. A Ratio of 1:1 means that no compression will be happening. For example, a Setting of 4 represents the ration 4:1, which means for every 4 decibel increase of amplitude above the threshold, the output will increase by only 1 decibel.
Makeup: Controls the output gain of the compressed signal. Used to compensate for the gain reduction of the effect.
Feedback Comp Fast Effect Modes
Compressors are dynamic tools that automatically reduce the level of loud passages in a signal, thereby affecting the signal's dynamic range. A feedback compressor is a type of compressor that compares the amplifier's output signal, rather than the input signal, to a threshold level. When the threshold level is reached, the compressor reduces the signal's gain level. The Feedback Compressor is modeled after a classic feedback compressor known for its bright and punchy sound.
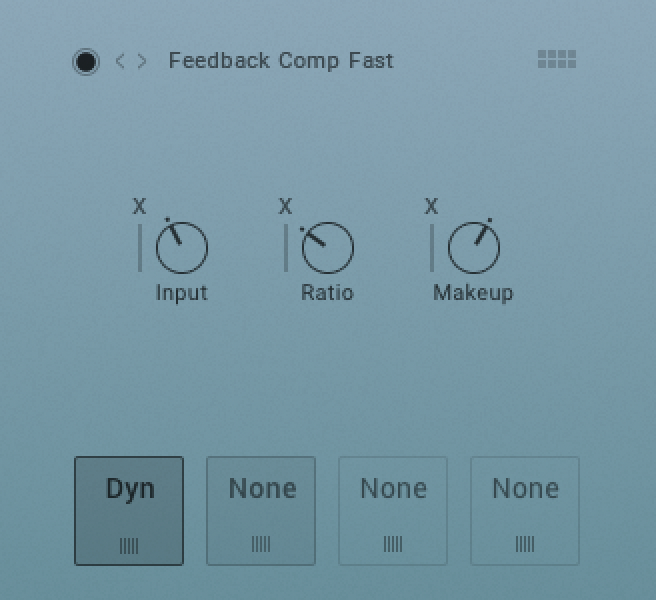 |
Feedback Comp Fast effect
Input: Controls the input gain to the effect.
Ratio: Controls the amount of compression, expressed as a ratio of “input level change” against “output level change”. A Ratio of 1:1 means that no compression will be happening. For example, a Setting of 4 represents the ration 4:1, which means for every 4 decibel increase of amplitude above the threshold, the output will increase by only 1 decibel.
Makeup: Controls the output gain of the compressed signal. Used to compensate for the gain reduction of the effect.
Transient Master
The Transient Master is an easy to use compressor designed to control the attack and sustain of a sound. Instead of following the amplitude of the sound like a traditional compressor, it follows the general envelope and is thus not as susceptible to changes of input gain. It is best used on sounds with fast attacks, like percussion, pianos or guitars. The Transient Master can also be quite extreme in some cases, so use it with caution.
 |
Transient Master
Input: Controls the input gain to the effect.
Attack: Adjusts the time the Compressor will take to reach the full Ratio value after an input signal exceeds the Threshold level.
Sustain: Controls the scaling of the sustain portion of the input signal’s volume envelope. Increasing this parameter will add more body to the sound and decreasing it will reduce the sound’s tail.
Limiter
Limiters are actually a special form of compressors with a ratio of one to infinity, a threshold just below the maximum level, and a very short attack time. They act as a “safety net” to keep short signal peaks from overloading the system, which would result in audio clipping. While compressors have a range of artistic applications, limiters are usually used for technical reasons — they can tame signals with peaks which would otherwise overload the output, without requiring you to turn the signal’s overall volume down.
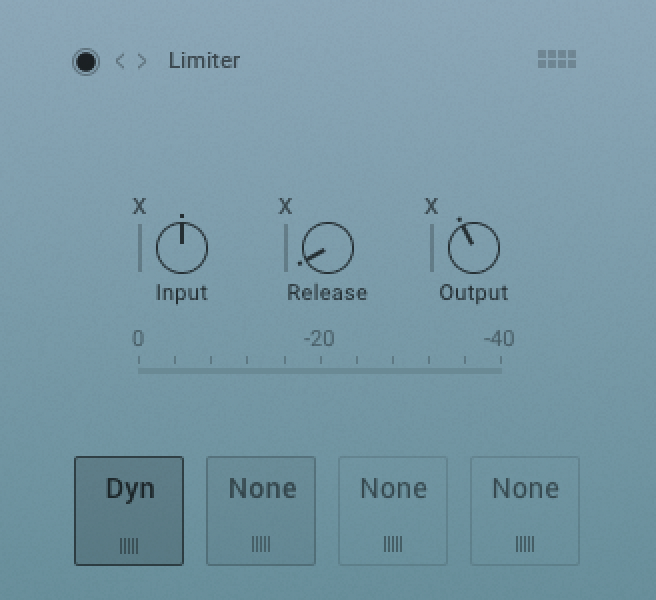 |
Limiter
Input: Controls the input gain to the effect.
Release: Adjusts the time the compressor will take to fall back to non-compression after the input signal falls below the threshold.
Output: Controls the module’s output level.
EQ
Fully parametric peak equalizers allow for a wide range of tonal alterations and corrections. Use the EQ to boost or cut selective frequencies of the audio signal. The EQ is mainly a tool to tailor your audio signal to taste by cutting out selected frequencies or boosting others. The EQ can be operated in a 1 Band EQ and in a 3 Band EQ which are explained in more detail below.
1 Band EQ
The 1 Band EQ is a simple equalizer. It contains the following parameters:
 |
1 Band EQ effect
Freq. (Frequency): Adjusts the center frequency at which the boost or cut will occur.
Width (Bandwidth): Adjusts the width of the frequency range that will be affected in octaves (bell shape).
Gain: Adjusts the amount of boost (positive values) or cut (negative values) at the center frequency.
3 Band EQ
Using up to three EQ bands, you can boost or cut any frequency range throughout the entire spectrum by up to 18 dB, with an adjustable Bandwidth parameter allowing you to choose between gentle corrections or very steep edits.
The 3 Band EQ contains the following parameters:
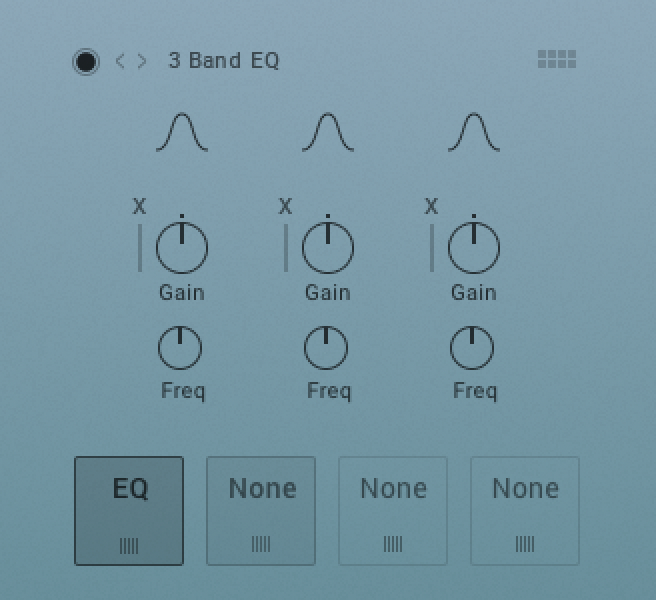 |
3 Band EQ effect
Q: Controls the Quality of the frequency band. For most EQs, the higher the quality, the narrower the frequency band. For most EQs, the higher the quality, the narrower the frequency band, but with this EQ the control is reversed to match the hardware it emulates and becomes a bandwidth control.
Gain: Adjusts the amount of boost (positive values) or cut (negative values) at the center frequency.
Freq. (Frequency): Adjusts the center frequency at which the boost or cut will occur.
Filter
A filter is a signal processor which changes the frequency content of a signal that passes through it. This means that in contrast to effects like distortion, reverb, or chorus, it only changes the amplitude and phase of frequency components which are already present in your signal, without creating new frequency content.
The following parameters are available depending on the effect mode:
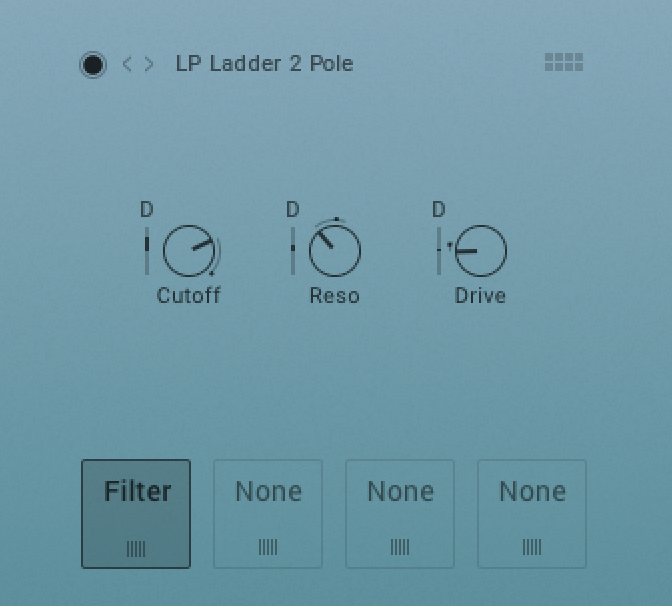 |
LP Ladder 2 Pole
Cutoff: Adjusts the frequency below which signals will be attenuated.
Reso: With a value greater than 0, this control will boost a small frequency range around the cutoff frequency.
Width: Controls the gap between the cutoff frequencies of the two filters, with the low-pass filter’s cutoff always above that of the high-pass. The gap is generated around a central point controlled by the Cutoff control.
Drive: Adjusts the amount of distortion.
Gain: Controls the amplitude increase after the filter. This control can be used to compensate for amplitude reduction due to the filter, or to increase the soft saturation of the effect.
HP Cutoff: Controls the cutoff frequency of the High Pass filter.
LP Cutoff: Controls the cutoff frequency of the Low Pass filter.
Talk: Controls the frequency response of the filter. Can be used to morph between vowel-sounds.
Sharp: Increases and decreases the peaks and notches in the response respectively, analogous to the resonance control of the other filters.
Size: Controls the center of the frequency response, analogous to the cutoff control of the other filters.
Filter Modes
LP Ladder 2 Pole: Based on the classic ladder circuit used in early synthesizers, these filters would be a first choice for synthetic sounds, but can work well on any signal. The LP2 is a 2-pole low-pass, which attenuates frequencies above the cutoff at a rate of -12 dB/octave.
LP Ladder 4 Pole:
LP SV 2 Pole: The State Variable (SV) filters have a clean characteristic that can be used for all kinds of audio signals. The LP2 is a 2-pole low-pass, which attenuates frequencies above the cutoff at a rate of -12 dB/octave.
LP SV 4 Pole: The State Variable (SV) filters have a clean characteristic that can be used for all kinds of audio signals. The LP4 is a 4-pole low-pass, which attenuates frequencies above the cutoff at a rate of -24 dB/octave.
HP Ladder 2 Pole: Based on the classic ladder circuit used in early synthesizers, these filters would be a first choice for synthetic sounds, but can work well on any signal. The HP2 is a 2-pole high-pass, which attenuates frequencies below the cutoff at a rate of -12 dB/octave. The Ladder HP2 filter also includes the following controls:
HP Ladder 4 Pole: Based on the classic ladder circuit used in early synthesizers, these filters would be a first choice for synthetic sounds, but can work well on any signal. The HP4 is a 4-pole high-pass, which attenuates frequencies below the cutoff at a rate of -24 dB/octave. The Ladder HP4 filter also includes the following controls:
HP SV 2 Pole: The State Variable (SV) filters have a clean characteristic that can be used for all kinds of audio signals. The HP2 is a 2-pole high-pass, which attenuates frequencies below the cutoff at a rate of -12 dB/octave.
HP SV 4 Pole: The State Variable (SV) filters have a clean characteristic that can be used for all kinds of audio signals. The HP4 is a 4-pole high-pass, which attenuates frequencies below the cutoff at a rate of -24 dB/octave.
BP Ladder 2 Pole: Based on the classic ladder circuit used in early synthesizers, these filters would be a first choice for synthetic sounds, but can work well on any signal. The BP2 is a 2-pole band-pass, which attenuates frequencies above and below the cutoff at a rate of -12 dB/octave. The Ladder BP2 filter also includes the following controls:
BP Ladder 4 Pole: Based on the classic ladder circuit used in early synthesizers, these filters would be a first choice for synthetic sounds, but can work well on any signal. The BP4 is a 4-pole band-pass, which attenuates frequencies above and below the cutoff at a rate of -24 dB/octave.
BP SV 2 Pole: The State Variable (SV) filters have a clean characteristic that can be used for all kinds of audio signals. The BP2 is a 2-pole band-pass, which attenuates frequencies above and below the cutoff at a rate of -12 dB/octave.
BP SV 4 Pole: The State Variable (SV) filters have a clean characteristic that can be used for all kinds of audio signals. The BP4 is a 4-pole band-pass, which attenuates frequencies above and below the cutoff at a rate of -24 dB/octave.
LP HP: This very clean sounding filter lacks any pronounced resonance and is ideally suited for removal of low frequency rumble and high frequency issues like harshness and excessive noise without coloring the filtered signal. The HP filter is a 2-pole (12 dB/octave), whereas the 1-pole LP has a more gentle slope of 6 dB/octave.
Phaser: This effect continually changes the phase relationships in your signal with an all-pass filter. This results in a comb filtering effect, which attenuates some frequencies while boosting others. The sound is similar to that of a Flanger but in a more subtle manner.
Vowel A: This filter simulates the resonant frequencies of the human vocal tract; when forming a vowel, the throat and mouth cavities will change their shape in order to create a complex, natural filter which emphasizes certain frequencies in the sound created by the vocal chords. These characteristic frequencies, called formants, allow the human hearing to discern between different vowels, and are being replicated by this filter.
Vowel B: This filter works similarly to the Vowel A module, but has a slightly different sonic character.
Formant: Formants are acoustic resonances. The term often applies to the phonetics of human speech, as such, the formant filters are designed to mimic the frequency response of the human vocal tract. These filters can be used to emulate the “talk box” effect.
LP Draft: The Daft filter has been adapted from MASSIVE and is a more aggressive synthesizer filter design. The response of the filter is a 2-pole low-pass, which attenuates frequencies above the cutoff at a rate of -12 dB/octave. The daft filter also includes a Gain knob that controls the amplitude increase after the filter. This control can be used to compensate for amplitude reduction due to the filter, or to increase the soft saturation of the effect.
HP Draft: The Daft filter has been adapted from MASSIVE and is a more aggressive synthesizer filter design. The response of the filter is a 2-pole high-pass, which attenuates frequencies below the cutoff at a rate of -12 dB/octave. The Daft filters also include the following controls:
Notch SV4 Pole: The State Variable (SV) filters have a clean characteristic that can be used for all kinds of audio signals. The Notch 4 is a 4-pole notch filter, which attenuates frequencies at the cutoff.
AR LP 2: The Adaptive Resonance (AR) filters follow the amplitude of the input signal and adjust the resonance accordingly. At higher input levels, the resonance will reduce, and for lower levels it will increase, this avoids unpleasant peaks. These filters work best on full loops or drums. The LP2 is a 2-pole low-pass, which attenuates frequencies above the cutoff at a rate of -12 dB/octave.
AR LP 4: The Adaptive Resonance (AR) filters follow the amplitude of the input signal and adjust the resonance accordingly. At higher input levels, the resonance will reduce, and for lower levels it will increase, this avoids unpleasant peaks. These filters work best on full loops or drums. The LP4 is a 4-pole low-pass, which attenuates frequencies above the cutoff at a rate of -24 dB/octave.
AR HP 2: The Adaptive Resonance (AR) filters follow the amplitude of the input signal and adjust the resonance accordingly. At higher input levels, the resonance will reduce, and for lower levels it will increase, this avoids unpleasant peaks. These filters work best on full loops or drums. The HP2 is a 2-pole high-pass, which attenuates frequencies below the cutoff at a rate of -12 dB/octave.
AR BP 2: The Adaptive Resonance (AR) filters follow the amplitude of the input signal and adjust the resonance accordingly. At higher input levels, the resonance will reduce, and for lower levels it will increase, this avoids unpleasant peaks. These filters work best on full loops or drums. The BP2 is a 2-pole band-pass, which attenuates frequencies below and above the cutoff at a rate of -12 dB/octave.
HP LP Serial: The State Variable (SV) filters have a clean characteristic that can be used for all kinds of audio signals. The Ser. LP/HP is the combination of a high-pass filter routed serially after a low-pass filter. The result is similar to a band-pass filter.
Gater
The Gater controls the volume of a sound with the help of two step sequencers. This can be used to rhythmically chop the signal and make it stutter or sound staccato. The Gater has two individual rhythms A and B which you can crossfade using the applied modulation source. The Gater in ASHLIGHT retriggers on the first note to better accommodate vocal-based presets.
The Gater contains the following controls:
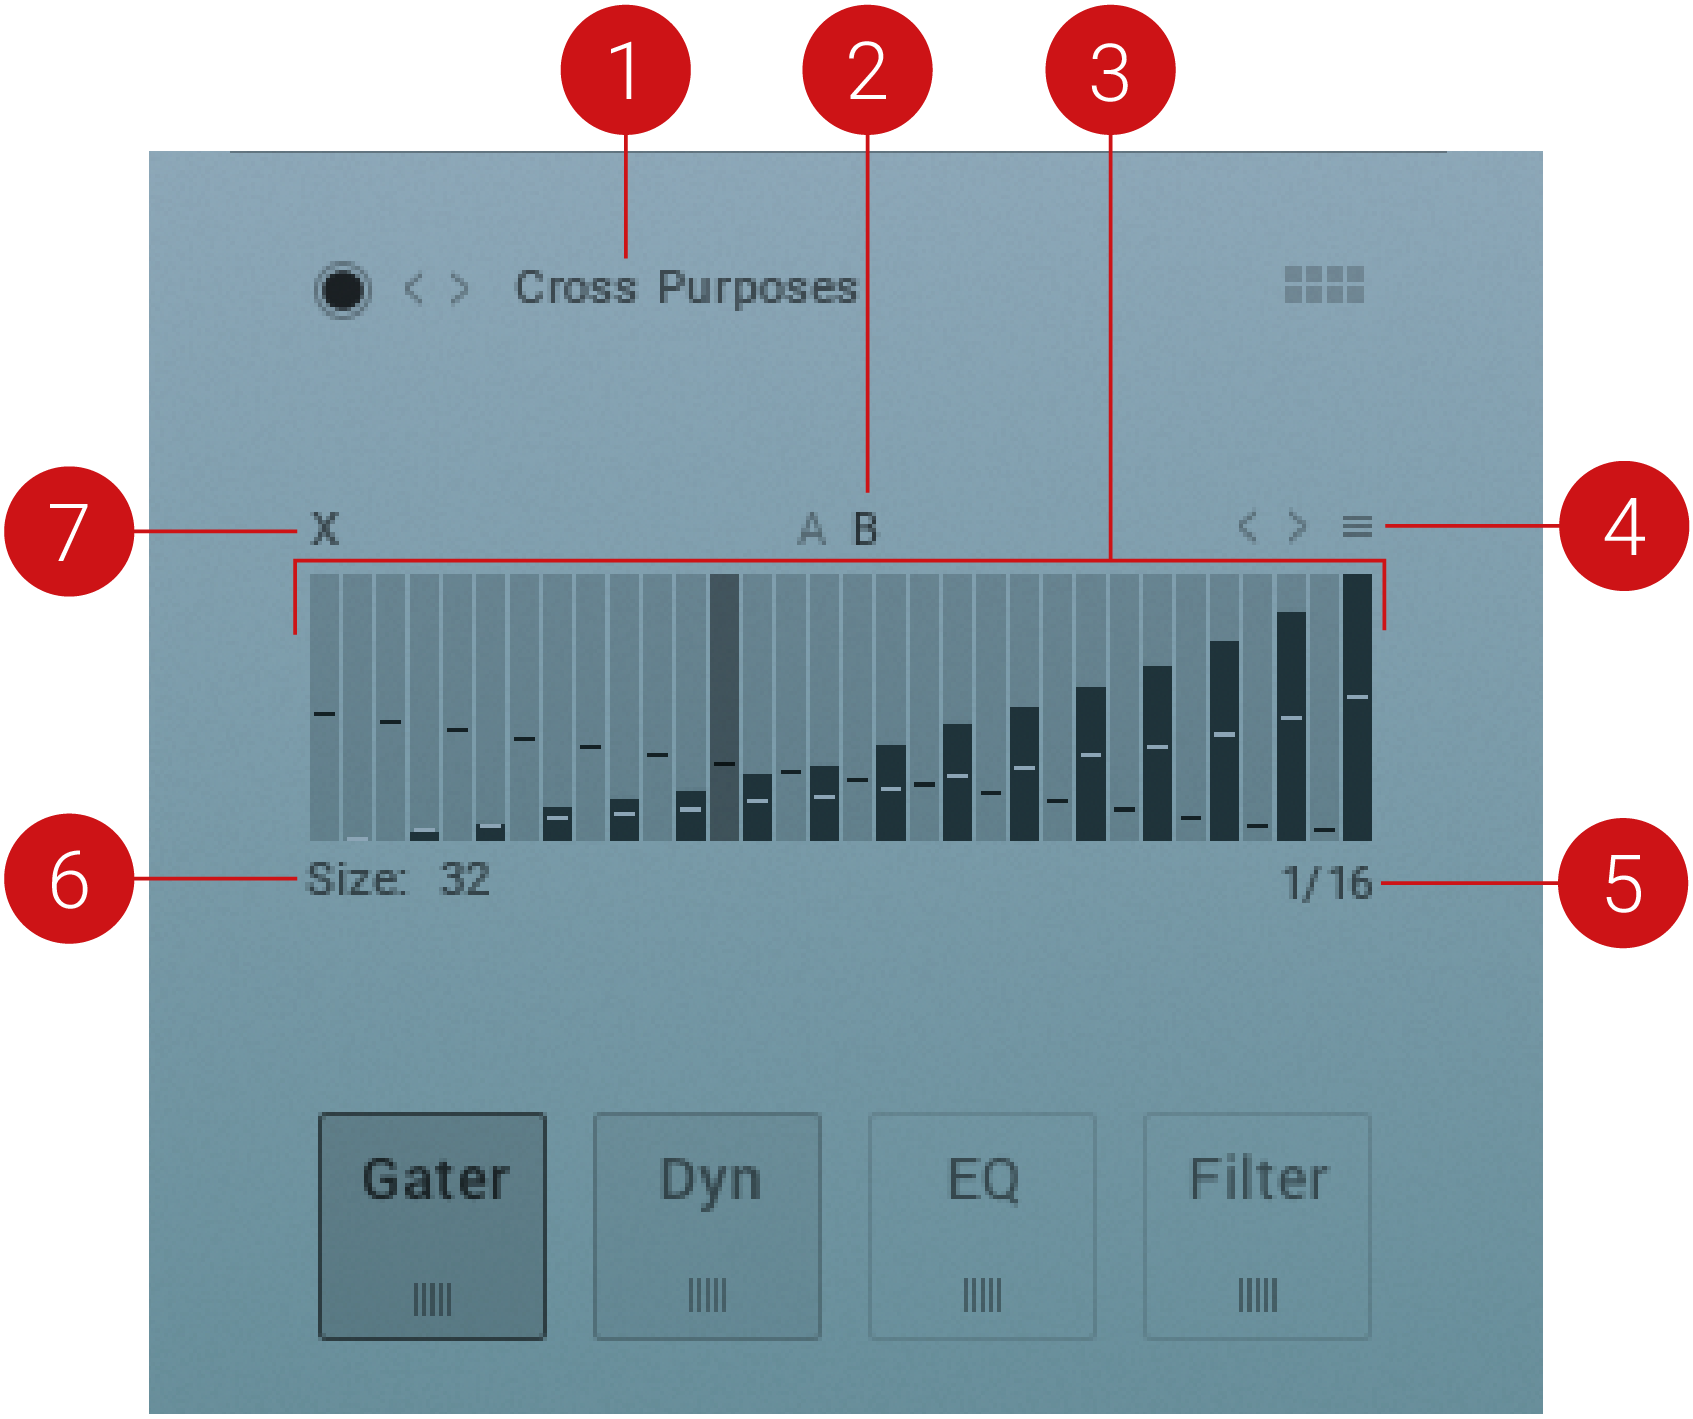 |
Gater effect
Presets: Selects a preset for the Gater effect. The name of the selected preset is displayed.
Rhythm A and B: Switches between the rhythms A and B.
Stepping area: Adjust the steps for the selected rhythm by dragging the bars up or down.
Context menu: With the options in this menu you can, for example, copy or swap the rhythms from A to B.
Musical timing: Determines how fast the Gater is stepping forward. You can select from 1/4 to 1/ 64 of a beat.
Size: Determines how many steps the Gater provides. You can select between 2 to 32 steps.
Modulation Source: Selects the modulation source to be applied to the parameter.
Note
The Gater effect can only be used once in ASHLIGHT .
Modulation
The Mod (Modulation) effect modifies the sound in various ways, depending on the selected effect mode. Mod can be used to thicken the sound as a standard chorus effect, or can be used to radically manipulate and alter the audio signal. The following effect modes are available:
Chorus and Chorus Phase
The Chorus module “thickens” the audio signal by splitting it up and detuning one version in relation to the original. Separate LFOs with an adjustable phase relationship detune each stereo channel independently for creating wide-panorama effects.
Chorus contains the following controls:
 |
Chorus effcect
Speed: Adjusts the LFO speed. To synchronize the speed to your host or Master Editor tempo, click the Speed parameter’s unit display and choose a note length value from the drop-down list.
FX Sync: Sets the effect's time-based parameters in-sync with the master clock.
Depth: Adjusts the range of modulated detuning. Higher values give a more pronounced chorusing effect.
Mix: Adjusts the respective levels of the original and processed signals. Note that the typical phasing effect is created by the combination of both signals, so setting these to the same levels results in the most pronounced effect.
Flanger and Flanger Color and Flanger Reso
This module splits the audio signal up and delays one version in relation to the original signal. By modulating the delay time, as well as feeding an adjustable amount of the output signal back into the input, the Flanger creates a characteristic “whooshing” sound. Just like the Phaser module, the Flanger uses a separate LFO for each stereo channel, with the phase relationship between both LFOs being adjustable.
Flanger contains the following controls:
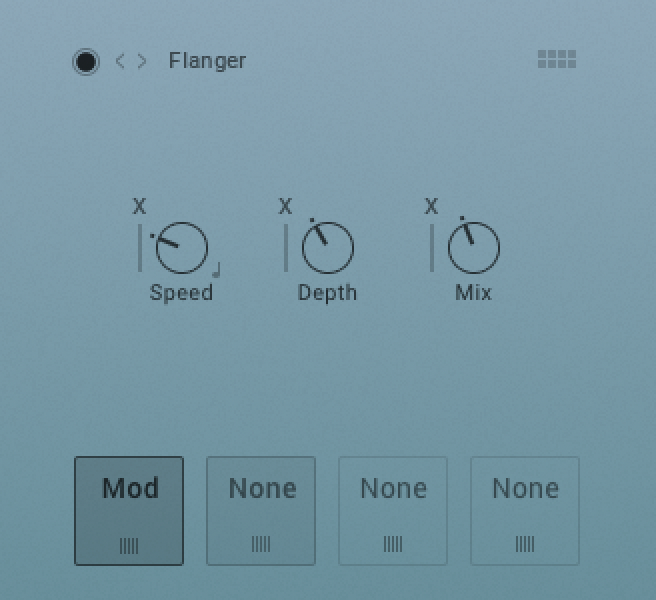 |
Flanger effect
Phaser Subtle and Phaser Feedback
This effect continually changes the phase relationships in your signal with an all-pass filter. This results in a comb filtering effect, which attenuates some frequencies while boosting others. The sound is similar to that of a Flanger but in a more subtle manner.
Phaser contains the following controls:
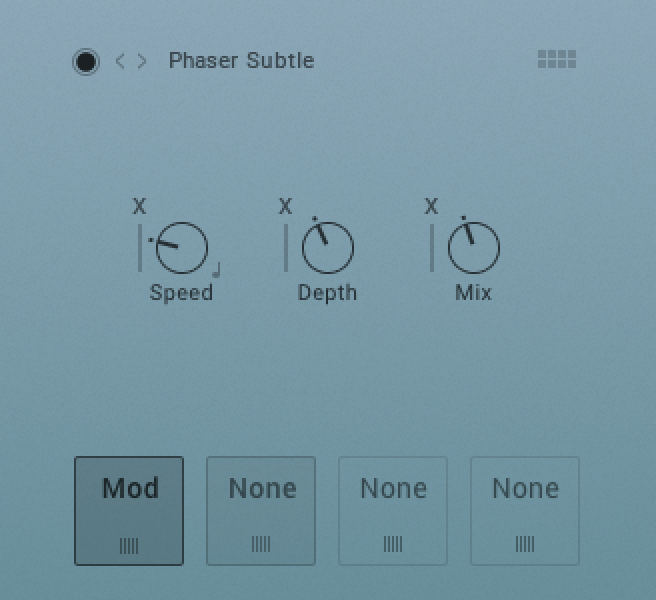 |
Phaser effect
Speed: The LFO modulation speed. To synchronize the speed to your host or Master Editor tempo, click the Speed control’s unit display and choose a note length value from the drop-down list.
FX Sync: Sets the effect's time-based parameters in-sync with the master clock.
Depth: The amount of LFO modulation. Higher values cause the Phaser effect to sweep over a wider frequency range.
Mix: Adjusts the respective levels of the original and processed signals. Note that the typical phasing effect is created by the combination of both signals, so setting these to the same levels results in the most pronounced effect.
Rotator and Rotator Room and Rotator Slow Acc and Rotator Fast Acc
The Rotator effect realistically simulates the sound of rotating speaker cabinets, which are commonly associated with drawbar organs that became popular in rock music of the 60s and 70s. Although the effect is almost intrinsically tied to "the" prototypical drawbar organ sound, it works equally well on guitars, synth pads, and a wide range of other sounds.
Rotator contains the following controls:
 |
Rotator effect
Speed: Although this parameter appears as a knob in order to facilitate automation, it has two positions Slow and Fast. A change of this setting realistically simulates the acceleration or braking of the rotor.
Balance: Controls the relative levels of the cabinet’s treble and bass parts.
Wet: Adjusts the level of the original and processed signal.
Choral Synth, Feedback, Ensemble, Dimension, and Sauce
Choral features four distinct chorus modes, ranging from the subtle sound of classic studio rack processors to the large ensemble sound of early string synthesizers.
Choral contains the following controls:
 |
Choral Synth effect
Speed: Adjusts the LFO speed. To synchronize the speed to your host or Master Editor tempo, click the Speed parameter’s unit display and choose a note length value from the drop-down list.
Depth: Adjusts the range of modulated detuning. Higher values give a more pronounced chorusing effect.
Mix: Adjusts the respective levels of the original and processed signals. Note that the typical phasing effect is created by the combination of both signals, so setting these to the same levels results in the most pronounced effect.
Choral Modes
Synth: This mode is inspired by the choruses of polyphonic synthesizers from the late seventies and early eighties. Its sound characteristic is dark and vintage. The modulation behavior is tuned for rich and dispersed sounds.
Ensemble: This mode is inspired by the choruses of string synthesizers from the seventies. Its sound characteristic is warm and lush. The modulation behavior is tuned for animated and lively sounds.
Dimension: This mode is inspired by the choruses of studio rack processors from the early eighties. Its sound characteristic is bright and transparent. The modulation behavior is tuned for wide and consistent sounds.
Universal: This mode is a more generic chorus implementation. Its sound characteristic is clean and modern. The modulation behavior is tuned for a range of sounds from consistent to lively, depending on the number of Voices.
Flair Standard, Resonance, Unison, Scan on C, Stairways
Flair features five flanger modes that offer different approaches to a range of effects from flanging to harmonization. The effect is produced by up to four comb filters, called Voices. Further expanding on the original concept of a flanger, the flanger voices have a harmonic relationship based on a wide selection of preset chords (Chord parameter).
Flair contains the following controls:
 |
Flair Standard
Speed: The LFO modulation speed. To synchronize the speed to your host or Master Editor tempo, click the Speed control’s unit display and choose a note length value from the list.
FX Sync: Sets the effect's time-based parameters in-sync with the master clock.
Depth: The amount of LFO modulation. Higher values cause the effect to sweep over a wider frequency range.
Mix: Adjusts the respective levels of the original and processed signals.
Flair Modes
Standard: Each flanger voice behaves like a basic flanger effect, creating harmonically related peaks and notches in the frequency spectrum
Thru Zero: Each flanger voice is duplicated. The duplicated instances of the flanger voices are excluded from the modulation and thus rest at their respective base pitch. When modulation is introduced, the flanger voices shift against the duplicated instances in time. This creates the strong thru zero flanging effect with its characteristic signal cancellation, similar to the flanging effect originally created with two tape machines.
Scan: Instead of adding the flanger voices to form a chord, the effect scans through them one after the other. This is similar to how an arpeggiator on a keyboard plays the notes contained in a chord as a sequence.
Scan on C: A “ringing” tone is added in the key of C.
Stairways: An ascending resonance is created.
Phasis Animator, 6 Notches, Complex Low, and High Scanner
Phasis is a new take on the phaser concept with additional features that have been carefully chosen to allow for more sophisticated and extreme sounds than possible with common phasers while staying true to the ease of use and clarity associated with these devices.
Phasis contains the following effects:
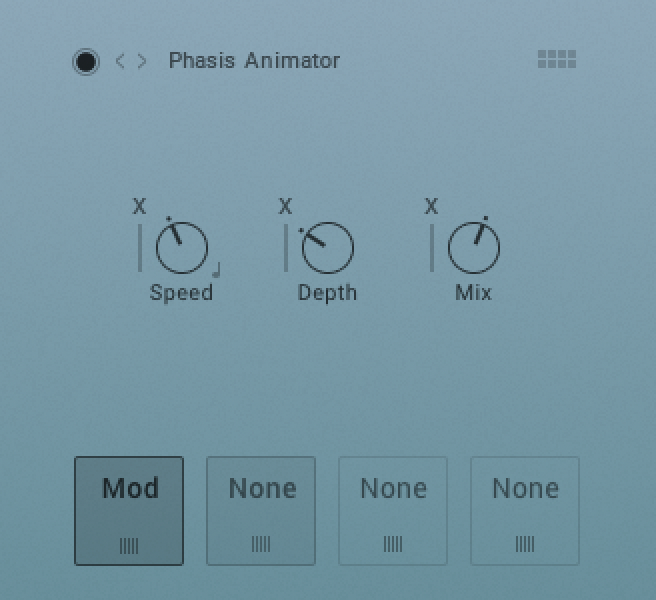 |
Phasis Animator
Speed: The LFO modulation speed. To synchronize the speed to your host or Master Editor tempo, click the Speed control’s unit display and choose a note length value from the list.
FX Sync: Sets the effect's time-based parameters in-sync with the master clock.
Depth: The amount of LFO modulation. Higher values cause the effect to sweep over a wider frequency range.
Mix: Adjusts the respective levels of the original and processed signals.
Phasis Modes
Animator: classic, subtle two-notch phaser stereo effect.
6 Notches: medium phaser effect with higher resonance.
Complex Low: Complex nine-notch phaser with the center frequency in the lower spectrum at around 300 Hz.
High Scanner: intense four-notch phaser effect in the upper mid-range at 3.2 kHz and obvious feedback setting.
Rev
With the Rev (reverb) effect you can adjust the size of the sound.
 |
Reverb effect
IRC Flat and Low Cut
This module simulates the natural reverberation that occurs when a sound source is placed in an acoustic environment, thus adding a feeling of spaciousness to the sound.
The following parameters are available:
Level: Adjusts the reverb's output level.
SIYE: Adjusts the size of the simulated room. This affects the duration of the reverb trail.
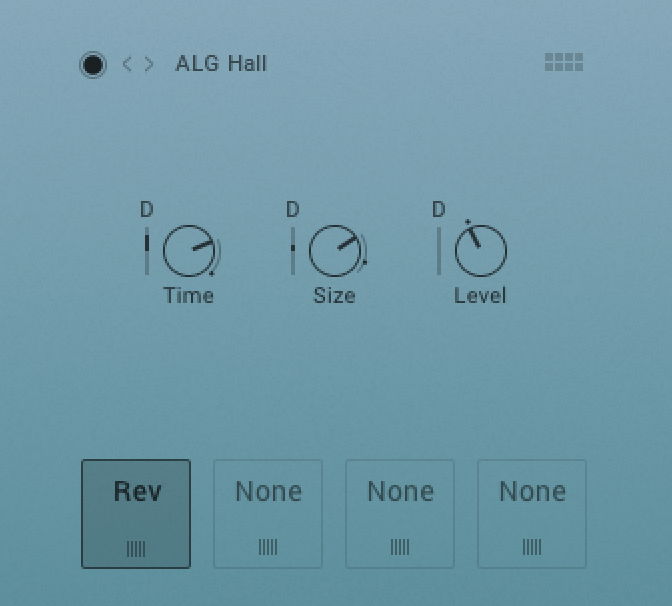
ALG Effect Modes
This algorithmic reverb offers Room and Hall modes. Room mode generates a natural reverb with strong initial reflections and a quick decay. You can use this to simulate the natural sound of a small acoustic space. With a faster reverberation time, it is particularly suited to drums and guitars.
Hall mode emulates the immensity of a large hall space, with a warm and rich sounding reverb. This can be used to replicate a vast, natural space. The large reverberation and long decay time make it a great tool to experiment with on a variety of sounds.
The following parameters are available:
Time: Adjusts the duration of the reverb effect.
Size: Adjusts the size of the room simulated by the reverb effect. Higher values replicate larger rooms.
Level: Adjusts the reverb's output level.
ALG Plate
Plate reverb was developed as an early method of generating an artificial reverb effect. A vibrating sheet of metal is employed to simulate reflection patterns in acoustical spaces. Since the sheet of metal vibrates across a two-dimensional plane, the echo density is higher and more evenly distributed than in a three-dimensional space. It is a good choice if you want to brighten a sound source. Plate reverb has a smooth reverb tail, allowing you to lengthen a sound without pushing it back in the mix. For this reason plate reverbs are most commonly used on vocals and snare drums. The Damping control affects the overall tone, so applying it to a bright source warms the sound.
The following parameters are available:
Decay: Adjusts the duration of the reverb effect.
Low Shelf: Attenuates or amplifies the low-frequency content of the reverb signal.
Level: Adjusts the reverb's output level.
Utility
The Utility effect allows you to control the width of your signal’s stereo image and adjust the panning. Applying modulation from an LFO or Shaper can produce particularly interesting stereo effects.
Utility contains the following parameters:
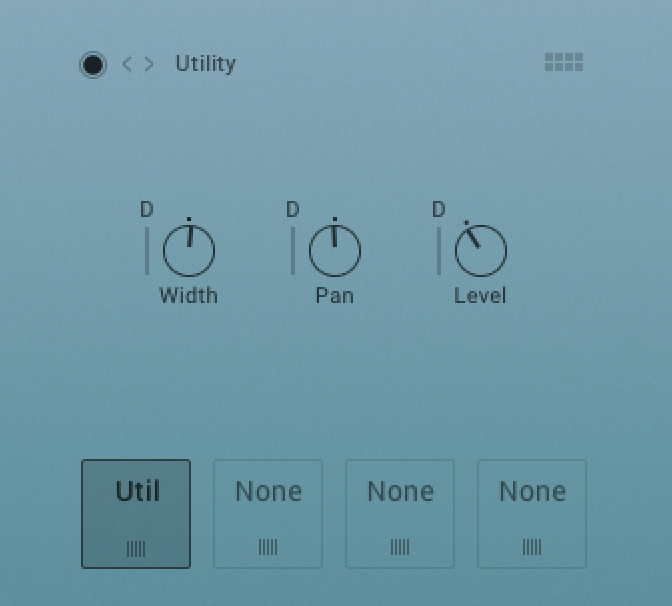 |
Utility effect
Width: Collapses or expands the signal’s stereo base. At the far left position, stereo signals will be summed to mono. Positive values will result in an artificial widening of stereo sources that has a tendency to apparently expand beyond the speakers, but watch out, this tends to cause mono incompatibilities in your mix.
Pan: This control allows you to place your signal within the stereo field. It works exactly like the Pan control of the Amplifier module.
Level: Adjusts the effect’s output level.