Side Pane
In addition to loading instruments, Kontakt's Side pane allows you to quickly organize and navigate through any number of files.
The Side pane allows you to quickly organize and navigate through any number of files that can be used in Kontakt. It display a convenient overview of various aspects of the currently selected Instrument. The Side pane be used to navigate through your file system to locate and load Kontakt Instruments, and also manage and browse the contents of your Libraries. It allows you to assign host and MIDI automation sources to Instrument parameters and to drag and drop items from the Side panel into the Rack.
To display the Side pane:
Click the Minimize icon from the Control panel to expand the Rack.
The Side pane will appear on the left side of the Rack.
 |
The Side pane
Libraries Tab
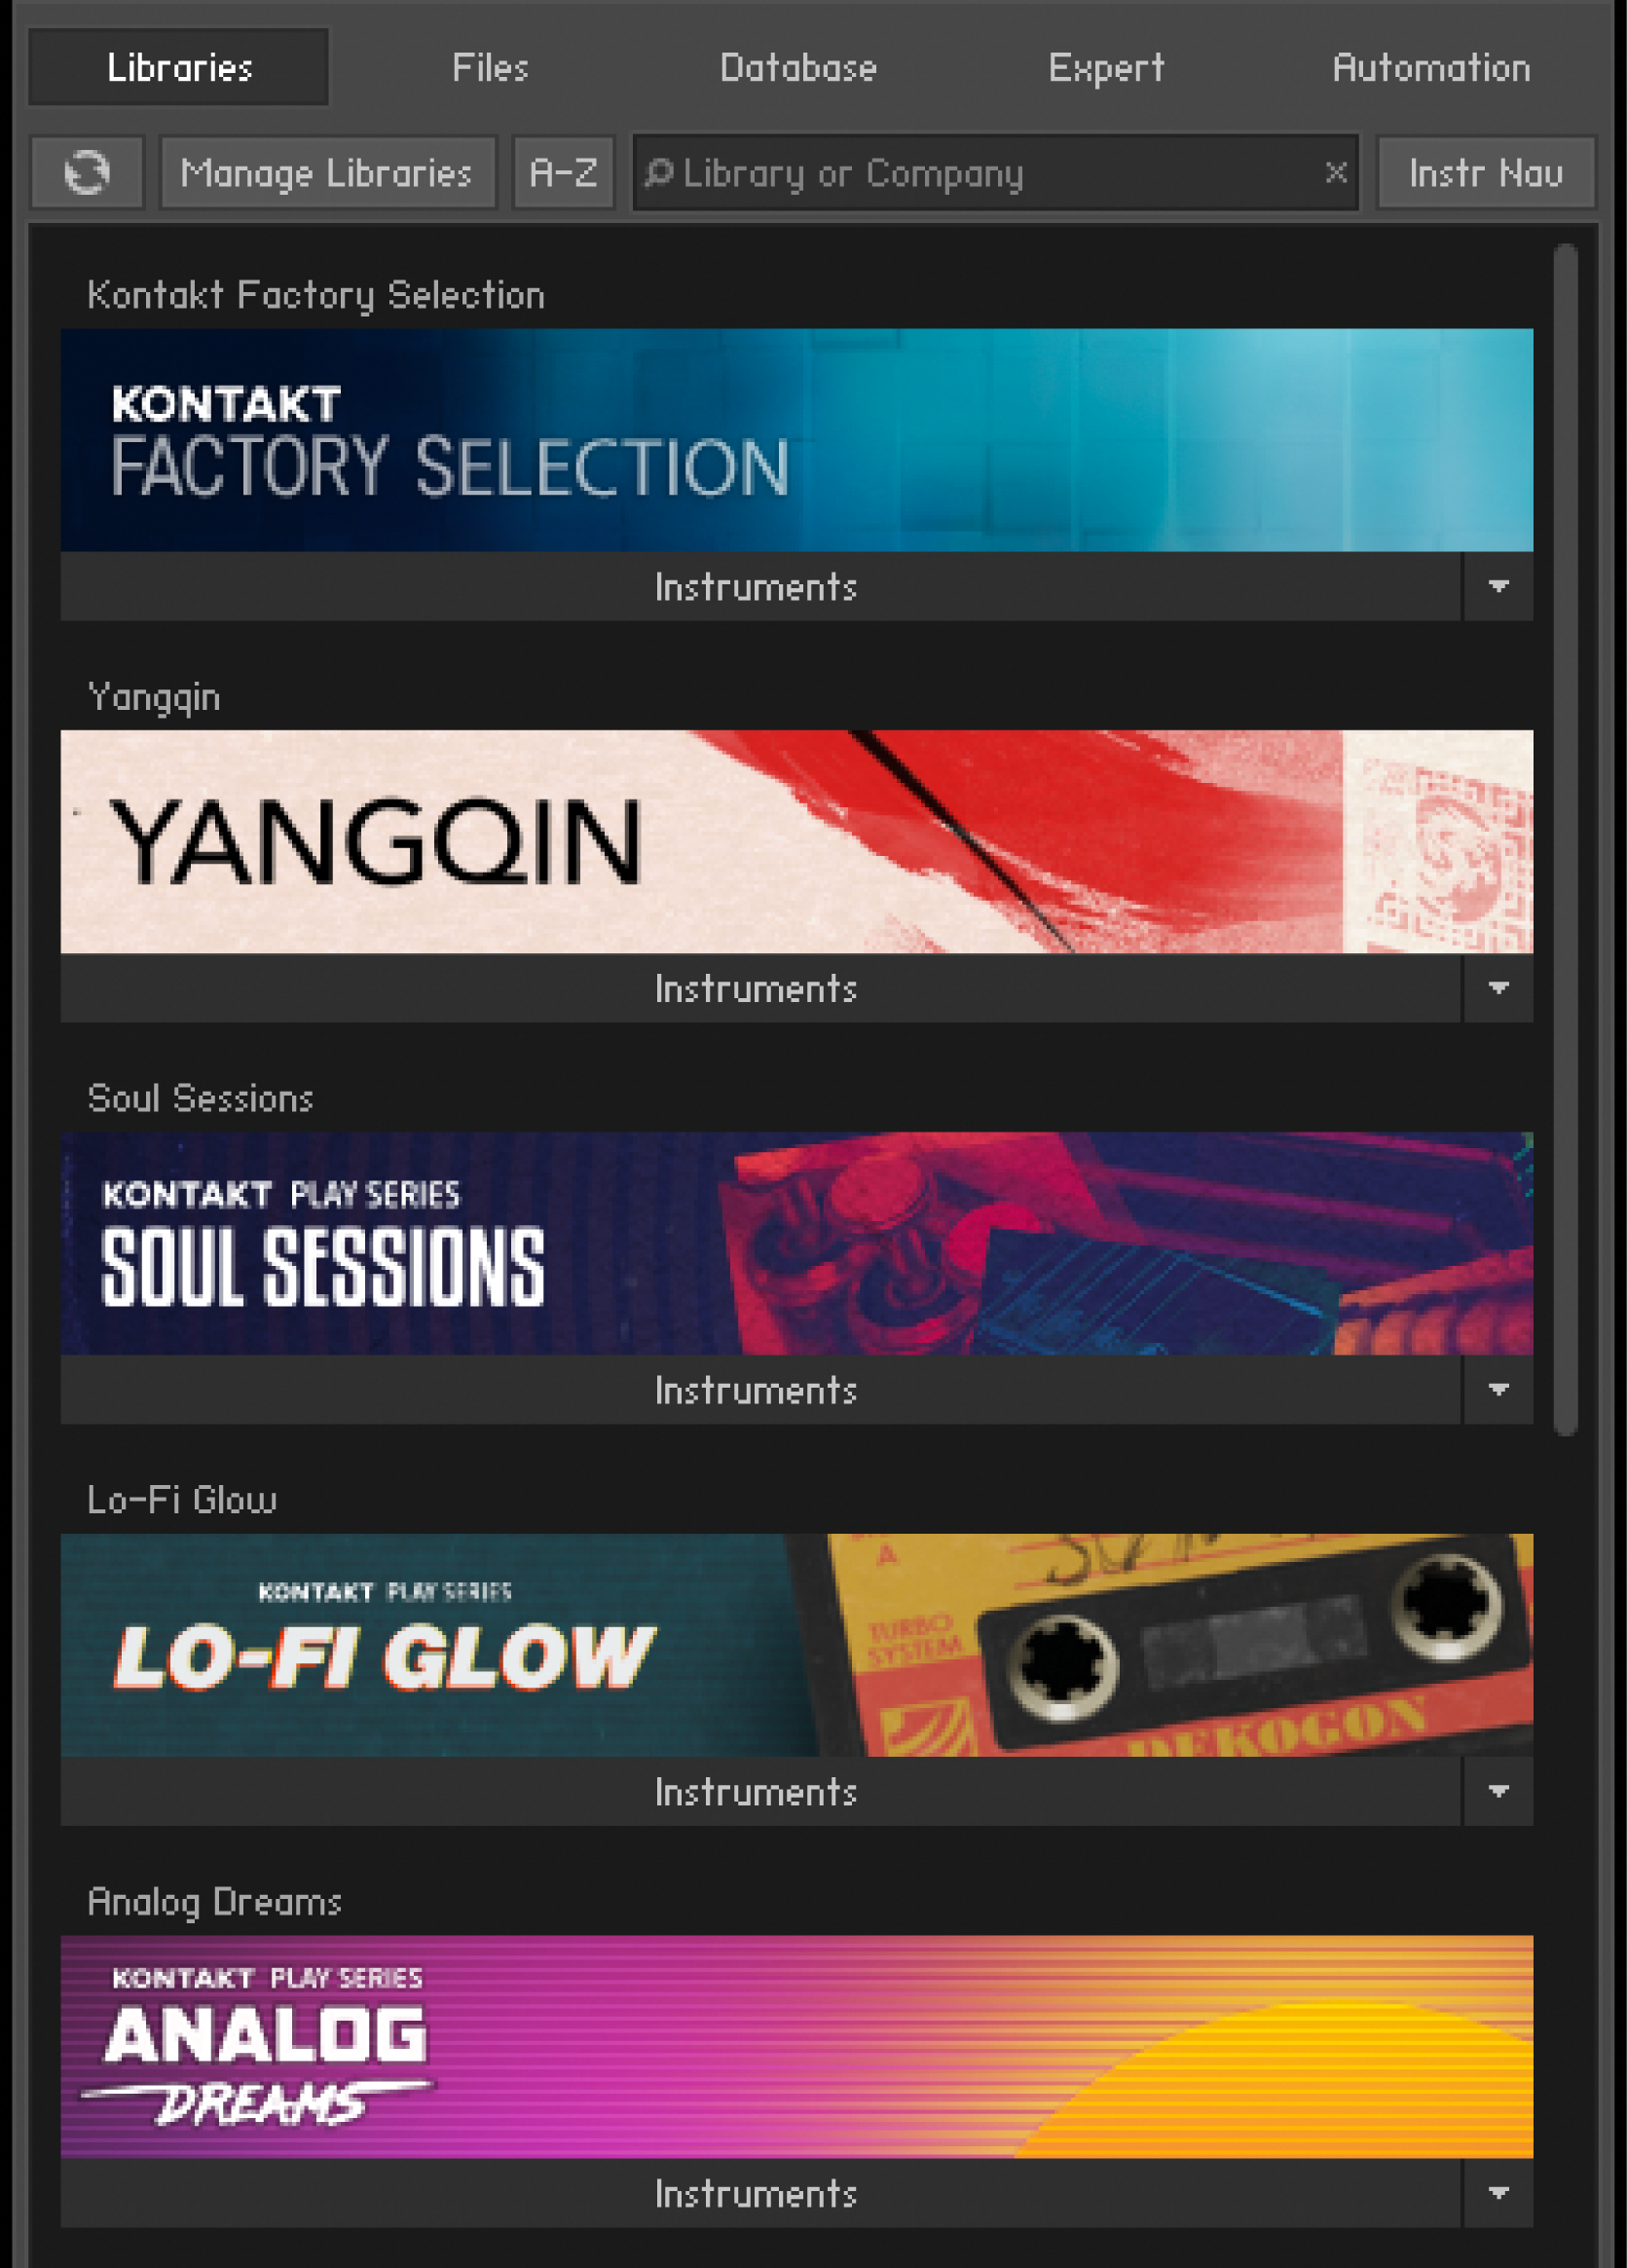
The Libraries Tab provides direct access to all Kontakt libraries installed on your computer.
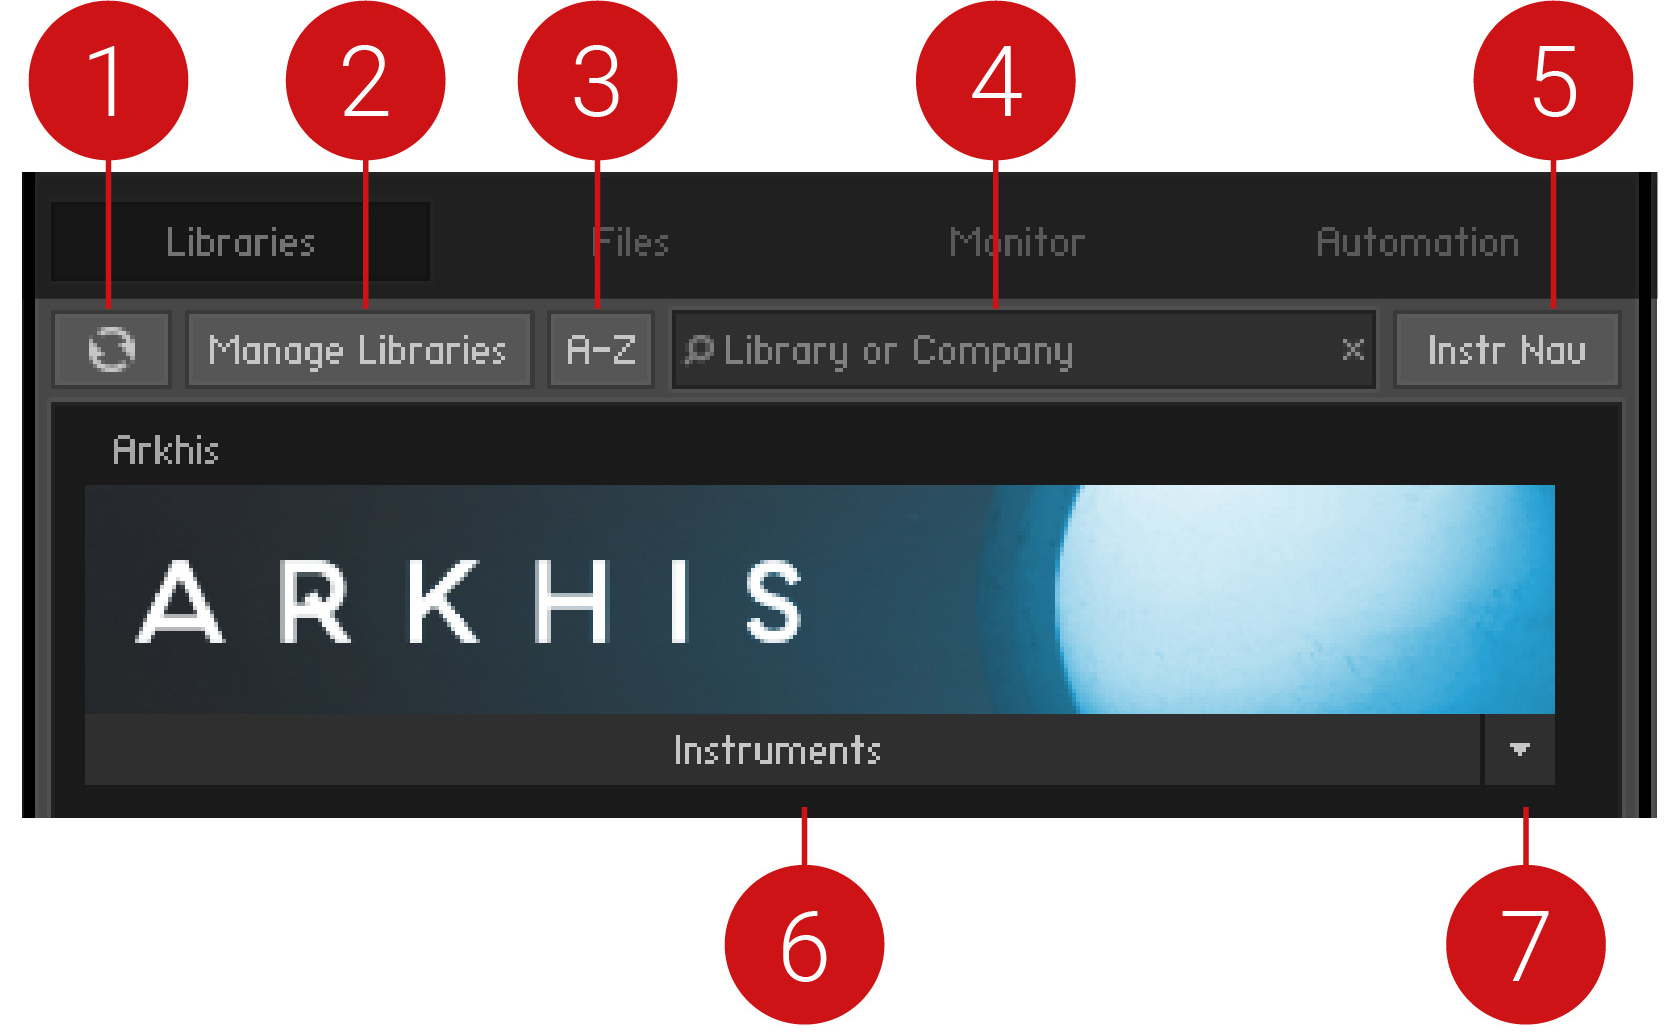 |
Refresh: Reloads the list of libraries.
Manage Libraries: Opens the Library tab in the Options dialog. There you can hide or show libraries, open Native Access to install new libraries, and manage existing installations. For more information, refer to Libraries Tab.
A-Z: Sorts the libraries alphabetically. When deactivated, the Library tab reverts to the previous custom sorting.
Search field: Allows you to enter a search string in order to find particular libraries within the Library tab.
Instr Nav (Instrument Navigation): Shows or hides the Instrument Navigator pane at the bottom of the Browser.
Instruments: Displays all Instruments included in the library.
Function Menu: Opens a drop-down menu with additional library options. For more information, refer to Function Menu.
Loading and Saving Instruments and Multis
To load an Instrument or a Multi, click the Instruments or Multis button and navigate through the library structure like in the lower pane of the Files tab.
When using Kontakt Player libraries, you can save your own Instruments and Multis to the original library or to any custom location. When saving your own variations to the original location of your library, these Instruments and Multis will also appear in the Libraries tab.
Function Menu
The Function menu provides access to important resources like the library readme file and manuals, and maintenance tasks such as locating a library and hiding a library box. The Function menu is located at the bottom right of the Library box. Click the arrow to open the drop-down menu.
The Function menu contains the following options:
 |
The Function menu
Open containing folder: Opens the location of the library on your hard disk, in your operating system's file browser.
Hide library: Removes the library from the Library tab. Note that this does not delete or uninstall the library. If you want the library to appear in the Libraries tab again, you can do this via the Libraries tab in the Options dialog. For more information, refer to Libraries Tab.
Readme.txt: If the library folder contains a readme text file, it will be displayed here. Clicking this option will open the file.
License Agreement: Contains a list of the licenses for the selected library.
Online Documentation: Clicking this option will open the user manual.
Library Activation
Libraries are activated through Native Access, but it is possible to quickly open Native Access to activate a specific library from the Kontakt Side pane.
After installing a library, open Kontakt.
Locate the library in the Libraries tab of the Side pane.
Click on the Activate button on the respective library and a log-in screen will open.
Native Access will open and prompt you to enter a serial number for the library.
Enter a serial number and click Activate.
Your library will now be activated and ready to play.
Files Tab
This section of the Side pane allows you to navigate your file system in a tree-based way, which will be immediately familiar if you’re accustomed to your operating system’s file browsers and selectors. It consists of two main panes and an audition toolbar at the bottom of the section. There is an optional third pane, the Instrument Navigator, which you can toggle via the InstrNav button just below the tabs. This pane is also available on the Libraries tab, refer to Libraries Tab.
Click the horizontal splitter bars that separate the panes and drag them up or down in order to change the height of the respective panes.
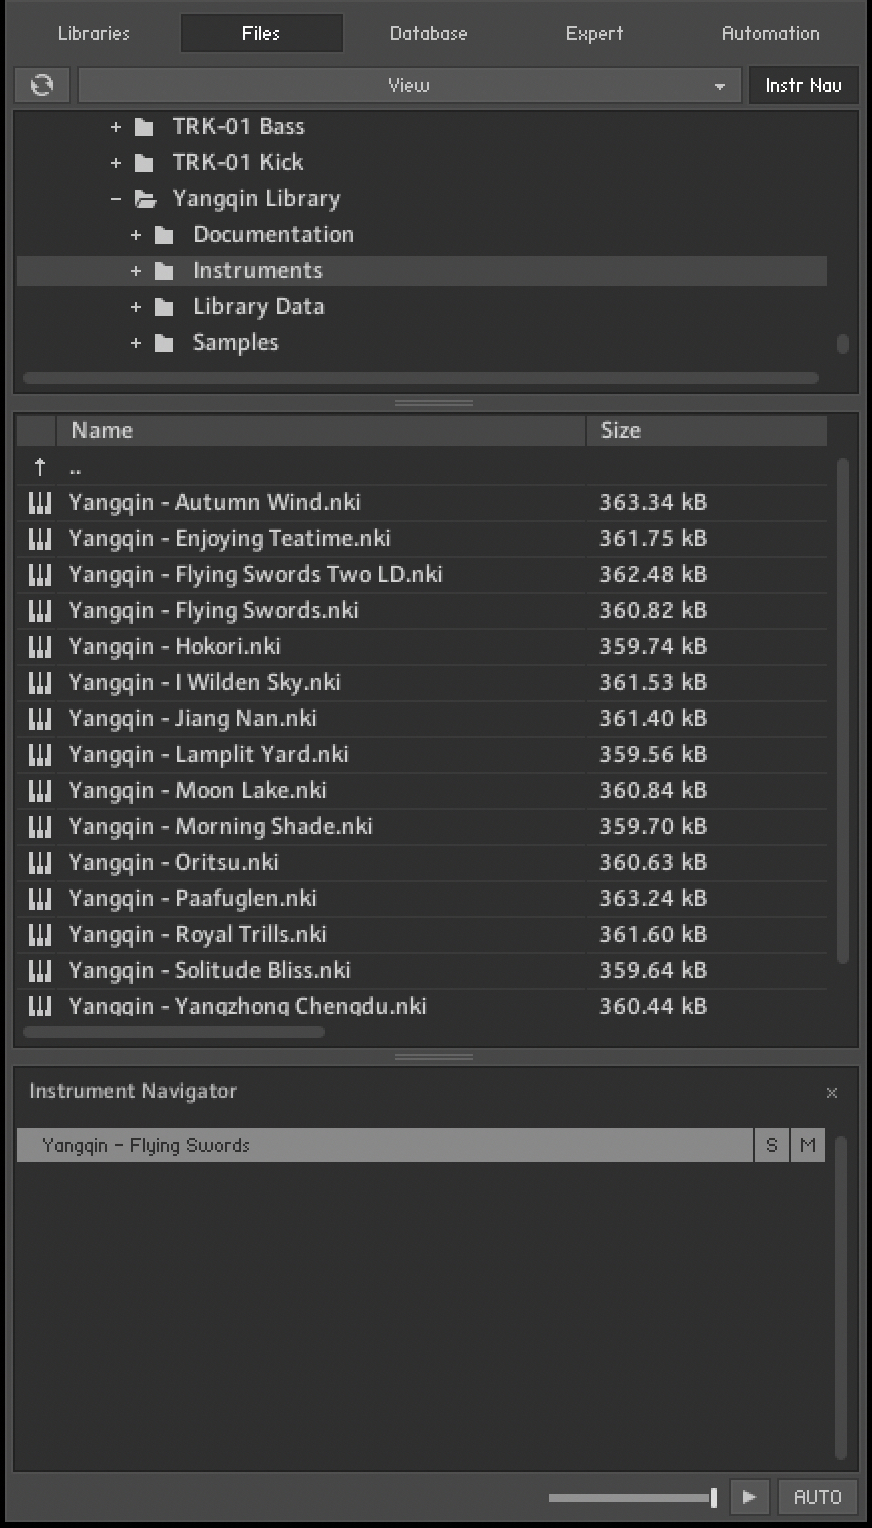 |
The Files tab of the Side pane provides a file system navigator
Upper (Container) Pane
The upper pane shows all container objects on your computer in a tree structure. The term "container" encompasses all items that contain other objects, such as volumes (like hard disks, CD-ROMs or network places), folders and monolithic sampler files that serve as "virtual folders" (more on this later). A + icon next to an object indicates that there are further objects contained within, which are not currently being shown. Display those by clicking the + icon. Conversely, clicking the - icon next to an object hides all its contents from the tree view.
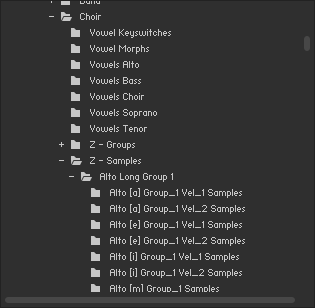
The upper pane of the File Browser displays a navigable tree structure of your file system.
Middle (Objects) Pane
Whenever a container object that you have selected in the upper pane contains items which can be used in Kontakt, these will show up in the middle pane. In contrast to the multi-dimensional tree structure of the upper pane, this list is always flat and does not span multiple folders. In addition to relevant files, folders (if any) will also show up in this list and can be navigated to via double-clicking. The first item of the list will usually be the parent directory, indicated with an arrow icon. This means you don’t need to use the upper pane to navigate through folders, although it’s usually faster and more convenient.
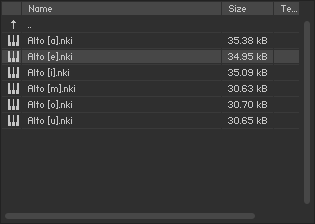
The middle pane of the File Browser, displaying a number of Samples, their file sizes, native tempos, and modification dates.
Information on the displayed items is spread across four columns; in addition to the file name, size and modification date, there’s also a tempo column that indicates the native tempo of sliced loops. You can change the width of these columns by clicking and dragging the separator bars between their labels. Clicking on a column label will change the sort order of the list according to the respective value and clicking on the same label again will reverse the ordering direction.
Once you have found one or more items that you want to use in Kontakt, there are several ways to load them:
Double-click a Multi file (.nkm) or drag it from the Side pane into the Rack to load it; Kontakt will ask you whether you want to replace your current Multi or merge the one you’ve selected with the existing Multi.
Double-click an Instrument file (.nki) or drag it from the Side pane onto a free space in the Rack to add it to your current Multi. Kontakt will assign a MIDI channel according to the MIDI channel assignment for loaded patches setting in the Options dialog. This also works with multiple Instruments.
Drag an Instrument onto an existing Instrument Header in your Rack to make it replace the respective Instrument. Kontakt will keep the MIDI channel setting of the previous Instrument.
Double-click a Sample (i.e. an audio file) or drag it onto a free space in the Rack to create a new Instrument (based on your default Instrument) that contains a Zone with this Sample spread across the whole keyboard range. If you do this with multiple Samples, Kontakt will still only create one instrument, but with a corresponding number of adjacent Zones. Note that this does not work with 8-bit Samples, as Groups created in this way will be set to DFD mode by default, which does not support 8-bit data.
Click and drag a Sample into the Mapping Editor of an existing Instrument to create a Zone and place it on the key or key range you’re pointing at. While dragging, move the mouse pointer up and down in the Mapping Editor to enlarge or shrink the target key range. This also works with multiple Samples, in which case Kontakt will create a number of adjacent Zones. If you want to create multiple Zones above each other (thus combining a number of Samples into a velocity switch that’s placed on a single key), move the mouse pointer all the way down to the keyboard.
There are two ways to select multiple items in the object pane: contiguous ranges of items in the list can be selected by clicking the first item and then, while holding your [Shift] key, the last one in the range. Non-adjacent items can be selected with [Ctrl]-click, or [Cmd]-click on Mac OS.
Tip
The sort order of the Side pane's object pane determines in which order multiple Samples will be used in Kontakt. For instance, if you’re planning to create a velocity switch from a number of Samples, but realize after placement that the velocity assignment ended up being upside down, just reverse the list order in the Side pane and try it again.
Instrument Navigator Pane
The Instrument Navigator shows a list of all Instruments in the Rack, which is updated at all times. It is divided into 4 pages of up to 16 Instruments each, and displays the Instrument names along with M (mute) and S (solo) indicators. It provides a good way to keep the bigger overview when you’re editing an Instrument, when the Rack does not convey any information about Instruments other than the currently edited one.
The Instrument Navigator list will keep in sync with the page and Instrument selection in the Rack and vice versa. To switch to one of the four Instrument pages, you can either use the page buttons in the Rack header (if it’s in Multi Instrument mode), or click the page numbers at the top of the Instrument Navigator list. Similarly, you can select an Instrument by clicking on either its header in the Rack, or its entry in the Instrument Navigator pane. If an Instrument that you select is not currently visible in the Instrument Navigator list, it will automatically scroll to its list position. Double-clicking an Instrument in the Instrument Navigator list will open it for editing in the Rack.
To display the Instrument Navigator pane, click on the InstrNav button at the top of the Side pane.
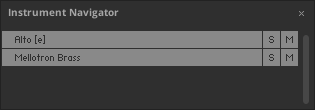
The Instrument Navigator pane, displaying a number of loaded Instruments in the Multi.
Tip
The Instrument Navigator is not strictly specific to the Files tab, but rather a utility window that’s available in various tabs in the Side pane. It’s explained here for sake of consistency, and referenced briefly in sections about other places where it’s available.
Audition Strip
The Audition Strip allows you to listen to audio files prior to loading them. This feature works with audio files and sliced loops that you select in the lower section of the Side pane. Note that when auditioning sliced loops, they will not be played in their native tempo (which is being displayed in the Side pane list), but in the current tempo of your host or, if you’re running Kontakt in stand-alone mode, the tempo that’s set in the Master Editor.
The Audition Strip contains the following controls:

The Audition Strip allows you to play any Sample that you select in the Side pane.
Volume slider: This slider adjusts the sample playback level.
Play button: This button plays the selected sample once or, if a sample is currently being auditioned, stops the playback.
Auto button: When activated, Kontakt will automatically play a sample once when you click it.
Refresh Button
Just below the Side pane tabs, you will find a series of function buttons and drop-down menus that are specific to the currently visible tab. On the Files tab, this row starts on the left side with a Refresh button, depicted by a circled arrow.
Whenever the File Browser has not yet picked up changes that recently occurred in your file system, such as newly installed or removed sample libraries, you can force an update of the file display by clicking this button.
The View Menu
The View menu in the Files tab contains options and functions that alter the way in which information will be shown in the File Browser panes.
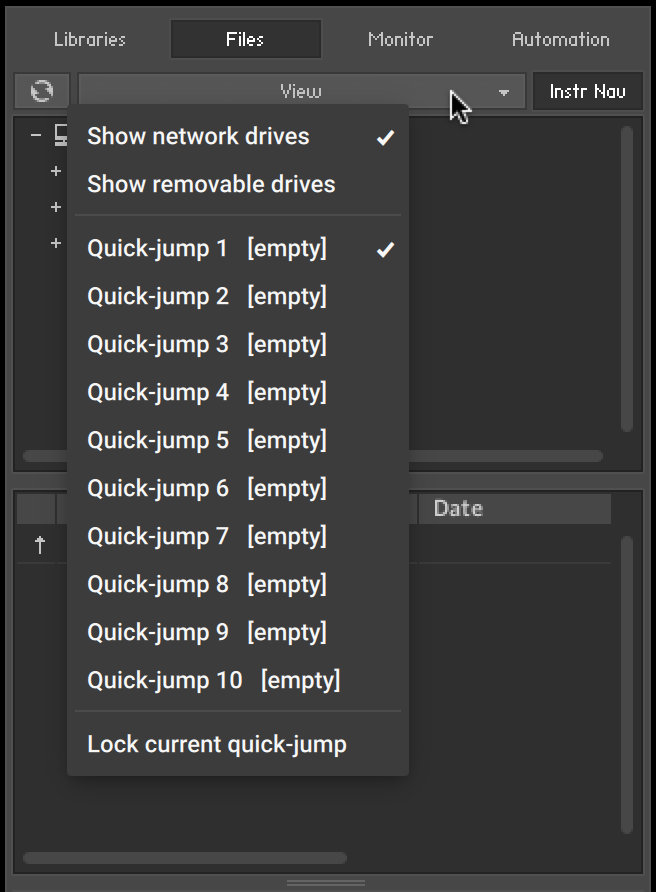 |
The view menu of the File Browser contains options that determine which items will be shown.
The first two items in this menu, labeled Show network drives, and Show removable drives, are toggle options; selecting them will switch them on, indicated with a small diamond next to their label. With these, you can adjust whether the File Browser should include mounted network volumes, and removable drives.
Below the options, you’ll find multiple slots labeled Quick-jump and numbered 1 to 10. Quick-jumps are location memories that you can use to conveniently access a number of frequently-visited places in your file system without the need to navigate there using the container pane each time. The handling is simple: any location you navigate to in the File Browser gets immediately saved to the currently selected Quick-jump entry. Once you switch to another Quick-jump location, the previously selected one will keep its value. Switching back to it will bring you to the saved location, but watch out — if you navigate any further now, the Quick-jump memory will be changed accordingly. If you don’t want this, activate the Lock current quick-jump option at the bottom of the View menu to freeze the saved location. Instead of using the pull-down menu each time, you can also use [Ctrl] + [F1] through [Ctrl] + [F10] (Windows) or [Alt]-[F1] through [Alt]-[F10] (Mac) to access the respective Quick-jump locations via your keyboard.
Monitor Tab
When editing a complex Instrument with various Groups and Zones, it’ is easy to get lost in KONNTAKT's editing facilities. The Monitor tab counteracts this by providing a useful overview of various aspects of your currently edited Instrument. Similar in nature to the Instrument Navigator pane, it shows a continually updated and searchable list of all Groups and Zones in your Instrument. It allows you to quickly include and exclude Groups for editing, and provides a context sensitive parameter view that shows the values of the parameter you touched last across all Groups.
 |
Monitor tab, displaying all Parameters of the Gongs Instrument
At the top, you’ll notice a tool bar with five buttons, the first four of which will switch the Monitor view into the respective display mode:
Groups
This view provides a list of all Groups in your Instrument. It will only work in Instrument Edit mode. The leftmost column indicates whether a Group is marked for editing — it corresponds to the checkboxes next to the Group names in the Group Editor — and can be clicked on to toggle the edit status of the respective Group.
Tip
The Group selection only affects commands that can be found in the "Edit" menu of the Group Editor, and is thus different from the editing checkbox, which is being used for changing parameters across multiple Groups.
At the right side of the list, the Group indexes are displayed as a quick reference for KSP script editing, as well as the number of Zones included. Groups can be selected by clicking on their names; multiple selections work in the same way as they do in the File Browser, i.e. [Shift]-clicking below or above a selected Group will select a range, a [Ctrl]+click ([Cmd]+click on Mac OS X) will add Groups to the active selection; [Alt]+click will select all currently visible Groups for editing.
You can rename Groups by double-clicking on their name and entering a new one.
Right-clicking on a Group will open a context menu with various Group-related actions; this is identical to the Edit menu of the Group Editor.
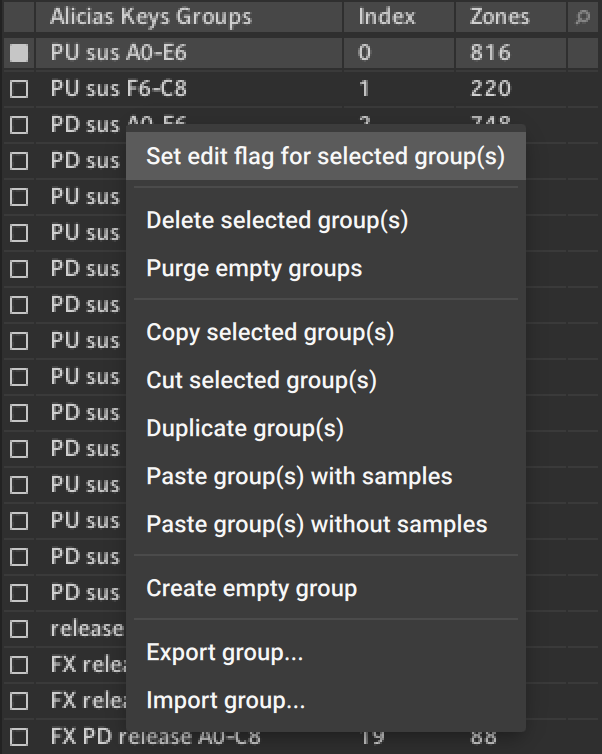 |
The Group context menu
You can toggle a Quick-Search function by clicking on the button with the magnifying glass symbol to the right side of the list header. This will show a text input box above the list; while it is visible, the list will only show Groups whose names contain whatever you enter into this box.
You can hide (and, in consequence, deactivate) the Quick-Search feature by clicking the "X" button on the right side of the search bar.
Zones
This view displays a list of all Zones that are contained in your Instrument across all Groups. Otherwise, it works exactly like the Groups view, and includes the Quick-Search feature as well.
Each row displays from left to right: The Zone, its Index, its ID, and finally the Group the Zone belongs to.
Double-clicking a Zone will open it in the Wave Editor.
Parameter
When you switch to this view and touch any knob, the Monitor pane will show the values of the respective parameter across all Groups in your currently edited Instrument, or, if you’re not in Instrument Edit mode, across all Instruments in your Multi. This makes for a convenient way to compare settings across Groups. You can also change parameter values directly within the list by clicking on their value and moving the mouse vertically, just like you would do on the respective knob.
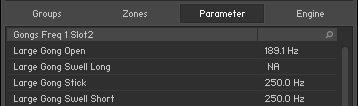 |
Monitor tab, displaying the values of EQ frequency parameters across multiple Groups.
Of course, parameters will only appear next to Groups that actually contain the edited parameter as well. For instance, if you’re adjusting the Grain parameter of the Source Module — which is unique to the Time Machine mode — all Groups that are not currently in Time Machine mode, and therefore don’t know this parameter, will be indicated with NA in the Value column.
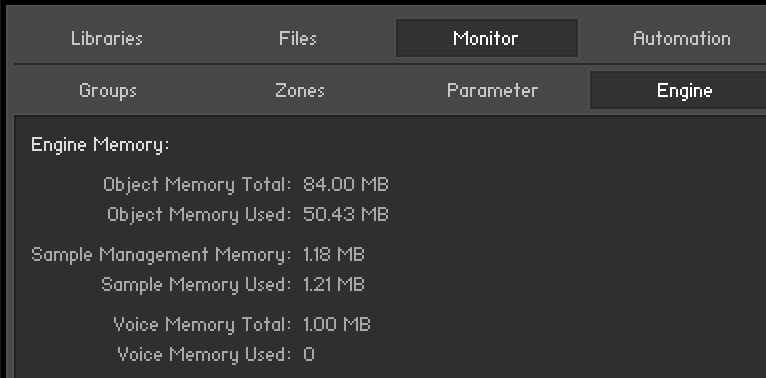
Engine
This sub-tab displays an overview of various system resources, such as detailed memory and CPU usage statistics. The information provided on this page is mainly intended for power users; when you have a problem and get in contact with the Native Instruments support, they might ask you for specific values from this page.
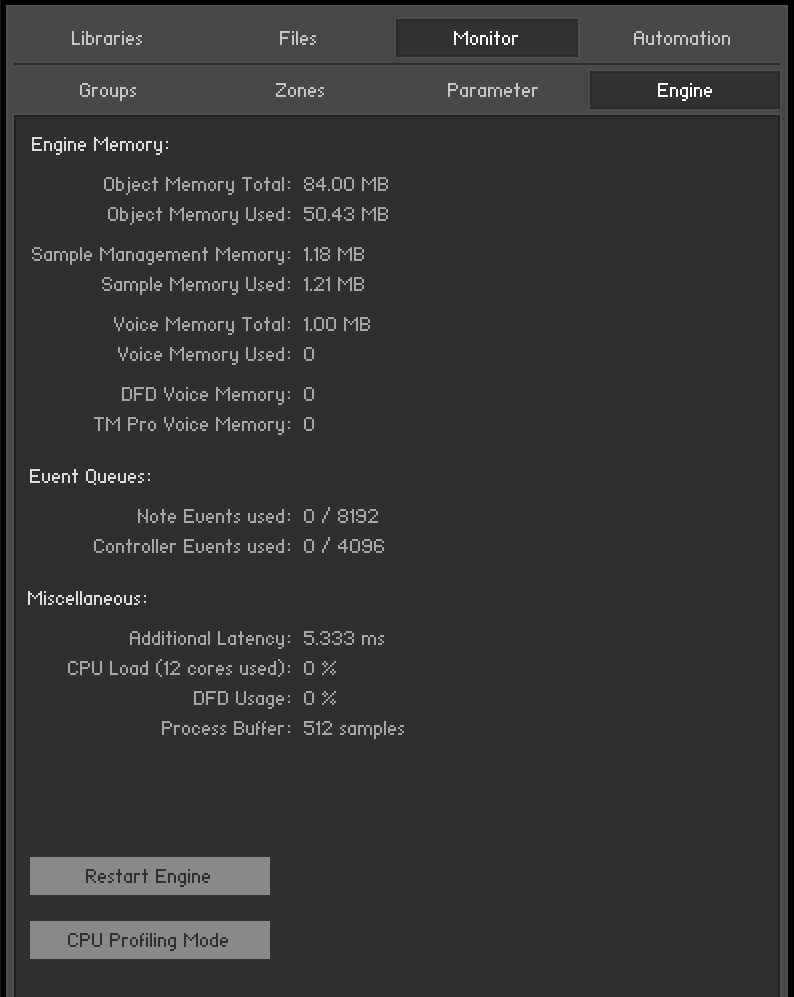 |
The Engine page provides an overview of the current status of Kontakt’s audio engine.
The Restart Engine button allows you to force a reinitialization of Kontakt’s audio engine in case of CPU overruns.
If you’re using Kontakt as a plug-in, there will be another button below labeled Offline (Bounce) Mode. This is intended for hosts that don’t correctly advertise this mode to their plug-ins when bouncing or freezing tracks. You can check if your host behaves correctly in this regard by observing the state of the button when bouncing or freezing; if it turns orange, Kontakt receives the bounce signal from the sequencer. If it doesn’t and you experience crackles or drop-outs, you can activate this button manually before bouncing or freezing.
CPU Profiling Mode: Switch to CPU Profiling mode in order to identify which parts of your Instruments are currently consuming the largest share of processing power. Percentages are shown in the instrument name as well as in the Source module in Edit mode and in the top parts of all effects in the effect chains.
Tip
Use the bottom part of the effect icons to switch to different effect slots for editing while in CPU Profiling mode.
Instrument name: observe the Rack to identify most consuming Instruments first, then switch to Edit mode.
Source module: switch to a different HQI setting if CPU usage is too high. If you are using Time Machine Pro, consider downgrading to the lighter Time Machine engines.
Group Inserts: Move memory-intensive effects without attached modulators to the Instrument or Bus Inserts instead. Remember group effects are calculated per voice!
Instrument Inserts / Bus Inserts / Sends: Move memory-intensive effects to the Outputs section, inserts into the regular output channel, sends into the Aux channels.
Just like the File Browser, the Monitor pane optionally provides an Instrument Navigator list. This can be shown and hidden with the rightmost button of the Monitor toolbar. For an in-depth explanation of what this pane does, refer to Instrument Navigator Pane.
Automation Tab
When you need to control a parameter of an Instrument from outside Kontakt, for example, using a sequencer’s automation system or MIDI controller data generated by an external fader box, you can easily pick and assign the appropriate automation source from the Automation tab of the Side pane.
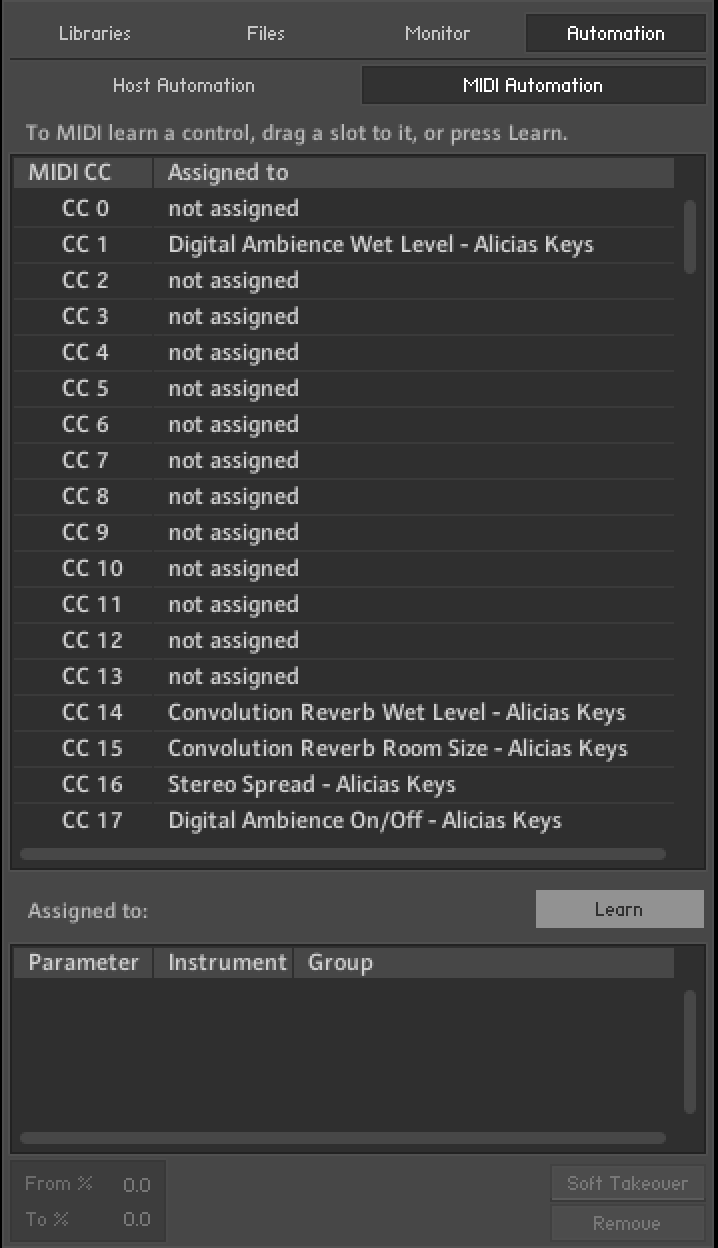 |
The MIDI Automation page displays a list of assignable MIDI controllers at the top, and details of the selected assignment at its bottom.
At the top of the Automation tab, two buttons allow you to switch between the list of automation sources that are provided by your host and MIDI controllers. Assigning a source to a parameter works the same way in both lists, so the described concepts and process for working with MIDI automation can be applied to the host automation workflow.
Assign automation by selecting a source from the list and dragging it onto a knob whose parameter you want to automate. If you want to assign a fader of a keyboard or a MIDI controller, but you are unsure which controller number is correct, just move the fader when the MIDI automation list is visible and Kontakt will flash a red dot next to the respective list entry when it receives any MIDI controller data. This allows you to quickly spot and assign the appropriate controller.
Another way to assign a source to a parameter is via the Learn button. Press it once to enter Learn Single mode. After moving a modulation source on your MIDI controller, such as a knob or slider, click on a parameter of the instrument to assign it. Learn Single mode will deactivate automatically and the control will become usable immediately.
To do multiple MIDI assignments successively, press the Learn button twice to enter Learn Multiple mode. This allows repeating the above steps of turning a control and clicking on a parameter indefinitely. Click the Learn Multiple button to exit this mode and start using the controls.
Tip
Multiple parameters can be assigned to the same automation source. This allows you to control multiple aspects of your Instrument with a single controller, such as increasing the brightness of an Instrument in combination with the loudness. Also note that modulation wheels usually send MIDI Controller #1, while volume controls send #7.
You can edit assignments and their parameters by selecting them in the list. If the selected item is assigned to one or more parameters, these will show up in the list below. At the bottom of the pane, you can adjust some parameters of the assignment that is selected in the lower list:
From % / To %: Adjusts the range of the assigned parameter. By default, automation controllers are mapped in a way that makes them cover the whole available range of the parameter. By changing these values, you can alter the scaling of the assignment so that the automation values are mapped to a limited range of the assigned parameter. This allows you to automate the section of the parameter’s range with finer resolution.
Soft Takeover: Avoids sudden parameter jumps that can happen if received automation data is different from the current value of the assigned parameter. If you activate this button, the assigned parameter will not be changed until an automation value is received that matches the parameter’s current value. A typical example would be the assignment of an external fader to a filter’s cutoff parameter; if the filter cutoff is currently set to 50% and you slowly move the fader upwards, Kontakt will softly pick it up as soon as it reaches its mid-point.
Remove: Deletes the automation assignment selected in the lower list.
Assigning MIDI Controllers via the Learn button
To assign MIDI controllers to controls via the Learn button:
Make sure at least one instrument is loaded and set to the MIDI port and channel of your hardware controller.
Click the Automation tab in the Side pane.
Select the MIDI Automation sub-tab.
Click the Learn button once to assign a single MIDI control. Click it twice to assign many MIDI controls. The button will show either Learn Single or Learn Multiple.
Move the control on your MIDI device that you want to assign.
Click the control in the GUI of the instrument that you want to assign.
When assigning multiple controls using Learn Multiple, repeat step 5 and 6 until all controls have been assigned. Afterwards click the Learn button again to stop assigning controls and start using them.
The MIDI Controller is assigned to the parameter.
Assigning MIDI Controllers in the Side Pane
If you are unable to assign MIDI controllers as described in MIDI Learn, there is an alternative way:
Make sure at least one instrument is loaded and set to the MIDI port and channel of your hardware controller.
Click the Automation tab in the Side pane.
Select the MIDI Automation sub-tab.
Turn a knob or move a slider on your hardware controller.
In the Side pane, you should see a flash next to the CC# that is used by your external controller; in addition, the MIDI symbol in the Instrument header should flash.
If this does not work, open the Options dialog.
Select the MIDI tab.
Select Inputs. Check if your MIDI hardware is selected as input for the same port you have assigned the instrument in question to.
If the MIDI input is setup correctly, drag and drop the MIDI CC# you wish to use onto the parameter you wish to control.
The MIDI Controller is assigned to the parameter.
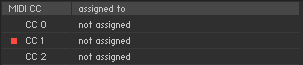
MIDI controller reception in Kontakt
Removing MIDI Controller Assignments
To remove an assignment made to a specific controller:
Click the Automation tab in the Side pane.
Select the MIDI Automation sub-tab.
Find the MIDI control whose assignment you wish to remove, either by searching, or by moving the control and seeing which number in the list is highlighted with the lightning bolt symbol.
Select the control in the list and click the Remove button.
The MIDI controller assignment is removed.