The Group Editor
Groups are the primary tool for manipulating batches of samples. Learn how to manage groups with the Group Editor.
Groups are perhaps the most prominent entity of a Kontakt Instrument. In addition to providing a way to combine and use a common signal path for any number of Zones in your Instrument, Groups allow you to define conditions on which Zones will be played, adjust how the voice allocation for the contained Zones will be handled, and provide a selection mechanism that lets you change parameters in unison across groups. What’s more, you can export and import Groups to and from your hard disk, which is the most convenient way to copy parts of one Instrument to another.
Generally, when you create your own Instruments, you should find a consistent way to distribute your Zones into Groups. This can be a common aspect of the Zones that serves as an attribute for dividing them into categories; for instance, if you create a chromatically sampled Instrument with four velocity layers, you could distribute the Zones on each layer across four Groups named “vel 0-31”, “vel 32-63”, “vel 64-95” and “vel 96-127”. This way, should you decide later that the highest velocity layer needs some additional “sparkle” to cut through your mix, you can simply select the respective Group for editing and add a EQ with a treble boost to its Group Insert Effects chain.
As another example, if you want to add release samples, you’ll need to move them into a separate Group, as the required Release Trigger parameter always acts upon a whole Group.
Once you’ve gotten the hang of how the Group concept works, you’ll need a convenient way to create, delete, access, name, and manage the Groups in your Instrument; this functionality is provided by the Group Editor.
When you’re in Instrument Edit mode, click the button labeled GroupEditor at the top of the Instrument Edit view
The Group Editor will appear in the Rack.
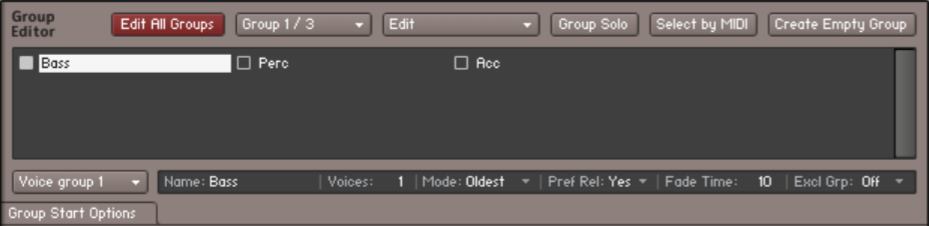
The Group Editor, opened on an Instrument which contains 3 Groups. Only the “Bass” Group is currently selected both for display and for editing.
The Group Editor is divided into four sections:
At its top, a control header provides several buttons and drop-down menus.
The largest amount of space is taken up by the Groups list below, which will display all Groups in your Instruments as a scrollable list.
At the bottom of the editor, you’ll find a row of several parameters that pertain to the assignment of Voice Groups
The Group Start Options button in the lower left corner will show or hide an additional set of rows which contain the Group start conditions.
Let’s take a look at what each of these elements does.
Control Header
This row of buttons and drop-down menus at the top of the Group Editor provides common utility functions for easy Group management. The following sections will explain each of these elements, from left to right, in detail.

The header of the Group Editor contains a number of options and utility functions.
Edit All Groups
If this button is activated, all parameters that you adjust on the Group level from that point on will affect all Groups in the currently edited Instrument. This button is just a convenient shortcut for checking all edit boxes in the Group list; the same function is also available via a button located in the Rack header when you’re in Instrument Edit mode.
As an example, suppose you have three Groups with a modulation assignment for each, which assigns an LFO to their pitch in order to create a vibrato effect. If you decide now that the vibrato effect is a little too strong across all Groups, you don’t need to change the respective modulation intensity in each Group. Just activate the Edit All Groups button and decrease the respective Intensity parameter in one of the Groups; the respective parameters in all other Groups will change with it.
We recommend that you always switch this feature off right after you’ve used it. If you leave it on and make any adjustments to Group parameters later without keeping it in mind, you’ll potentially destroy carefully tweaked parameter settings in other Groups.
You can find more information on how to change parameters across Groups in section Group List.
Group Selector
Next to the Edit All Groups button, you’ll notice a label that indicates the currently selected Group, as well as the total number of Groups in your Instrument. Clicking on it opens a drop-down menu that allows you to select another Group; clicking on the Group name that’s displayed in the Rack header when you’re in Instrument Edit mode will do the same. In contrast to clicking on a name in the Group list, however, this action won’t enable the selected Group for editing at the same time, which makes it the preferred way of selecting Groups if you just want to check out their contents without editing them.
Edit
This drop-down menu contains a number of utility functions, most of which act on all Groups that are currently selected in the Group list. Note that this selection is different from enabling Groups for editing; selected Groups will be indicated with a filled or hollow rectangle around their name in the Group list, while Groups that are activated for editing will be indicated with a checked box in front of their name.
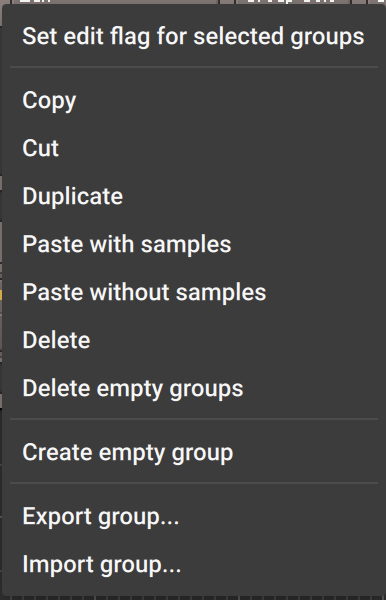
The Edit menu contains editing commands that operate on the currently selected Group(s).
The Edit menu is also available as a right-click context menu both inside the Group Editor and the Groups tab of the Monitor.
Let’s take a look at each function in this menu:
Set edit flag for selected groups: This option checks the Edit Flag for all Groups that are currently selected in the Groups List. This allows you to check multiple Groups for editing quickly, without using the Edit All Groups option, which only allows an all or one mode of editing Groups.
Copy: Copies the selected Groups to the clipboard.
Cut: Moves the selected Group and its Zones to the clipboard for later use, removing the Group from the Group list in the process.
Tip
Using the cut, copy, and paste commands in the Group Editor, you can move and copy Groups between Instruments. This even works across multiple Kontakt instances and sessions.
Duplicate: Creates identical copies of the selected Groups.
Paste with samples: Inserts the contents of the Group clipboard into the Group list, leaving their Zones and referenced Sample information intact. Note that if you copied the respective Group(s) beforehand, therefore creating duplicates by pasting them, the Zones will be duplicated along with the Groups, so later changes to the Zone parameters in one Group won’t affect the Zones of its copy.
Paste without samples: Inserts the contents of the Group clipboard into the Group list, omitting any Zones in the process. This way, you’ll get empty Groups that replicate the settings of a previously copied or cut Group.
Delete: Deletes any selected Groups. If any of the Groups still contain Zones, they will be deleted as well; in such cases, you’ll be asked if you’re sure about this.
Delete empty groups: Deletes all Groups that don’t contain any Zones.
Create empty group: Creates a new empty group.
Export group...: This function allows you to save the currently selected Group to an .nkg file on your hard disk, which you can re-use in other Instruments. In contrast to other commands that act on all selected Groups, this one doesn’t handle multiple selections; only the currently displayed Group, which will be indicated in the Group list with a filled rectangle around its name, will be saved. When you click this function, a pop-up dialog will ask you to specify a location and name for the file. In addition, you can also choose between different ways of how the referenced Samples in this Group should be handled:
Patch Only won’t save the Samples, but reference them at their original positions in the Group file.
Patch + Samples will save the Samples along with the Group file in a definable location
Monolith will combine both Group data and its referenced Samples into one large file.
Import group...: Load a Group in .nkg format and add it to your Instrument, along with all of its contained Zones. This command also allows you to import Battery 3 Cells.
Group Solo
If this button is activated, all Groups except the currently selected one will be muted. This lets you conveniently check out the contents of a Group when working with multiple Groups, whose Zones may overlap.
Select by MIDI
If this button is activated, you can select Groups by playing notes on your keyboard. When Kontakt receives a MIDI note, it checks all Groups for Zones that match its note number and velocity, and selects any Groups that contain such Zones in the Group list. This makes for a very intuitive way to quickly switch between Groups; suppose you’re working on a drum set with every instrument being assigned to a separate Group. Instead of locating the bass drum Group within the Group list and clicking on its name, you just play a bass drum note on your keyboard, and the corresponding Group will be automatically selected.
Group List
This pane displays a list of all Groups in your currently edited Instrument. If the number of Groups won’t fit into the window, a scroll bar will appear on its right side. Here you can select Groups and enable them for editing.
In order to select a Group for viewing, just click its name; it will be highlighted with a filled rectangle, and all currently visible controls on the Group level will now show the parameters of this Group. Any command you select from the Edit menu of the Group Editor will now operate on this Group only. Double-clicking an entry allows you to change its name.
While only one Group can be displayed at any time (which will always be indicated with a filled rectangle in the Group list), you can select multiple Groups by holding the [Ctrl] key ([Cmd] on OS X) while clicking on separate Groups to add them to your selection, or holding the [Shift] key while clicking on a second entry to include all Groups between the first and the last one in your selection. This selection affects only upon which Groups the commands in the Edit menus will act; to find out how to change parameters across multiple Groups, read on.
You will notice a small check box next to each Group name in the Group list, which will always be activated on the list entry on which you clicked last.

The check box next to a Group name indicates whether this Group is selected for editing.
It indicates whether the parameters of the respective Group will be changed along when you do any adjustments. In other words, when you enable the check boxes next to multiple Groups and then move any controls of the currently displayed Group (such as the Volume or Pan knob of the Amplifier Module), the parameters of the other Groups will be affected as well.
This transfer happens in an absolute fashion; settings in the other Groups will simply be replaced with the new ones. This can easily result in unintentional changes to parameters in other Groups than the currently visible one, so be sure to check whether other Groups are currently activated for editing before you do any adjustments on Group level modules. This is made easier by a text indicator in the Rack header: as long as you’re in Instrument Edit mode, it will indicate how many and which Groups are currently activated for editing.
Note that the Monitor tab in the Side pane offers you alternate views for the functions described in this section. These can greatly simplify managing Groups and changing parameters across Groups; depending on your preference, you might want to use them instead of the Group list for some operations. The Monitor tab is described in detail in section Monitor Tab.
Voice Groups
The concept of Voice Groups allows you to fine-tune the way in which Kontakt allocates audio voices to Groups. Please don’t confuse Voice Groups with Groups; in spite of the similar names, they’re entirely different concepts. To understand Voice Groups, let’s begin with an example.
A typical sampler program of a drum set contains at least one sample of a closed hi-hat and one of an opened hi-hat. As the ringing sound of an opened hi-hat will be immediately cut off when the drummer closes it, we can conclude that these sounds never occur at the same time; therefore, we could simulate this behavior by limiting the maximum voice count of the hi-hat to one. As each played Sample will take one voice, and the last played Sample will have priority over any Samples that were triggered before by default, playing the closed hi-hat Sample will cut a still ringing open hi-hat Sample off.
How can we accomplish this? You can adjust the maximum number of voices to be used for an Instrument in the Instrument Header, but this would restrict all other parts of the drum kit to one voice as well. A more practical way would be to make use of the Voice Group concept: it allows you to create a voice allocation setting and apply it to any number of Groups in your Instrument.
In contrast to Groups, you don’t have to create or manage Voice Groups; instead, 128 of them are pre-defined in every Instrument. By default, Groups are not assigned to any Voice Group, which means they will share the pool of voices as defined in the Instrument Header with all other Groups. By assigning some of your Groups to one of the 128 Voice Groups and adjusting this Voice Group’s parameters, you can define a new set of voice allocation rules for these Groups. For instance, you could solve the hi-hat problem by assigning the closed and open hi-hat Groups to Voice Group 1, then set the voice count of this Voice Group to one. There are more parameters to a Voice Group than its maximum voice count; these will be explained later.
The 128 Voice Groups can be assigned and edited in the strip below the Group list of the Group Editor. Selecting a Voice Group from the drop-down menu at its left will assign all currently selected Groups to this Voice Group, and display its parameters in the fields to the right.

The row of parameters below the Group list allows you to assign and adjust Voice Groups.
Here’s a run-down of these parameters, from left to right:
Name: Displays the name of the selected voice group. Clicking in this field allows you to change the name.
Voices: Adjusts the maximum number of voices that can be used by the Groups in this Voice Group. If a Sample is triggered and the maximum voice count has already been reached, voices of Samples that would otherwise still sound will be “sacrificed” and recycled.
Mode: This setting decides which of the currently allocated voices will be sacrificed and recycled if a newly triggered Sample would otherwise exceed the maximum voice count for this Voice Group:
Kill Any: Let Kontakt decide what to do.
Kill Oldest: The oldest, still playing Sample will be cut off.
Kill Newest: The most recently triggered Sample will be cut off.
Kill Highest: The note with the highest pitch will be cut off.
Kill Lowest: The note with the lowest pitch will be cut off.
Pref.Rel: If this button is activated and the Voice Group runs out of voices, Kontakt will give already released notes a higher priority when it decides which voices to keep.
FadeTime: Adjusts how long a sacrificed voice will fade out before it disappears. The fadeout length is specified in milliseconds. This may cause the overall number of voices to temporarily exceed the maximum value.
Excl.Grp: This drop-down menu allows you to assign the current Voice Group to one of 16 Exclusive Groups. Assigning two or more Voice Groups to the same Exclusive Group will cause Samples from one Voice Group to cut off all still-sounding Samples from the other Voice Groups assigned to the Exclusive Group. When you re-consider our hi-hat example, you’ll notice that an alternative solution would be keeping the samples in separate Groups and assigning them to the same Exclusive Group. This has the added benefit that you can edit the Group-level signal processing of both samples separately.
Group Start Options
By default, each Zone in a Group will always play its assigned Sample when a note is received that matches its keyboard and velocity range. However, there are applications that demand for more control about when the Zones in a Group will come active. Some examples include:
When you sample an acoustic Instrument, you might want to provide multiple, slightly different Samples for each note and velocity range, then have Kontakt cycle between them in a round-robin fashion when note repetitions are played; this eliminates the dreaded “machine gun effect”, which is a giveaway of sampled instruments. For this, you need a way to make each Group wait for its turn before it sounds.
With the advent of large, modern sample libraries, it has become customary to let the user switch between different articulations with keys on his master keyboard that are unused by the Instrument’s Zones; these so-called keyswitches require a way to make Groups only come active when their respective keyswitch was the last received one.
You might want to switch between Groups depending on the value of a MIDI controller; for instance, lots of modern piano libraries use separate sample sets for notes which are played with the sustain pedal depressed and released.
The Group Start Options allow you to define a range of conditions that have to be met before the respective Group will become active and can output any sound. The list of these conditions is hidden from the Group Editor view by default; you can show it by clicking on the Group Start Options button in the lower left corner of the Group Editor.

Multiple Group start conditions, combined with “and” operators. This means that all specified conditions must be met before the Group becomes active.
Each row of this list has a drop-down menu at its left side.
To add a condition to the list, select its general type from this menu.
To the right of the menu, Kontakt will then show the respective parameters that belong to the respective condition along with explanatory labels, as well as an operator drop-down menu that logically combines this entry with the next one.
The Group Start Options list includes the following types of conditions:
Always: This is a no-operation value. If it’s is the only value in the list, the selected Group will always be active. In lists with more than one row, this value serves as a marker for the last row in the list, as well as an entry that deletes rows from the list when you choose it.
Start on Key: This condition lets you define keyswitches. A Group with this condition will be deactivated until a trigger note within the defined range is received; it will be deactivated again when another Group in your Instrument with a Start on Key condition will come active, so that you can switch between Groups with single key strokes.
Start on Controller: The Group will come active when Kontakt receives a MIDI controller within a specific range. It will be deactivated again when a controller value outside the range is received.
Cycle Round Robin: All Groups that have this condition in their Group Start Options will be cycled in a round-robin fashion on each note. Among other things, you can use this feature to add realistic variations to note repetitions, or automatically alternate between left and right strokes on percussion instruments.
Cycle Random: Like Cycle Round Robin, but notes will be cycled randomly instead of sequentially.
Slice Trigger: This option was used by slice Groups in Kontakt 2. It is provided for backwards compatibility and should not be used explicitly.
By adding multiple conditions to the list and connecting them with the logical operators you’ll find in the drop-down menu at the right side, you can create very complex combinations of conditions. Note that the last entry of the list (which will be an always condition) won’t be taken into account when your list contains at least another condition entry.