The Amplifier Module
This section describes the Amplifier module, the final stage in the Group level of Kontakt's signal flow.
The Amplifier Module follows the Source Module and the Group Insert Effects chain in the Group level of Kontakt’s signal flow. Its purpose is to adjust the volume and stereo panorama of the signal before it enters the Instrument level, and optionally change the default output channel assignment and the channel routing that occurs between the Group and the Instrument level. A particularly vital task of the Amplifier Module is brought about by combining it with modulation: this way, you can use volume envelopes, which are elementary in the creation of playable Instruments.
As it’s a fundamental part of Kontakt’s signal flow, the Amplifier Module can’t be removed from a Group, nor can you have more than one Amplifier Module within a Group. All signals generated by the Source Module in the Group will pass through your Amplifier Module.
The Amplifier contains the following controls:

Volume: Adjusts the overall level of all signals that originate from this Group.
Pan: If the Group is being routed to a stereo Output Channel, this control allows you to place the signal in the stereo panorama. Note that the Volume and Pan controls affect the playback of all Zones in your Group; if you want to adjust these parameters on a per-Zone basis, change them in the Mapping Editor instead, or use Zone Envelopes, which are described in section Zone Envelopes.
Phase Invert: Switching this button on inverts the phase of the audio signal, so that negative signals become positive, and vice versa. It acts in the same manner as a phase invert button on a mixing console and has the same uses, namely to make sure that signals mix together without phase cancellation.
L/R Swap: Activating this button will swap the left and right channels of a stereo signal.
Channel Routing: Clicking this button will open a routing matrix below the panel, which allows you to change the channel assignment aspects of the connection between the Group and the Instrument level, as well as create special routing configurations for up-mixing or down-mixing your Group signal to a different channel configuration. More details regarding this panel will be described later in this chapter.
Output: This drop-down menu allows you to specify an alternate Output Channel, or Bus routing for this Group. When set to Default (Instrument), the Group’s output is routed to the Instrument Insert Effects Chain, then to the output of the instrument, the Channel Output of which is selected from the Instrument Header. If you select a Bus from this dropdown, the group’s audio will be routed to that Bus Effect Chain, then to the respective Bus’s output (which, by default, is the Instrument Effect Chain). You can also send the Group’s audio directly to a Channel Output, which will bypass any Bus and/or Instrument effects.
Channel Routing Panel
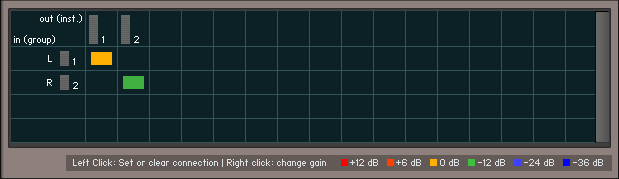
A routing configuration which keeps the channel order and assignment intact, but lowers the second channel by -12 dB in volume.
Each horizontal row of this table corresponds to a channel of the Group signal that’s present at the input of the Amplifier Module, as specified in the leftmost column. Each vertical column corresponds to an audio channel of the output that you’ve selected for this Instrument in the Instrument Header. You can create a connection between an input and an output channel by clicking into the field that is crossed by the respective row and column. An existing connection will be indicated with a colored rectangle; click it again to remove the connection.
For more complex routings that convert between different channel configurations, it’s possible to send an input signal to multiple output channels, or to mix multiple input signals down to one output channel. You do this simply by creating more than one connection within a row (mix-up) or a column (mix-down). In such cases, it’s often desirable to create connections with an intrinsic amplification or attenuation; for example, a common practice for mixing surround signals down to stereo is to fold the rear signal to the stereo channels at a lower volume. This can be accomplished in the Channel Routing matrix by right-clicking into the fields of existing connections, which will change the level of this connection as indicated by the color of the rectangle. Repeated clicking will cycle through a number of preset levels, which are displayed with their respective colors at the bottom of the routing matrix.